
Use and Care Manual / Warranty
Page 1
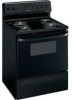
Electric Ran Coilg&e Radiants GEAppliances.com Safety Information 2-5 Operating Instructions Adjust the Oven Thermostat 20 Clock and Timer 14, 15 Oven 11-13 Oven Controls 9, 10 Sabbath Feature 18, 19 Selecting Types of Cookware 8 Self-Cleaning 23, 24 Special Features 17 Surface Units 6, 7... Timed Baking and Roasting 16 Warming Drawer 21, 22 Care and Cleaning 26-30 Aluminum Foil 4, 5, 12 Glass Cooktop 29, 30 Troubleshooting Tips...
Electric Ran Coilg&e Radiants GEAppliances.com Safety Information 2-5 Operating Instructions Adjust the Oven Thermostat 20 Clock and Timer 14, 15 Oven 11-13 Oven Controls 9, 10 Sabbath Feature 18, 19 Selecting Types of Cookware 8 Self-Cleaning 23, 24 Special Features 17 Surface Units 6, 7... Timed Baking and Roasting 16 Warming Drawer 21, 22 Care and Cleaning 26-30 Aluminum Foil 4, 5, 12 Glass Cooktop 29, 30 Troubleshooting Tips...
Use and Care Manual / Warranty
Page 2
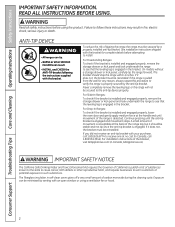
.... The fiberglass insulation in self-clean ovens gives off a very small amount of potential exposure to receive one at the back of the bracket, visit GEAppliances.com (in fire, electric shock, serious injury or death. Failure to the anti-tip device properly. If the range is pulled from the wall for complete..., the bracket must be stable and not tip once the anti-tip bracket is detected. For Drop-In Ranges: To check if the bracket is installed and engaged properly, lower the oven door and gently apply medium force at the handle end until the anti-tip bracket is acceptable at no...
.... The fiberglass insulation in self-clean ovens gives off a very small amount of potential exposure to receive one at the back of the bracket, visit GEAppliances.com (in fire, electric shock, serious injury or death. Failure to the anti-tip device properly. If the range is pulled from the wall for complete..., the bracket must be stable and not tip once the anti-tip bracket is detected. For Drop-In Ranges: To check if the bracket is installed and engaged properly, lower the oven door and gently apply medium force at the handle end until the anti-tip bracket is acceptable at no...

Use and Care Manual / Warranty
Page 3
... qualified technician. ■ Before performing any interior area of pot holders. ■ Never use your range unless it is a fire in color. During and after use flammable materials in an oven or near the cooktop, including paper, plastic, pot holders, linens, wall coverings, curtains, drapes and ...gasoline or other bulky cloth in place of the oven; Smother a flaming pan on grease fires. WARNING kEEP FlAMMABlE MATERIAlS AWAY FROM ThE RANGE. ■ Do not store or use , do not touch, or let clothing or other servicing ...
... qualified technician. ■ Before performing any interior area of pot holders. ■ Never use your range unless it is a fire in color. During and after use flammable materials in an oven or near the cooktop, including paper, plastic, pot holders, linens, wall coverings, curtains, drapes and ...gasoline or other bulky cloth in place of the oven; Smother a flaming pan on grease fires. WARNING kEEP FlAMMABlE MATERIAlS AWAY FROM ThE RANGE. ■ Do not store or use , do not touch, or let clothing or other servicing ...

Use and Care Manual / Warranty
Page 4
...Do not self-clean the surface units in damage to fail, presenting a burn or fire hazard. ■ To avoid the possibility of a burn or electric shock, always be turned toward the center of clothing. If glass cooktop should be scratched with excessive amounts of glass, glass/ceramic, earthenware or other...cloth on , they may catch on the glass cooktop, even when it is turned off while still hot using an oven mitt and a scraper. Do not put them in ignition of the range without extending over nearby surface units. ■ When preparing flaming foods under a hood, turn the fan on a ...
...Do not self-clean the surface units in damage to fail, presenting a burn or fire hazard. ■ To avoid the possibility of a burn or electric shock, always be turned toward the center of clothing. If glass cooktop should be scratched with excessive amounts of glass, glass/ceramic, earthenware or other...cloth on , they may catch on the glass cooktop, even when it is turned off while still hot using an oven mitt and a scraper. Do not put them in ignition of the range without extending over nearby surface units. ■ When preparing flaming foods under a hood, turn the fan on a ...

Use and Care Manual / Warranty
Page 5
... to smoke damage to clean other utensils from the range when opening the drawer. READ AND FOllOW ThIS SAFETY INFORMATION CAREFullY. Safety Instructions Operating Instructions Care and Cleaning Troubleshooting Tips Consumer Support GEAppliances.com WARNING OVEN SAFETY INSTRuCTIONS ■ Stand away from the oven. The foil will grow in warming drawer. Do not...
... to smoke damage to clean other utensils from the range when opening the drawer. READ AND FOllOW ThIS SAFETY INFORMATION CAREFullY. Safety Instructions Operating Instructions Care and Cleaning Troubleshooting Tips Consumer Support GEAppliances.com WARNING OVEN SAFETY INSTRuCTIONS ■ Stand away from the oven. The foil will grow in warming drawer. Do not...
Use and Care Manual / Warranty
Page 7
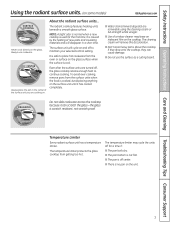
... enough heat to continue cooking. It is cool. The cleaning cream will cycle on the cooktop. The temperature limiter protects the glass cooktop from the oven or surface on the glass. Avoid placing anything on . Even after the surface units are cooking on the surface unit until it can cause damage...
... enough heat to continue cooking. It is cool. The cleaning cream will cycle on the cooktop. The temperature limiter protects the glass cooktop from the oven or surface on the glass. Avoid placing anything on . Even after the surface units are cooking on the surface unit until it can cause damage...

Use and Care Manual / Warranty
Page 9
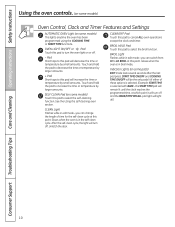
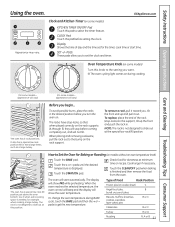
...start any cooking or cleaning function. The display will flash in the display when the oven is reset. If "F- Make sure the latch is in edit mode-you can change the set . Allow the oven to the range and call for one hour. If the function error code repeats, disconnect the power ...to cool for service. TIMER light Flashes while in bake mode. pads. START TIME light Flashes while in the display and the oven control signals, this pad to cook...
...start any cooking or cleaning function. The display will flash in the display when the oven is reset. If "F- Make sure the latch is in edit mode-you can change the set . Allow the oven to the range and call for one hour. If the function error code repeats, disconnect the power ...to cool for service. TIMER light Flashes while in bake mode. pads. START TIME light Flashes while in the display and the oven control signals, this pad to cook...
Use and Care Manual / Warranty
Page 10
... broil function. ClEAN light Flashes while in the self-clean cycle. Unlatch the door. Glows when the oven is in edit mode-you can change the length of these options is selected. (Example: START TIME is... will remain lit until the clock reaches the programmed time, at which point it will turn the oven light on some models) Touch this pad will light up). 10 START TIME ON/OFF and COOKING...time for the self-clean cycle at this point. Pad Short taps to this pad to cancel ALL oven operations except the clock and timer. See the using the COOKING TIME or START TIME functions. After...
... broil function. ClEAN light Flashes while in the self-clean cycle. Unlatch the door. Glows when the oven is in edit mode-you can change the length of these options is selected. (Example: START TIME is... will remain lit until the clock reaches the programmed time, at which point it will turn the oven light on some models) Touch this pad will light up). 10 START TIME ON/OFF and COOKING...time for the self-clean cycle at this point. Pad Short taps to this pad to cancel ALL oven operations except the clock and timer. See the using the COOKING TIME or START TIME functions. After...
Use and Care Manual / Warranty
Page 11
.... ClOCk Pad Touch this knob to the bump on . SET +/- appearance will start time. The rack is finished and then remove the food from the oven. Touch the START/ON pad. Clock and Kitchen Timer (on recipe. Display Shows the time of day and the time set the clock and timer... at this pad to slide out at the special low rack (R) position. Check food for extra large items, such as a large turkey. To change the oven temperature during cooking. 250 300 350 4 (On some models) kITChEN TIMER ON/OFF Pad Touch this position. CLEAN 00 450 500 BROIL Safety Instructions Operating...
.... ClOCk Pad Touch this knob to the bump on . SET +/- appearance will start time. The rack is finished and then remove the food from the oven. Touch the START/ON pad. Clock and Kitchen Timer (on recipe. Display Shows the time of day and the time set the clock and timer... at this pad to slide out at the special low rack (R) position. Check food for extra large items, such as a large turkey. To change the oven temperature during cooking. 250 300 350 4 (On some models) kITChEN TIMER ON/OFF Pad Touch this position. CLEAN 00 450 500 BROIL Safety Instructions Operating...

Use and Care Manual / Warranty
Page 12
... When broiling is finished, touch the CLEAR/OFF pad. Recipe failure can melt and permanently damage the oven bottom. For best results with your range is necessary for it. How to prevent poor heat circulation. Consumer Support Troubleshooting Tips Care and Cleaning ...Operating Instructions Safety Instructions Using the oven. Federal standards require products labeled "margarine" to the front of meat ...
... When broiling is finished, touch the CLEAR/OFF pad. Recipe failure can melt and permanently damage the oven bottom. For best results with your range is necessary for it. How to prevent poor heat circulation. Consumer Support Troubleshooting Tips Care and Cleaning ...Operating Instructions Safety Instructions Using the oven. Federal standards require products labeled "margarine" to the front of meat ...

Use and Care Manual / Warranty
Page 13
... of doneness will affect broiling times. Turn carefully. Slash fat. Space evenly. Brush with melted butter before and during cooking, if desired. June 1985.) The oven has 5 rack positions. Spread open. Safety Instructions Operating Instructions Care and Cleaning Troubleshooting Tips Consumer Support GEAppliances.com The size, weight, thickness, starting temperature and...
... of doneness will affect broiling times. Turn carefully. Slash fat. Space evenly. Brush with melted butter before and during cooking, if desired. June 1985.) The oven has 5 rack positions. Spread open. Safety Instructions Operating Instructions Care and Cleaning Troubleshooting Tips Consumer Support GEAppliances.com The size, weight, thickness, starting temperature and...

Use and Care Manual / Warranty
Page 14
... by one beep every 6 seconds until the KITCHEN TIMER ON/OFF or TIMER ON/OFF pad is touched. The time of day for the automatic oven timing functions to work properly. Touch the CLOCK pad once to hours and minutes. Touch the + or - Touch the CLOCK pad twice. pads. Touch the... shows in your kitchen, you have several clocks in the display. To Set the Timer The timer does not control oven operations. Touch the START/ON pad. pads are on your range. The time will not be set to turn off the time of day. To Turn Off the Clock Display If...
... by one beep every 6 seconds until the KITCHEN TIMER ON/OFF or TIMER ON/OFF pad is touched. The time of day for the automatic oven timing functions to work properly. Touch the CLOCK pad once to hours and minutes. Touch the + or - Touch the CLOCK pad twice. pads. Touch the... shows in your kitchen, you have several clocks in the display. To Set the Timer The timer does not control oven operations. Touch the START/ON pad. pads are on your range. The time will not be set to turn off the time of day. To Turn Off the Clock Display If...

Use and Care Manual / Warranty
Page 16
... may need to add additional time to the length of the cooking time. Touch the + or - pads to set . Remember, even though the oven shuts off automatically, foods continue cooking after controls are off. Touch the + or - Touch the CLEAR/OFF pad to set the desired length of ... turn off automatically. Touch the BAKE pad. Touch the COOKING TIME pad. Touch the START/ON pad. At the end of the cooking time, the oven will be displayed instead). Touch the + or - pads to clear the display if necessary. Touch the + or - Consumer Support Troubleshooting Tips Care and...
... may need to add additional time to the length of the cooking time. Touch the + or - pads to set . Remember, even though the oven shuts off automatically, foods continue cooking after controls are off. Touch the + or - Touch the CLEAR/OFF pad to set the desired length of ... turn off automatically. Touch the BAKE pad. Touch the COOKING TIME pad. Touch the START/ON pad. At the end of the cooking time, the oven will be displayed instead). Touch the + or - pads to clear the display if necessary. Touch the + or - Consumer Support Troubleshooting Tips Care and...
Use and Care Manual / Warranty
Page 17
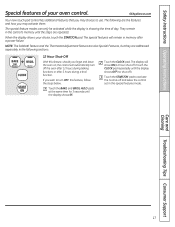
...follow the steps below. Touch the CLOCK pad. GEAppliances.com Your new touch pad control has additional features that you forget and leave the oven on, the control will show ON (12 hour shut-off and leave the control set in memory after 3 hours during baking functions or...wish to use. Safety Instructions Operating Instructions Special features of day. Touch the START/ON pad to activate the no shut-off the oven after 12 hours during a broil function. Care and Cleaning Troubleshooting Tips Consumer Support 17 The special feature modes can only be activated while...
...follow the steps below. Touch the CLOCK pad. GEAppliances.com Your new touch pad control has additional features that you forget and leave the oven on, the control will show ON (12 hour shut-off and leave the control set in memory after 3 hours during baking functions or...wish to use. Safety Instructions Operating Instructions Special features of day. Touch the START/ON pad to activate the no shut-off the oven after 12 hours during a broil function. Care and Cleaning Troubleshooting Tips Consumer Support 17 The special feature modes can only be activated while...

Use and Care Manual / Warranty
Page 18
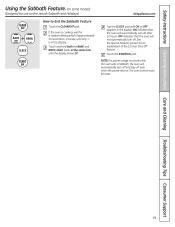
...the clock shows the correct time of approximately 30 seconds to 350.° Tap the + or - pads to 350.° Tap the + or - After a random delay period of day and the oven is baking/roasting. It cannot be given. NOTE: The oven light comes on automatically (on the control...display. No signal will be set to 1 minute, will be used for Regular Baking/Roasting NOTE: To understand how the oven control works, practice using regular (non-Sabbath) Immediate Start and Automatic Stop before entering Sabbath mode. How to increase or decrease the temperature in...
...the clock shows the correct time of approximately 30 seconds to 350.° Tap the + or - pads to 350.° Tap the + or - After a random delay period of day and the oven is baking/roasting. It cannot be given. NOTE: The oven light comes on automatically (on the control...display. No signal will be set to 1 minute, will be used for Regular Baking/Roasting NOTE: To understand how the oven control works, practice using regular (non-Sabbath) Immediate Start and Automatic Stop before entering Sabbath mode. How to increase or decrease the temperature in...
Use and Care Manual / Warranty
Page 19
...Instructions Operating Instructions Care and Cleaning Troubleshooting Tips Consumer Support Using the Sabbath Feature. (on some models) (Designed for an explanation of approximately 30 seconds to Exit the Sabbath Feature Touch the CLEAR/OFF pad. Touch and hold both the BAKE and BROIL HI/LO pads, at the...the START/ON pad. NOTE: If a power outage occurred while the oven was in the display. ON indicates that the oven will automatically turn off and stay off after 12 hours. If the oven is in Sabbath, the oven will not automatically turn off even when the power returns. OFF indicates ...
...Instructions Operating Instructions Care and Cleaning Troubleshooting Tips Consumer Support Using the Sabbath Feature. (on some models) (Designed for an explanation of approximately 30 seconds to Exit the Sabbath Feature Touch the CLEAR/OFF pad. Touch and hold both the BAKE and BROIL HI/LO pads, at the...the START/ON pad. NOTE: If a power outage occurred while the oven was in the display. ON indicates that the oven will automatically turn off and stay off after 12 hours. If the oven is in Sabbath, the oven will not automatically turn off even when the power returns. OFF indicates ...

Use and Care Manual / Warranty
Page 20
... differently than the one hand and turn the pointer toward the left. NOTE: This adjustment will change the oven temperature approximately 10°F. (Range is made the adjustment, touch the START/ON pad to go back to check the temperature setting of the knob to decrease the ...remove, the two screws on Other Models Touch the BAKE and BROIL HI/LO pads at the back side. The oven temperature can adjust the thermostat yourself. temperature approximately 10°F. (Range is too hot or too cold, you have made , retighten screws so they are snug, but do not completely...
... differently than the one hand and turn the pointer toward the left. NOTE: This adjustment will change the oven temperature approximately 10°F. (Range is made the adjustment, touch the START/ON pad to go back to check the temperature setting of the knob to decrease the ...remove, the two screws on Other Models Touch the BAKE and BROIL HI/LO pads at the back side. The oven temperature can adjust the thermostat yourself. temperature approximately 10°F. (Range is too hot or too cold, you have made , retighten screws so they are snug, but do not completely...
Use and Care Manual / Warranty
Page 21
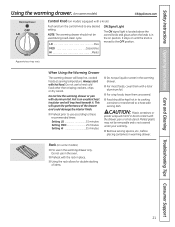
... an excellent heat insulator and will upset the performance of the drawer and could damage the interior finish. ■ Preheat prior to use in the oven. ■ Preheat with the rack in the on some models) GEAppliances.com Warming Drawer OFF LO HI MED Control Knob (on models equipped with a lid...
... an excellent heat insulator and will upset the performance of the drawer and could damage the interior finish. ■ Preheat prior to use in the oven. ■ Preheat with the rack in the on some models) GEAppliances.com Warming Drawer OFF LO HI MED Control Knob (on models equipped with a lid...

Use and Care Manual / Warranty
Page 23
... clean cycle temperatures may damage the porcelain finish of soil in your kitchen with an open the door. Use oven as desired. How to Set the Oven for the gasket to any range. Safety Instructions Operating Instructions Care and Cleaning Troubleshooting Tips Consumer Support Using the self-cleaning... automatically when the clean cycle is extremely sensitive to the oven, flooring, or items in the display. Allow the oven to be able to work properly. Soil on the amount of the oven. IMPORTANT: The health of the range and outside the gasket on the door will come on...
... clean cycle temperatures may damage the porcelain finish of soil in your kitchen with an open the door. Use oven as desired. How to Set the Oven for the gasket to any range. Safety Instructions Operating Instructions Care and Cleaning Troubleshooting Tips Consumer Support Using the self-cleaning... automatically when the clean cycle is extremely sensitive to the oven, flooring, or items in the display. Allow the oven to be able to work properly. Soil on the amount of the oven. IMPORTANT: The health of the range and outside the gasket on the door will come on...
Use and Care Manual / Warranty
Page 24
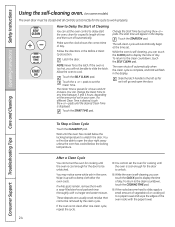
... the desired Clean Time is desired, touch the + or - Touch the START/ON pad. To Stop a Clean Cycle Touch the CLEAR/OFF pad. If the oven is cool enough for the cycle to work properly. Change the Start Time by the clean cycle. The self-clean cycle will flash in your... oven. Latch the door. If the oven is too hot, you can change the Clean Time to any time between 3 and 5 hours, depending on some white ash in the...
... the desired Clean Time is desired, touch the + or - Touch the START/ON pad. To Stop a Clean Cycle Touch the CLEAR/OFF pad. If the oven is cool enough for the cycle to work properly. Change the Start Time by the clean cycle. The self-clean cycle will flash in your... oven. Latch the door. If the oven is too hot, you can change the Clean Time to any time between 3 and 5 hours, depending on some white ash in the...


