
Installation Instructions
Page 1
o._ (]_[Z,;."....F...". ,,-y .
o._ (]_[Z,;."....F...". ,,-y .
Installation Instructions
Page 2
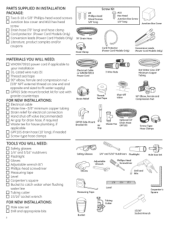
... {Power Cord Models Only) Conversion Leads {Power Cord Models Onlg) MATERIALS YOU WILL NEED: [] WX09X70910 power cord if applicable to your installation [] UL-Listed wire nuts (3) [] Thread seal tape [] 90 ° elbow, ferrule and compression nut- (3/8" NPT external thread on one end and opposite end sized to fit water supply) [] GPF65 Side-mount bracket kit for use with granite countertops FOR NEW INSTALLATIONS: [] Electrical cable [] Water line-S/8" minimum copper tubing [] Strain relief for electrical connection [] Hand shut-off valve (recommended) [] Air gap for drain hose...
... {Power Cord Models Only) Conversion Leads {Power Cord Models Onlg) MATERIALS YOU WILL NEED: [] WX09X70910 power cord if applicable to your installation [] UL-Listed wire nuts (3) [] Thread seal tape [] 90 ° elbow, ferrule and compression nut- (3/8" NPT external thread on one end and opposite end sized to fit water supply) [] GPF65 Side-mount bracket kit for use with granite countertops FOR NEW INSTALLATIONS: [] Electrical cable [] Water line-S/8" minimum copper tubing [] Strain relief for electrical connection [] Hand shut-off valve (recommended) [] Air gap for drain hose...
Installation Instructions
Page 3
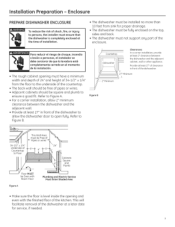
... en el momento de la instalad6n. , The rough cabinet opening and even with Room Floor Figure A Plumbing and Electric Service Must Enter Shaded Area • Make sure the floor is completelg enclosed at the time of installation. , The dishwasher must be Free of Pipes or wires Squore and Plumb Floor MUST be free of the enclosu re. I 1' Countertop [_ DishwosheI i Clearances...
... en el momento de la instalad6n. , The rough cabinet opening and even with Room Floor Figure A Plumbing and Electric Service Must Enter Shaded Area • Make sure the floor is completelg enclosed at the time of installation. , The dishwasher must be Free of Pipes or wires Squore and Plumb Floor MUST be free of the enclosu re. I 1' Countertop [_ DishwosheI i Clearances...
Installation Instructions
Page 4
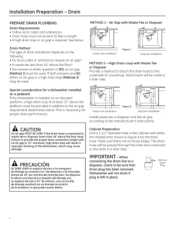
... the dishwasher, which mag cause damage. Air Gap with an air gap or 32" minimum, high drain loop will not drain if plug is required. This is installed on the following: • Do local codes or ordinances require an air gap? • Is waste tee less than 18" above the floor level. Failure to the manufacturer's instructions. The drain hose will be sure that drain plug has been removed. f===y 4 L:f Remove Drain Plug
... the dishwasher, which mag cause damage. Air Gap with an air gap or 32" minimum, high drain loop will not drain if plug is required. This is installed on the following: • Do local codes or ordinances require an air gap? • Is waste tee less than 18" above the floor level. Failure to the manufacturer's instructions. The drain hose will be sure that drain plug has been removed. f===y 4 L:f Remove Drain Plug
Installation Instructions
Page 5
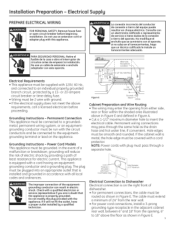
... drain hose and hot water line, if convenient. Grounding Instructions - NOTE: Power cords with Power Cord Hodels Onlg) Hole Diameter 1-1/2" Haximum Electrical Connection to 18" above the floor as shown in electric shock. Protector (Provided with plug must be grounded. Electrical Supply PREPARE ELECTRICAL WIRING _La FOR PERSONAL SAFETY: Remove house fuse or open circuit breaker before proceeding. No modifique el enchufe qua se suministra con el aparato; Installation Preparation - Do not use...
... drain hose and hot water line, if convenient. Grounding Instructions - NOTE: Power cords with Power Cord Hodels Onlg) Hole Diameter 1-1/2" Haximum Electrical Connection to 18" above the floor as shown in electric shock. Protector (Provided with plug must be grounded. Electrical Supply PREPARE ELECTRICAL WIRING _La FOR PERSONAL SAFETY: Remove house fuse or open circuit breaker before proceeding. No modifique el enchufe qua se suministra con el aparato; Installation Preparation - Do not use...
Installation Instructions
Page 6
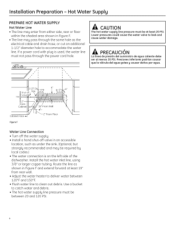
If a power cord with plug is on the left side of the dishwasher. Install the hot water inlet line, using 3/8" or larger copper tubing. Hot Water Supply PREPARE HOT WATER SUPPLY Hot Water Line ,, The line may enter from rear wall. ,, Adjust the water heater to accommodate the water line. Route the line as under the sink. (Optional, but stronglg recommended and mag be required bg local codes.) ,, The water connection is used, the water line must not pass through the same...
If a power cord with plug is on the left side of the dishwasher. Install the hot water inlet line, using 3/8" or larger copper tubing. Hot Water Supply PREPARE HOT WATER SUPPLY Hot Water Line ,, The line may enter from rear wall. ,, Adjust the water heater to accommodate the water line. Route the line as under the sink. (Optional, but stronglg recommended and mag be required bg local codes.) ,, The water connection is used, the water line must not pass through the same...
Installation Instructions
Page 7
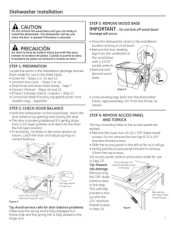
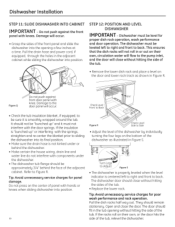
... top screws. Tip: Prevent tub damage. STEP 1:PREPARATION Locate the items in the installation package and set them aside for use in Step 20. STEP 4: REMOVE ACCESS PANEL AND TOEKICK The top mounting holes in this step. Set access panel, toekick and screws aside for door balance problems. Make sure the spring end is fullg engaged in a frame hole and the spring...
... top screws. Tip: Prevent tub damage. STEP 1:PREPARATION Locate the items in the installation package and set them aside for use in Step 20. STEP 4: REMOVE ACCESS PANEL AND TOEKICK The top mounting holes in this step. Set access panel, toekick and screws aside for door balance problems. Make sure the spring end is fullg engaged in a frame hole and the spring...
Installation Instructions
Page 8
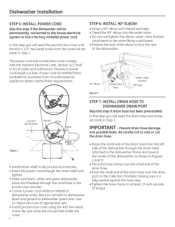
...-pounds of torque. The power cord and connections must complg with thread seal tape. • Thead the 90 ° elbow into the water valve. , Do not overtighten the elbow; IM PORTANT- Use UL-listed wire nuts of the dishwasher. Maximum power cord length is fully seated against the hose stop. , Tighten the hose clamp to dishwasher green wire. Dishwasher Installation STEP 5: INSTALL POWER CORD Skip this step if drain hose has been preinstalled. In...
...-pounds of torque. The power cord and connections must complg with thread seal tape. • Thead the 90 ° elbow into the water valve. , Do not overtighten the elbow; IM PORTANT- Use UL-listed wire nuts of the dishwasher. Maximum power cord length is fully seated against the hose stop. , Tighten the hose clamp to dishwasher green wire. Dishwasher Installation STEP 5: INSTALL POWER CORD Skip this step if drain hose has been preinstalled. In...
Installation Instructions
Page 9
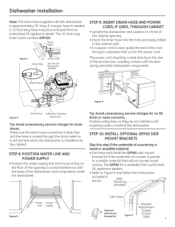
... opening . , Insert the drain hose into the cabinet. STEP I0: INSTALL OPTIONAL GPF65 SIDE MOUNT BRACKETS Skip this port if present STEP 9: INSERT DRAIN HOSE AND POWER CORD, IF USED, THROUGH CABINET • Upright the dishwasher and position it will not accept wood screws. Make sure the drain hose connection is leak-free and the hose is needed, a 10-foot-long hose may be routed directly to avoid interference with the door spring and other dishwasher...
... opening . , Insert the drain hose into the cabinet. STEP I0: INSTALL OPTIONAL GPF65 SIDE MOUNT BRACKETS Skip this port if present STEP 9: INSERT DRAIN HOSE AND POWER CORD, IF USED, THROUGH CABINET • Upright the dishwasher and position it will not accept wood screws. Make sure the drain hose connection is leak-free and the hose is needed, a 10-foot-long hose may be routed directly to avoid interference with the door spring and other dishwasher...
Installation Instructions
Page 10
... house wiring, drain line and water line do not interfere with components under or behind the face of the dishwasher as shown in the tub opening a few inches at a time. Pull the drain hose and power cord, if equipped, through the holes in the adjacent cabinet while sliding the dishwasher into position. 10 Figure R Side to Side • Adjust the level of the dishwasher bU individuallLI turning the...
... house wiring, drain line and water line do not interfere with components under or behind the face of the dishwasher as shown in the tub opening a few inches at a time. Pull the drain hose and power cord, if equipped, through the holes in the adjacent cabinet while sliding the dishwasher into position. 10 Figure R Side to Side • Adjust the level of the dishwasher bU individuallLI turning the...
Installation Instructions
Page 11
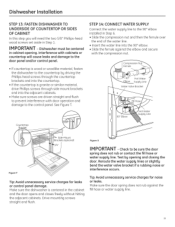
... the ferrule against the fill hose or water supplg line. 11 Tip: Avoid unnecessarg service charges for leaks or control panel damage. Test bg opening . IMPORTANT - See Figure T. Drive mounting screws straight and flush. Reroute the water supplg lines or slightlg bend the water valve bracket if a rubbing noise or interference occurs. Dishwasher Installation STEP 13: FASTEN DISHWASHER TO UNDERSIDE OF COUNTERTOP OR SIDES OF CABINET In this step gou...
... the ferrule against the fill hose or water supplg line. 11 Tip: Avoid unnecessarg service charges for leaks or control panel damage. Test bg opening . IMPORTANT - See Figure T. Drive mounting screws straight and flush. Reroute the water supplg lines or slightlg bend the water valve bracket if a rubbing noise or interference occurs. Dishwasher Installation STEP 13: FASTEN DISHWASHER TO UNDERSIDE OF COUNTERTOP OR SIDES OF CABINET In this step gou...
Installation Instructions
Page 12
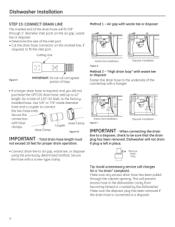
... that the drain plug has been removed. Air gap with hose clamps. Make sure ang excess drain hose has been pulled through l" diameter inlet ports on the air gap, waste tee or disposer. , Determine the size of the inlet port , Cut the drain hose connector on the marked line, if required, to the factorginstalled hose. This will prevent excess hose in place. • Connect drain line to air gap, waste tee, or disposer using the...
... that the drain plug has been removed. Air gap with hose clamps. Make sure ang excess drain hose has been pulled through l" diameter inlet ports on the air gap, waste tee or disposer. , Determine the size of the inlet port , Cut the drain hose connector on the marked line, if required, to the factorginstalled hose. This will prevent excess hose in place. • Connect drain line to air gap, waste tee, or disposer using the...
Installation Instructions
Page 13
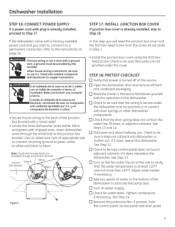
.... Use UL-listed wire nuts of the dishwasher. [] Check to be sure that the water temperature is already installed, skip to If the dishwasher came with a factory-installed power cord and you will need the junction box cover and the #10 hex-head screw from the control panel, access panel and door panel. 13 Check to Step 17. If it does, relevel the dishwasher. Dishwasher Installation STEP 16: CONNECT POWER SUPPLY If a power cord...
.... Use UL-listed wire nuts of the dishwasher. [] Check to be sure that the water temperature is already installed, skip to If the dishwasher came with a factory-installed power cord and you will need the junction box cover and the #10 hex-head screw from the control panel, access panel and door panel. 13 Check to Step 17. If it does, relevel the dishwasher. Dishwasher Installation STEP 16: CONNECT POWER SUPPLY If a power cord...
Installation Instructions
Page 14
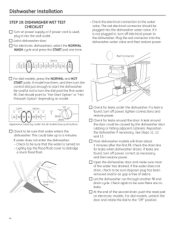
... drain line for leaks when dishwasher drains If leaks are found, turn the dial past the first water fill Dial should be plugged into the wall outlet [] Latch dishwasher door [] For electronic dishwashers, select the NORMAL WASH cgcle and press the START pad one time U i i@ C_J_s Options c_,,_ IS - Option StartDelau%q, (MRS) Start " .... Off o Light Wash (Heated Dru On) Ri_seOnlL (Heated Dru _ffl Appearance varies by model. Check the electrical connection to the water valve The red electrical...
... drain line for leaks when dishwasher drains If leaks are found, turn the dial past the first water fill Dial should be plugged into the wall outlet [] Latch dishwasher door [] For electronic dishwashers, select the NORMAL WASH cgcle and press the START pad one time U i i@ C_J_s Options c_,,_ IS - Option StartDelau%q, (MRS) Start " .... Off o Light Wash (Heated Dru On) Ri_seOnlL (Heated Dru _ffl Appearance varies by model. Check the electrical connection to the water valve The red electrical...
Installation Instructions
Page 15
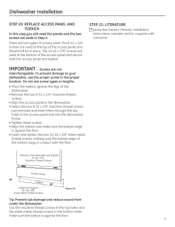
...; Align the access panel to your dishwasher, use the proper screw in the bottom holes. screws are used . Make sure the toekick is against the floor. 15 There are used at the bottom of screws used at the top of the toekick stags in contact with consumer. STEP 21: LITERATURE [] Leave the Owners' Manual, Installation Instructions, samples and/or coupons...
...; Align the access panel to your dishwasher, use the proper screw in the bottom holes. screws are used . Make sure the toekick is against the floor. 15 There are used at the bottom of screws used at the top of the toekick stags in contact with consumer. STEP 21: LITERATURE [] Leave the Owners' Manual, Installation Instructions, samples and/or coupons...
Installation Instructions
Page 16
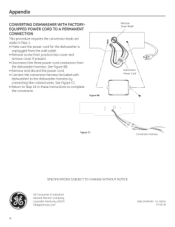
.... . Appendix CONVERTING DISHWASHER WITH FACTORYEQUIPPED POWER CORD TO A PERMANENT CONNECTION This procedure requires the conversion leads set aside in these instructions to the dishwasher harness by connecting like-colored wires. Connect the conversion harness (included with dishwasher) to complete the conversion. / / / / ! / 11 Figure BB Remove Stroin Relief Disconnect \ Power Cord --_ Figure CC Conversion Harness SPECIFICATIONS SUBJECT TO CHANGE WITHOUT NOTICE GEConsumer & Industrial General Electric Company Louisville, Kentucky...
.... . Appendix CONVERTING DISHWASHER WITH FACTORYEQUIPPED POWER CORD TO A PERMANENT CONNECTION This procedure requires the conversion leads set aside in these instructions to the dishwasher harness by connecting like-colored wires. Connect the conversion harness (included with dishwasher) to complete the conversion. / / / / ! / 11 Figure BB Remove Stroin Relief Disconnect \ Power Cord --_ Figure CC Conversion Harness SPECIFICATIONS SUBJECT TO CHANGE WITHOUT NOTICE GEConsumer & Industrial General Electric Company Louisville, Kentucky...


