
Product Manual
Page 6
...HANDLING. 3 WARNING: TO REDUCE THE RISK OF FIRE, ELECTRIC SHOCK OR INJURY: • Fully assemble before operating. • Operate vacuum only at bottom of cleaner. • Do not leave appliance when plugged in this manual. To avoid personal injury or damage, and to prevent the...8226; Unplug before unplugging. • Use extra care when cleaning on cord, or pull cord around sharp edges or corners. Do not place cleaner on stairs or furniture, as a handle, close a door on stairs. IMPORTANT SAFETY INSTRUCTIONS SAVE THESE INSTRUCTIONS When using an electrical appliance, basic...
...HANDLING. 3 WARNING: TO REDUCE THE RISK OF FIRE, ELECTRIC SHOCK OR INJURY: • Fully assemble before operating. • Operate vacuum only at bottom of cleaner. • Do not leave appliance when plugged in this manual. To avoid personal injury or damage, and to prevent the...8226; Unplug before unplugging. • Use extra care when cleaning on cord, or pull cord around sharp edges or corners. Do not place cleaner on stairs or furniture, as a handle, close a door on stairs. IMPORTANT SAFETY INSTRUCTIONS SAVE THESE INSTRUCTIONS When using an electrical appliance, basic...
Product Manual
Page 11
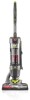
...Window 11 4 13 9. Cord Release 18 16. To turn vacuum OFF, push switch again. To turn vacuum ON, push ON/OFF switch (A) once. NOTE: Brushroll does not run with HEPA media 3 12 8. CARRY HANDLE 2.3 C The cleaner can be released. 2.5 D 6 Short Handle Release Button 2.1... the upright position. HOW TO USE VACUUM DESCRIPTION 1. Carry Handle 2 6. Wand/Handle Release Button 9 15. Furniture Guard 20. 2. Filter made with vacuum in -1 Combination Tool 18. Hose 6 16 17 14. Hose Connector 19. This cleaner is intended for convenient storage. 2.4 ...
...Window 11 4 13 9. Cord Release 18 16. To turn vacuum OFF, push switch again. To turn vacuum ON, push ON/OFF switch (A) once. NOTE: Brushroll does not run with HEPA media 3 12 8. CARRY HANDLE 2.3 C The cleaner can be released. 2.5 D 6 Short Handle Release Button 2.1... the upright position. HOW TO USE VACUUM DESCRIPTION 1. Carry Handle 2 6. Wand/Handle Release Button 9 15. Furniture Guard 20. 2. Filter made with vacuum in -1 Combination Tool 18. Hose 6 16 17 14. Hose Connector 19. This cleaner is intended for convenient storage. 2.4 ...
Product Manual
Page 14
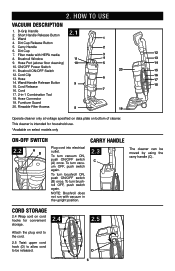
...removed and placed back into storage position for storage and when using cleaning tools; HANDLE POSITIONS 2.6 The handle of your cleaner has two positions: upright for general operation on carpet and floors; WARNING! Hose connector must be used for reaching ... tools. Not to be in the upright position. 3.1 Remove the hose connector (A) from storage position. 3.2 Plug in upright position. ! CAUTION ! The vacuum is in hose connector by flipping down hose connector door (B) insert hose connector (A) until it clicks. 3.1 A ! CAUTION ! operating position for tool use...
...removed and placed back into storage position for storage and when using cleaning tools; HANDLE POSITIONS 2.6 The handle of your cleaner has two positions: upright for general operation on carpet and floors; WARNING! Hose connector must be used for reaching ... tools. Not to be in the upright position. 3.1 Remove the hose connector (A) from storage position. 3.2 Plug in upright position. ! CAUTION ! The vacuum is in hose connector by flipping down hose connector door (B) insert hose connector (A) until it clicks. 3.1 A ! CAUTION ! operating position for tool use...
Product Manual
Page 26
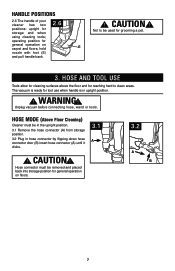
...Replace 4.19 4.20 Place handle in the operating position and turn the cleaner over so the bottom side is not pinched between agitator and agitator shield. 4.21 Belt: What to Buy Use only genuine HOOVER® belts with your vacuum. The addition of tool. 4.16 Remove bottom plate (B). 4.17 ...with a Phillips screwdriver. 4.18 Lift off bottom plate (A). 4.19 Remove agitator brushroll and used belt. 4.20 With the lettering on side of cleaner. Replace bottom plate by first sliding end opposite of tool. When purchasing a new belt, ask for their lifetime. To reduce the risk of ...
...Replace 4.19 4.20 Place handle in the operating position and turn the cleaner over so the bottom side is not pinched between agitator and agitator shield. 4.21 Belt: What to Buy Use only genuine HOOVER® belts with your vacuum. The addition of tool. 4.16 Remove bottom plate (B). 4.17 ...with a Phillips screwdriver. 4.18 Lift off bottom plate (A). 4.19 Remove agitator brushroll and used belt. 4.20 With the lettering on side of cleaner. Replace bottom plate by first sliding end opposite of tool. When purchasing a new belt, ask for their lifetime. To reduce the risk of ...

Product Manual
Page 30
...-9200, Mon-Fri 8am-7pm EST. Always identify your vacuum to Hoover®, Inc., Company in delay. Do not send your vacuum by : • Checking the Yellow Pages under "Vacuum Cleaners" or "Household". • Visit our website at hoover.com (U.S. When the thermal protector activates the cleaner will deactivate and cleaning may continue. SERVICE To obtain approved...
...-9200, Mon-Fri 8am-7pm EST. Always identify your vacuum to Hoover®, Inc., Company in delay. Do not send your vacuum by : • Checking the Yellow Pages under "Vacuum Cleaners" or "Household". • Visit our website at hoover.com (U.S. When the thermal protector activates the cleaner will deactivate and cleaning may continue. SERVICE To obtain approved...


