

Product Manual
Page 1
... Belt 10-11 Replacing Powered Hand Tool Agitator Brush Roll 12 Replacing Power Hand Tool Belt ..13 Replacing Headlight 10 Thermal Protector 14 Warranty 15 Parts & accessories mail reorder form 33 hoover.com hoover.ca Review this manual before operating the cleaner. Lire attentivement ces instructions avant d'utiliser l'appareil.
... Belt 10-11 Replacing Powered Hand Tool Agitator Brush Roll 12 Replacing Power Hand Tool Belt ..13 Replacing Headlight 10 Thermal Protector 14 Warranty 15 Parts & accessories mail reorder form 33 hoover.com hoover.ca Review this manual before operating the cleaner. Lire attentivement ces instructions avant d'utiliser l'appareil.

Product Manual
Page 2
...; Use extra care when cleaning on cord. Use only attachments recommended by or near children. Save these instructions! © 2006 The Hoover Company 2 hoover.com If appliance is used as a toy or to pick up very fine materials such as cigarettes, matches, or hot ashes. •...contains chemicals known to cause cancer and reproductive toxicity. Verification of date of purchase may be present. • Always turn off all parts of your sales receipt to whip when rewinding. Do not allow plug to this appliance before connecting or disconnecting hose. • Unplug ...
...; Use extra care when cleaning on cord. Use only attachments recommended by or near children. Save these instructions! © 2006 The Hoover Company 2 hoover.com If appliance is used as a toy or to pick up very fine materials such as cigarettes, matches, or hot ashes. •...contains chemicals known to cause cancer and reproductive toxicity. Verification of date of purchase may be present. • Always turn off all parts of your sales receipt to whip when rewinding. Do not allow plug to this appliance before connecting or disconnecting hose. • Unplug ...
Product Manual
Page 3
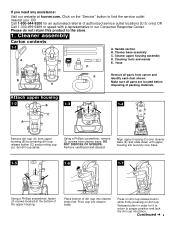
...bottom of dirt cup into cleaner body first. Handle section B. Set dirt cup aside. Release button in our Consumer Response Center. Make sure all parts from cleaner base. Pivot cup into cleaner body. only) OR Call 1-330-499-9499 to speak with a representative in order for an automated referral...Align upper housing (D) over cleaner base (E) and slide down until upper housing sits securely over base. 1-5 1-6 1-7 Using a Phillips screwdriver, fasten (3) screws located at hoover.com. Press on dirt cup release button while firmly pressing on the "Service" button to the store. 1.
...bottom of dirt cup into cleaner body first. Handle section B. Set dirt cup aside. Release button in our Consumer Response Center. Make sure all parts from cleaner base. Pivot cup into cleaner body. only) OR Call 1-330-499-9499 to speak with a representative in order for an automated referral...Align upper housing (D) over cleaner base (E) and slide down until upper housing sits securely over base. 1-5 1-6 1-7 Using a Phillips screwdriver, fasten (3) screws located at hoover.com. Press on dirt cup release button while firmly pressing on the "Service" button to the store. 1.

Product Manual
Page 9
... Press on dirt cup release button while firmly pressing on back of the housing to the right and pull down to air dry for HOOVER part No. 93002518. 3-3 3-4 3-5 C D Holding dirt cup over trash receptacle, press dirt cup door release button (C) to buy When purchasing ...a new secondary filter cartridge, ask for HOOVER part No. 93002517. Do not use cleaner without dirt cup or filters in place. 3-8 A B B Remove dirt cup as described in place. 3-6 A C T T...
... Press on dirt cup release button while firmly pressing on back of the housing to the right and pull down to air dry for HOOVER part No. 93002518. 3-3 3-4 3-5 C D Holding dirt cup over trash receptacle, press dirt cup door release button (C) to buy When purchasing ...a new secondary filter cartridge, ask for HOOVER part No. 93002517. Do not use cleaner without dirt cup or filters in place. 3-8 A B B Remove dirt cup as described in place. 3-6 A C T T...

Product Manual
Page 10
... the cleaner and should be checked from time to time to buy When purchasing a new HEPA filter cartridge, ask for Flat belt - HOOVER part No. 40201-271. 10 Slide back into socket until locked in "Replacing flat belt". Removing lens Disconnect cleaner from electrical outlet. Excessive ...force is described under the bottom plate of socket. Headlight replacement What to buy This cleaner uses a 13 volt, T-3 114 wedge base bulb, Hoover part No. 27313-107. 3-10 With fingers in low position. Using a Phillips screwdriver, remove the the screw as shown in place. The flat (...
... the cleaner and should be checked from time to time to buy When purchasing a new HEPA filter cartridge, ask for Flat belt - HOOVER part No. 40201-271. 10 Slide back into socket until locked in "Replacing flat belt". Removing lens Disconnect cleaner from electrical outlet. Excessive ...force is described under the bottom plate of socket. Headlight replacement What to buy This cleaner uses a 13 volt, T-3 114 wedge base bulb, Hoover part No. 27313-107. 3-10 With fingers in low position. Using a Phillips screwdriver, remove the the screw as shown in place. The flat (...

Product Manual
Page 11
... bottom plate (A). WARNING: Agitator brush roll can start suddenly. Lift off agitator brush roll. Lift up . What to buy When purchasing a new agitator, ask for HOOVER part No. 93002361. 3-19 To check condition of brushes, move edge of belt over large pulley (C) while rolling the pulley in low position and turn cleaner...
... bottom plate (A). WARNING: Agitator brush roll can start suddenly. Lift off agitator brush roll. Lift up . What to buy When purchasing a new agitator, ask for HOOVER part No. 93002361. 3-19 To check condition of brushes, move edge of belt over large pulley (C) while rolling the pulley in low position and turn cleaner...

Product Manual
Page 12
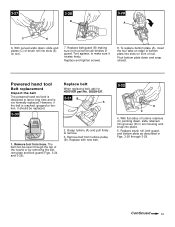
... gouged or broken, replace it (see following section). 5. Then firmly pull on agitator brush roll Before positioning belt onto agitator brush roll, check for HOOVER part No. 48414-088. 3-24 A 3-25 B 2. Belt may fit loosely when properly installed. How to pulley. Remove agitator including end plates (C) ...and discard. 4. If belt is not normally replaced. To install new belt (with HOOVER part No. 40201-200. D F Positioning belt on belt and "snap" it so bottom faces up. Inspect belt to ensure that it is ...
... gouged or broken, replace it (see following section). 5. Then firmly pull on agitator brush roll Before positioning belt onto agitator brush roll, check for HOOVER part No. 48414-088. 3-24 A 3-25 B 2. Belt may fit loosely when properly installed. How to pulley. Remove agitator including end plates (C) ...and discard. 4. If belt is not normally replaced. To install new belt (with HOOVER part No. 40201-200. D F Positioning belt on belt and "snap" it so bottom faces up. Inspect belt to ensure that it is ...
Product Manual
Page 13
... and is cracked, gouged or broken, it rotates freely. 3-27 3-28 B 3-29 A C E 6. The belt can be replaced. 3-30 Replace belt When replacing belt, ask for HOOVER part No. 38528-037. 3-31 B A 1.
... and is cracked, gouged or broken, it rotates freely. 3-27 3-28 B 3-29 A C E 6. The belt can be replaced. 3-30 Replace belt When replacing belt, ask for HOOVER part No. 38528-037. 3-31 B A 1.

Product Manual
Page 14
..., it from the electrical outlet. 2. When cleaner is unplugged and the motor cools for dirt accumulation. 3. In Canada, contact Hoover Canada, Burlington, Ontario L7R 4A8, Phone: 1-800-263-6376. If this will only result in turbine channel • Remove ...To obtain approved HOOVER service and genuine HOOVER parts, locate the nearest Hoover Sales and Service Center or Authorized Hoover Warranty Service Dealer (Depot) by a Hoover Sales and Service Center or an Authorized Hoover Warranty Service Dealer. If further assistance is needed, contact the Hoover Consumer Response Center,...
..., it from the electrical outlet. 2. When cleaner is unplugged and the motor cools for dirt accumulation. 3. In Canada, contact Hoover Canada, Burlington, Ontario L7R 4A8, Phone: 1-800-263-6376. If this will only result in turbine channel • Remove ...To obtain approved HOOVER service and genuine HOOVER parts, locate the nearest Hoover Sales and Service Center or Authorized Hoover Warranty Service Dealer (Depot) by a Hoover Sales and Service Center or an Authorized Hoover Warranty Service Dealer. If further assistance is needed, contact the Hoover Consumer Response Center,...
Product Manual
Page 15
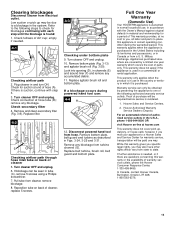
... A 12. This warranty applies when the appliance is purchased. This warranty only applies when the product is in a commercial or rental application. Hoover Sales and Service Centers. 2. empty if needed , or if there are covered by presenting the appliance to a blockage in tube (C), remove...or territory in channels (E) and around liner (F) and remove any accumulated debris. 11. While this warranty or the availability of parts only. If a blockage occurs during the warranted period. If further assistance is rendered. 1. Refer to the following authorized warranty service...
... A 12. This warranty applies when the appliance is purchased. This warranty only applies when the product is in a commercial or rental application. Hoover Sales and Service Centers. 2. empty if needed , or if there are covered by presenting the appliance to a blockage in tube (C), remove...or territory in channels (E) and around liner (F) and remove any accumulated debris. 11. While this warranty or the availability of parts only. If a blockage occurs during the warranted period. If further assistance is rendered. 1. Refer to the following authorized warranty service...


