

Product Manual
Page 1
...3-4 Carton Contents 3 How To Use 5-8 Cleaner Descriptions 5 Cleaning Tools 7-8 If You Have a Problem 14 Important Safeguards 2 Lubrication 14 Maintenance 8-13 Authorized Service 14 Cleaning Filters 9-10 Clearing Blockages 15 Emptying Dirt Cup 8-9 Replacing Agitator Brush Roll ..11-12 Replacing Belt 10-11 Replacing Powered Hand Tool Agitator Brush Roll 12... Replacing Power Hand Tool Belt ..13 Replacing Headlight 10 Thermal Protector 14 Warranty 15 Parts & accessories mail reorder form 33 hoover.com hoover.ca Review this manual before operating the cleaner.
...3-4 Carton Contents 3 How To Use 5-8 Cleaner Descriptions 5 Cleaning Tools 7-8 If You Have a Problem 14 Important Safeguards 2 Lubrication 14 Maintenance 8-13 Authorized Service 14 Cleaning Filters 9-10 Clearing Blockages 15 Emptying Dirt Cup 8-9 Replacing Agitator Brush Roll ..11-12 Replacing Belt 10-11 Replacing Powered Hand Tool Agitator Brush Roll 12... Replacing Power Hand Tool Belt ..13 Replacing Headlight 10 Thermal Protector 14 Warranty 15 Parts & accessories mail reorder form 33 hoover.com hoover.ca Review this manual before operating the cleaner.

Product Manual
Page 2
...heated surfaces. • Use vacuum cleaner only for warranty service of purchase may be required for its intended use without dirt cup or filters in use cord as powder. • Use extra care when cleaning on cord. Wash hands after handling. • Do not ... and serial numbers in China Hecho en China/FaébreinquChine SERIAL NUMBER Important Safeguards! Save these instructions! © 2006 The Hoover Company 2 hoover.com Do not use with the cleaner. Model Serial number Hint: Attach your cleaner (see back cover). When using an electrical appliance...
...heated surfaces. • Use vacuum cleaner only for warranty service of purchase may be required for its intended use without dirt cup or filters in use cord as powder. • Use extra care when cleaning on cord. Wash hands after handling. • Do not ... and serial numbers in China Hecho en China/FaébreinquChine SERIAL NUMBER Important Safeguards! Save these instructions! © 2006 The Hoover Company 2 hoover.com Do not use with the cleaner. Model Serial number Hint: Attach your cleaner (see back cover). When using an electrical appliance...
Product Manual
Page 5
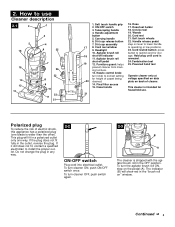
... 11 21 1. The indicator (B) will fit in the OFF position. ON/OFF switch 3. Telescoping handle 4. Furniture guard: helps prevent cleaner from marking furniture. 13. Final filter access 15. Wands 20. Soft touch wheels 22. To turn knob to operating or low positions. 23. Nozzle control knob: turn cleaner OFF, push switch...
... 11 21 1. The indicator (B) will fit in the OFF position. ON/OFF switch 3. Telescoping handle 4. Furniture guard: helps prevent cleaner from marking furniture. 13. Final filter access 15. Wands 20. Soft touch wheels 22. To turn knob to operating or low positions. 23. Nozzle control knob: turn cleaner OFF, push switch...
Product Manual
Page 8
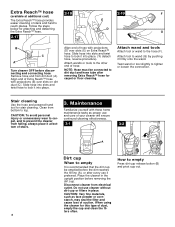
.... Attach tool to the other end of Extra Reach™ hose with these home maintenance tasks as face powder or cornstarch, may seal the filter and cause loss of stairs and hard to car- Stair cleaning Use the hose and powered hand 3. Maintenance tool for attaching and detaching D ... for this type of stairs. Twist wand or tool slightly to dirt duct and hose tube after every use cleaner without dirt cup or filters in the upright position before disconnecting and connecting hose. When using the cleaner for carpet or floor cleaning. Align end of your cleaner will...
.... Attach tool to the other end of Extra Reach™ hose with these home maintenance tasks as face powder or cornstarch, may seal the filter and cause loss of stairs and hard to car- Stair cleaning Use the hose and powered hand 3. Maintenance tool for attaching and detaching D ... for this type of stairs. Twist wand or tool slightly to dirt duct and hose tube after every use cleaner without dirt cup or filters in the upright position before disconnecting and connecting hose. When using the cleaner for carpet or floor cleaning. Align end of your cleaner will...

Product Manual
Page 9
... position and lock the dirt cup into filter frame. Allow both filter frame and filter to latch dirt cup door closed . Rinse filter frame cartridge and foam filter under cold water. Close door and press dirt cup door release button to air dry for HOOVER part No. 93002517. To purchase a ...new black foam filter, ask for it clockwise to open dirt cup door (D). 3-3 3-4 3-5 C D Holding dirt cup over trash receptacle, press dirt cup door release button...
... position and lock the dirt cup into filter frame. Allow both filter frame and filter to latch dirt cup door closed . Rinse filter frame cartridge and foam filter under cold water. Close door and press dirt cup door release button to air dry for HOOVER part No. 93002517. To purchase a ...new black foam filter, ask for it clockwise to open dirt cup door (D). 3-3 3-4 3-5 C D Holding dirt cup over trash receptacle, press dirt cup door release button...

Product Manual
Page 10
...Agitator brush roll". Slide back into socket until locked in low position. HOOVER part No. 40201-271. 10 Removing lens Disconnect cleaner from electrical outlet. Do not operate cleaner without dirt cup or filters in good condition. Excessive force is described under the bottom plate of... socket. the other belt is not required. 3-12 Replacing lens Reposition lens and secure with your cleaner. When purchasing a new belt, ask for HOOVER part No. 93002360. ...
...Agitator brush roll". Slide back into socket until locked in low position. HOOVER part No. 40201-271. 10 Removing lens Disconnect cleaner from electrical outlet. Do not operate cleaner without dirt cup or filters in good condition. Excessive force is described under the bottom plate of... socket. the other belt is not required. 3-12 Replacing lens Reposition lens and secure with your cleaner. When purchasing a new belt, ask for HOOVER part No. 93002360. ...

Product Manual
Page 14
... life of the motor. If you have a problem If a minor problem occurs, it from overheating. Check secondary and final filters for 30 minutes, the thermal protector automatically resets and cleaning may need servicing (see "Service" section). Refer to motor bearings.... and genuine HOOVER parts, locate the nearest Hoover Sales and Service Center or Authorized Hoover Warranty Service Dealer (Depot) by: • checking the Yellow Pages under "Cleaner won 't turn agitator brush roll ON • Filters dirty • Clean filters (Figs. 3-6 through 3-18 in turbine channel • ...
... life of the motor. If you have a problem If a minor problem occurs, it from overheating. Check secondary and final filters for 30 minutes, the thermal protector automatically resets and cleaning may need servicing (see "Service" section). Refer to motor bearings.... and genuine HOOVER parts, locate the nearest Hoover Sales and Service Center or Authorized Hoover Warranty Service Dealer (Depot) by: • checking the Yellow Pages under "Cleaner won 't turn agitator brush roll ON • Filters dirty • Clean filters (Figs. 3-6 through 3-18 in turbine channel • ...
Product Manual
Page 15
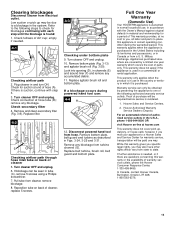
..., or house calls; Check fullness of warranty service outlets, phone the Hoover Consumer Response Center, 1-330-499-9499. This warranty only applies when the product is rendered. 1. Replace filter. 4-2 C Checking airflow path through hose inlet tube on back of purchase.... 4-3 D F E Checking under bottom plate 9. Check secondary filter 4. Turn cleaner OFF and unplug. Pull tube from state to place this appliance in and turn ON. Hoover Sales and Service Centers. 2. Remove and clean secondary filter (Fig. 3-8). While this warranty or the availability of dirt cup...
..., or house calls; Check fullness of warranty service outlets, phone the Hoover Consumer Response Center, 1-330-499-9499. This warranty only applies when the product is rendered. 1. Replace filter. 4-2 C Checking airflow path through hose inlet tube on back of purchase.... 4-3 D F E Checking under bottom plate 9. Check secondary filter 4. Turn cleaner OFF and unplug. Pull tube from state to place this appliance in and turn ON. Hoover Sales and Service Centers. 2. Remove and clean secondary filter (Fig. 3-8). While this warranty or the availability of dirt cup...


