Product Manual
Page 3
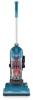
WARNING: TO REDUCE THE RISK OF FIRE, ELECTRIC SHOCK OR INJURY: • Fully assemble before operating. • Operate vacuum only at bottom of stairs on cord, or pull cord around sharp edges or corners. Unplug from outlet when not in . Not intended for use ...
WARNING: TO REDUCE THE RISK OF FIRE, ELECTRIC SHOCK OR INJURY: • Fully assemble before operating. • Operate vacuum only at bottom of stairs on cord, or pull cord around sharp edges or corners. Unplug from outlet when not in . Not intended for use ...
Product Manual
Page 5
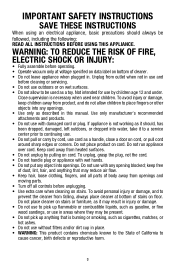
...place. 1.2 1.3 Press handle release button (A) to wand) C. Attach dirt cup 1.6 Place bottom of packing. A. Dirt Cup E. Pivot cup into vacuum body first. Dirt cup is secure when you hear a click. 1.6 5 Actual model may vary from carton and identify each item shown. Handle/Wand...shown for all operations. Cleaner Body D. Cleaner ASSEMBLY Carton contents 1.1 1.1 Remove all parts are A C located before disposing of dirt cup into vacuum. Crevice Tool (Attached to remove. 1.3 A Attach hose 1.4 Align end of hose with projection in dirt duct on back of cleaner. 1. ...
...place. 1.2 1.3 Press handle release button (A) to wand) C. Attach dirt cup 1.6 Place bottom of packing. A. Dirt Cup E. Pivot cup into vacuum body first. Dirt cup is secure when you hear a click. 1.6 5 Actual model may vary from carton and identify each item shown. Handle/Wand...shown for all operations. Cleaner Body D. Cleaner ASSEMBLY Carton contents 1.1 1.1 Remove all parts are A C located before disposing of dirt cup into vacuum. Crevice Tool (Attached to remove. 1.3 A Attach hose 1.4 Align end of hose with projection in dirt duct on back of cleaner. 1. ...
Product Manual
Page 6
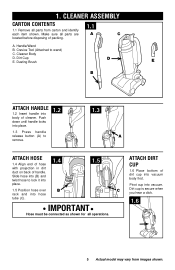
... Clip 13. Power Cord 15. CORD RELEASE/ STORAGE 2.2 Turn the Quick Cord Release for storage. 1.6 1.7 D E 2. Turn cleaner on by visiting www.hoover.com, or your local HOOVER® service center. Suction Control Pedal 2.1 4 10 5 6 7 8 9 1 11 3 12 2 13 16 14 17 15 *Accessories not included with... removal. Dirt Cup 7. Filters 8. Crevice Tool (Attached to handle and stored in cord guide to keep out of the way while vacuuming. Store tools 1.6 Snap dusting brush (D) into storage area on side of cleaner. 1.7 Crevice tool is permanently attached to end of ...
... Clip 13. Power Cord 15. CORD RELEASE/ STORAGE 2.2 Turn the Quick Cord Release for storage. 1.6 1.7 D E 2. Turn cleaner on by visiting www.hoover.com, or your local HOOVER® service center. Suction Control Pedal 2.1 4 10 5 6 7 8 9 1 11 3 12 2 13 16 14 17 15 *Accessories not included with... removal. Dirt Cup 7. Filters 8. Crevice Tool (Attached to handle and stored in cord guide to keep out of the way while vacuuming. Store tools 1.6 Snap dusting brush (D) into storage area on side of cleaner. 1.7 Crevice tool is permanently attached to end of ...
Product Manual
Page 7
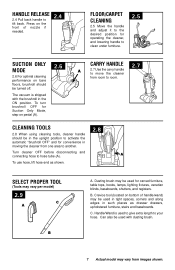
The vacuum is used in tight spaces, corners and along edges in the upright position to activate the automatic "brushroll OFF" and for operating the cleaner, and ...
The vacuum is used in tight spaces, corners and along edges in the upright position to activate the automatic "brushroll OFF" and for operating the cleaner, and ...
Product Manual
Page 9
..., the thermal protector will ensure continued cleaning effectiveness. To reduce the risk of your cleaner will deactivate and cleaning may vary from moving parts, unplug vacuum before servicing. Snap dirt cup bottom back into your cleaner needs servicing. When the thermal protector activates the cleaner witll stop running. Turn cleaner OFF...
..., the thermal protector will ensure continued cleaning effectiveness. To reduce the risk of your cleaner will deactivate and cleaning may vary from moving parts, unplug vacuum before servicing. Snap dirt cup bottom back into your cleaner needs servicing. When the thermal protector activates the cleaner witll stop running. Turn cleaner OFF...
Product Manual
Page 10
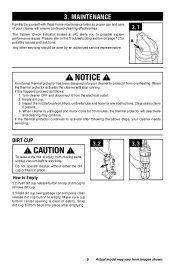
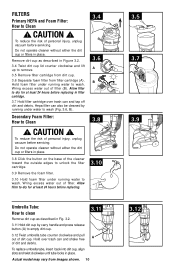
To reduce the risk of personal injury, unplug vacuum before servicing. Do not operate cleaner without either the dirt cup or filters in Figure 3.2. 3.4 Twist dirt cup lid counter clockwise and lift up to ... ! Actual model may vary from filter cartridge (A). Hold over trash can and tap off dirt and debris. To reduce the risk of personal injury, unplug vacuum before servicing. Wring excess water out of filter. Remove dirt cup as described in filter cartridge. 3.7 Hold filter cartridge over trash can also be cleaned...
To reduce the risk of personal injury, unplug vacuum before servicing. Do not operate cleaner without either the dirt cup or filters in Figure 3.2. 3.4 Twist dirt cup lid counter clockwise and lift up to ... ! Actual model may vary from filter cartridge (A). Hold over trash can and tap off dirt and debris. To reduce the risk of personal injury, unplug vacuum before servicing. Wring excess water out of filter. Remove dirt cup as described in filter cartridge. 3.7 Hold filter cartridge over trash can also be cleaned...
Product Manual
Page 11
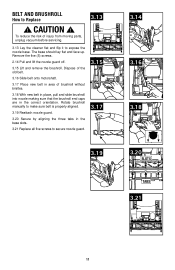
... the nozzle base. Dispose of the old belt. 3.16 Slide belt onto motorshaft. 3.17 Place new belt in area of injury from moving parts, unplug vacuum before servicing. 3.13 Lay the cleaner flat and flip it to secure nozzle guard. 3.15 3.17 3.14 3.16 3.18 3.19 3.20 SLOTS SLOTS SLOTS SLOTS...
... the nozzle base. Dispose of the old belt. 3.16 Slide belt onto motorshaft. 3.17 Place new belt in area of injury from moving parts, unplug vacuum before servicing. 3.13 Lay the cleaner flat and flip it to secure nozzle guard. 3.15 3.17 3.14 3.16 3.18 3.19 3.20 SLOTS SLOTS SLOTS SLOTS...

Product Manual
Page 13
... EST. Do not send your vacuum by : • Checking the Yellow Pages under "Vacuum Cleaners" or "Household". • Visit our website at hoover.com (U.S. Mon-Fri 8am-7pm EST. Customers) or hoover.ca (Canadian customers). 5. Service To obtain approved Hoover® service and genuine Hoover® parts, locate the nearest Authorized Hoover® Warranty Service Dealer (Depot...
... EST. Do not send your vacuum by : • Checking the Yellow Pages under "Vacuum Cleaners" or "Household". • Visit our website at hoover.com (U.S. Mon-Fri 8am-7pm EST. Customers) or hoover.ca (Canadian customers). 5. Service To obtain approved Hoover® service and genuine Hoover® parts, locate the nearest Authorized Hoover® Warranty Service Dealer (Depot...


