Product Manual
Page 1
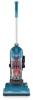
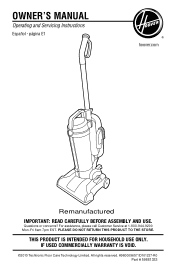
For assistance, please call Customer Service at 1-800-944-9200 Mon-Fri 8am-7pm EST. PLEASE DO NOT RETURN THIS PRODUCT TO THE STORE. All rights reserved. #960009657 ID101237-R0 Part # 59881333 THIS PRODUCT IS INTENDED FOR HOUSEHOLD USE ONLY. IF USED COMMERCIALLY WARRANTY IS VOID. ©2010 Techtronic Floor Care Technology Limited. página E1 hoover.com Remanufactured IMPORTANT: READ CAREFULLY BEFORE ASSEMBLY AND USE. Questions or concerns? Owner's Manual Operating and Servicing Instructions Español -
For assistance, please call Customer Service at 1-800-944-9200 Mon-Fri 8am-7pm EST. PLEASE DO NOT RETURN THIS PRODUCT TO THE STORE. All rights reserved. #960009657 ID101237-R0 Part # 59881333 THIS PRODUCT IS INTENDED FOR HOUSEHOLD USE ONLY. IF USED COMMERCIALLY WARRANTY IS VOID. ©2010 Techtronic Floor Care Technology Limited. página E1 hoover.com Remanufactured IMPORTANT: READ CAREFULLY BEFORE ASSEMBLY AND USE. Questions or concerns? Owner's Manual Operating and Servicing Instructions Español -
Product Manual
Page 2
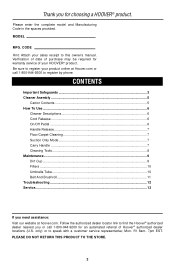
... Use...6 Cleaner Descriptions 6 Cord Release...6 On/Off Pedal...6 Handle Release 7 Floor/Carpet Cleaning 7 Suction Only Mode 7 Carry Handle ...7 Cleaning Tools...8 Maintenance...9 Dirt Cup...9 Filters...10 Umbrella Tube...10 Belt And Brushroll 11 Troubleshooting...12 Service...13 . If you need assistance: Visit our website at Hoover.com or call 1-800-944-9200 for choosing a HOOVER® product. Please enter the complete model and Manufacturing Code in the spaces provided. Be sure to register by phone. CODE Hint: Attach your HOOVER® product...
... Use...6 Cleaner Descriptions 6 Cord Release...6 On/Off Pedal...6 Handle Release 7 Floor/Carpet Cleaning 7 Suction Only Mode 7 Carry Handle ...7 Cleaning Tools...8 Maintenance...9 Dirt Cup...9 Filters...10 Umbrella Tube...10 Belt And Brushroll 11 Troubleshooting...12 Service...13 . If you need assistance: Visit our website at Hoover.com or call 1-800-944-9200 for choosing a HOOVER® product. Please enter the complete model and Manufacturing Code in the spaces provided. Be sure to register by phone. CODE Hint: Attach your HOOVER® product...
Product Manual
Page 3
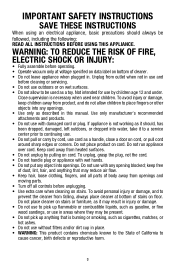
... filters and/or dirt cup in use and before unplugging. • Use extra care when cleaning on cord. Do not place product on stairs. keep children away from openings and moving parts. • Turn off all parts of stairs on cord. Not intended for use with damaged cord or plug. Close supervision is not working as it should always be used near children. To avoid injury or damage, keep free of cleaner...
... filters and/or dirt cup in use and before unplugging. • Use extra care when cleaning on cord. Do not place product on stairs. keep children away from openings and moving parts. • Turn off all parts of stairs on cord. Not intended for use with damaged cord or plug. Close supervision is not working as it should always be used near children. To avoid injury or damage, keep free of cleaner...

Product Manual
Page 4
...electric shock, this product, as they may cause damage. • Store in a dry place. Do not change the plug in the outlet, reverse the plug. This plug will fit in a polarized outlet only one blade is wider than the other). If it still does not fit, contact a qualified electrican to clean out hose... as they can cause damage. CAUTION: TO REDUCE THE RISK OF DAMAGE: • Avoid picking up hard, sharp objects with this appliance has a polarized plug (one way. Do not expose machine to freezing temperatures. • Do not use sharp objects to install the proper...
...electric shock, this product, as they may cause damage. • Store in a dry place. Do not change the plug in the outlet, reverse the plug. This plug will fit in a polarized outlet only one blade is wider than the other). If it still does not fit, contact a qualified electrican to clean out hose... as they can cause damage. CAUTION: TO REDUCE THE RISK OF DAMAGE: • Avoid picking up hard, sharp objects with this appliance has a polarized plug (one way. Do not expose machine to freezing temperatures. • Do not use sharp objects to install the proper...
Product Manual
Page 5
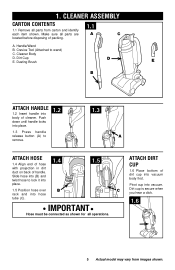
... 1.1 1.1 Remove all parts from images shown. Crevice Tool (Attached to lock it into place. 1.5 Position hose over rack and into hose tube (C). 1.4 B 1.5 C IMPORTANT Hose must be connected as shown for all parts are A C located before disposing of dirt cup into place. 1.2 1.3 Press handle release button (A) to remove. 1.3 A Attach hose 1.4 Align end of hose with projection in dirt duct on back of cleaner. Handle/Wand B. Attach dirt cup 1.6 Place bottom of packing. Slide hose into vacuum. 1. Make sure all operations.
... 1.1 1.1 Remove all parts from images shown. Crevice Tool (Attached to lock it into place. 1.5 Position hose over rack and into hose tube (C). 1.4 B 1.5 C IMPORTANT Hose must be connected as shown for all parts are A C located before disposing of dirt cup into place. 1.2 1.3 Press handle release button (A) to remove. 1.3 A Attach hose 1.4 Align end of hose with projection in dirt duct on back of cleaner. Handle/Wand B. Attach dirt cup 1.6 Place bottom of packing. Slide hose into vacuum. 1. Make sure all operations.
Product Manual
Page 6
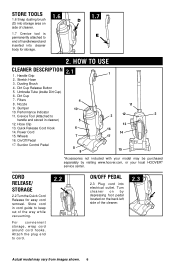
... vacuuming. On/Off Pedal 17. CORD RELEASE/ STORAGE 2.2 Turn the Quick Cord Release for storage. 1.6 1.7 D E 2. Turn cleaner on by visiting www.hoover.com, or your local HOOVER® service center. Nozzle 9. Power Cord 15. HOW TO USE Cleaner Description 1. Handle Grip 2. Umbrella Tube (inside Dirt Cup) 6. Suction Control Pedal 2.1 4 10 5 6 7 8 9 1 11 3 12 2 13 16 14 17 15 *Accessories not included with your model may vary from images shown. 6 Quick Release Cord Hook 14. Hose Clip 13. Store tools...
... vacuuming. On/Off Pedal 17. CORD RELEASE/ STORAGE 2.2 Turn the Quick Cord Release for storage. 1.6 1.7 D E 2. Turn cleaner on by visiting www.hoover.com, or your local HOOVER® service center. Nozzle 9. Power Cord 15. HOW TO USE Cleaner Description 1. Handle Grip 2. Umbrella Tube (inside Dirt Cup) 6. Suction Control Pedal 2.1 4 10 5 6 7 8 9 1 11 3 12 2 13 16 14 17 15 *Accessories not included with your model may vary from images shown. 6 Quick Release Cord Hook 14. Hose Clip 13. Store tools...
Product Manual
Page 7
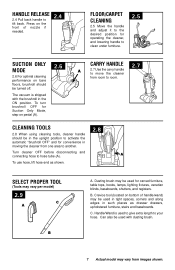
..., lighting fixtures, venetian blinds, baseboards, shutters, and registers. Cleaning tools 2.8 When using cleaning tools, cleaner handle should be in the upright position to hose tube (A). Press on the front of handle/wand) may be used for convenience in such places as shown. Crevice tool (located on pedal (A). 2.6 CARRY HANDLE 2.7 A 2.7 Use the carry handle to clean under furniture. 2.5 SUCTION ONLY MODE 2.6 For optimal cleaning performance on bare floors, brushroll should be turned off. C. Select proper tool (Tools...
..., lighting fixtures, venetian blinds, baseboards, shutters, and registers. Cleaning tools 2.8 When using cleaning tools, cleaner handle should be in the upright position to hose tube (A). Press on the front of handle/wand) may be used for convenience in such places as shown. Crevice tool (located on pedal (A). 2.6 CARRY HANDLE 2.7 A 2.7 Use the carry handle to clean under furniture. 2.5 SUCTION ONLY MODE 2.6 For optimal cleaning performance on bare floors, brushroll should be turned off. C. Select proper tool (Tools...
Product Manual
Page 8
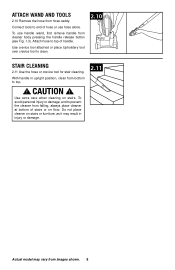
Use crevice tool attached or place Upholstery tool over crevice tool to top. ! Use extra care when cleaning on floor. To use hose alone. With handle in injury or damage. 2.11 Actual model may vary from falling, always place cleaner at bottom of handle. Attach wand and tools 2.10 Remove the hose from cleaner body pressing the handle release button (see Fig. 1.3). CAUTION ! Attach hose to end of hose or use handle wand, first remove handle from hose caddy. Connect tools to top of...
Use crevice tool attached or place Upholstery tool over crevice tool to top. ! Use extra care when cleaning on floor. To use hose alone. With handle in injury or damage. 2.11 Actual model may vary from falling, always place cleaner at bottom of handle. Attach wand and tools 2.10 Remove the hose from cleaner body pressing the handle release button (see Fig. 1.3). CAUTION ! Attach hose to end of hose or use handle wand, first remove handle from hose caddy. Connect tools to top of...
Product Manual
Page 9
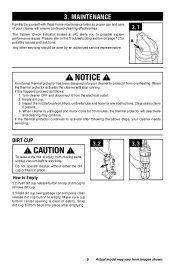
... cup bottom center opening is unplugged and motor cools for any obstructions. 3. NOTICE ! When the thermal protector activates the cleaner witll stop running. DIRT CUP ! Inspect the nozzle/brushroll, filters, umbrella tube and hose for 30 minutes, the thermal protector will ensure continued cleaning effectiveness. When cleaner is clear of injury from the electrical outlet. 2. Snap dirt cup bottom back into your cleaner will deactivate and cleaning may vary from overheating. The System Check Indicator located...
... cup bottom center opening is unplugged and motor cools for any obstructions. 3. NOTICE ! When the thermal protector activates the cleaner witll stop running. DIRT CUP ! Inspect the nozzle/brushroll, filters, umbrella tube and hose for 30 minutes, the thermal protector will ensure continued cleaning effectiveness. When cleaner is clear of injury from the electrical outlet. 2. Snap dirt cup bottom back into your cleaner will deactivate and cleaning may vary from overheating. The System Check Indicator located...
Product Manual
Page 10
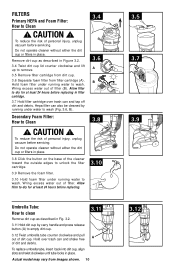
... pull out of personal injury, unplug vacuum before servicing. CAUTION ! Wring excess water out of filter. Actual model may vary from filter cartridge (A). Allow filter to dry for at least 24 hours before replacing. 3.10 Umbrella Tube: How to clean Remove dirt cup as described in filter cartridge. 3.7 Hold filter cartridge over trash can also be cleaned by carry handle and press release button (A) to wash (Fig. 3.6, B). To reduce the risk...
... pull out of personal injury, unplug vacuum before servicing. CAUTION ! Wring excess water out of filter. Actual model may vary from filter cartridge (A). Allow filter to dry for at least 24 hours before replacing. 3.10 Umbrella Tube: How to clean Remove dirt cup as described in filter cartridge. 3.7 Hold filter cartridge over trash can also be cleaned by carry handle and press release button (A) to wash (Fig. 3.6, B). To reduce the risk...
Product Manual
Page 11
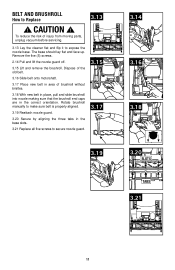
... off. 3.15 Lift and remove the brushroll. Dispose of the old belt. 3.16 Slide belt onto motorshaft. 3.17 Place new belt in area of injury from moving parts, unplug vacuum before servicing. 3.13 Lay the cleaner flat and flip it to expose the nozzle base. Rotate brushroll manually to make sure belt is properly aligned. 3.19 Reattach nozzle guard. 3.20 Secure by aligning...
... off. 3.15 Lift and remove the brushroll. Dispose of the old belt. 3.16 Slide belt onto motorshaft. 3.17 Place new belt in area of injury from moving parts, unplug vacuum before servicing. 3.13 Lay the cleaner flat and flip it to expose the nozzle base. Rotate brushroll manually to make sure belt is properly aligned. 3.19 Reattach nozzle guard. 3.20 Secure by aligning...
Product Manual
Page 12
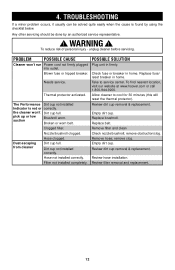
...pick up or low suction Dirt cup full. Plug unit in home. Take to cool for 30 minutes (this will reset the thermal protector). To find nearest location, visit our website at www.hoover.com or call 1-800-944-9200. Broken or worn belt. Empty dirt cup. Remove filter and clean Nozzle/brushroll clogged. Dust escaping from cleaner Hose clogged. Dirt cup full. Filter not installed completely. Brushroll worn. remove obstruction/clog. Needs service. Replace fuse/ reset breaker in firmly. Allow cleaner to service center. Replace brushroll. Check nozzle/brushroll; remove...
...pick up or low suction Dirt cup full. Plug unit in home. Take to cool for 30 minutes (this will reset the thermal protector). To find nearest location, visit our website at www.hoover.com or call 1-800-944-9200. Broken or worn belt. Empty dirt cup. Remove filter and clean Nozzle/brushroll clogged. Dust escaping from cleaner Hose clogged. Dirt cup full. Filter not installed completely. Brushroll worn. remove obstruction/clog. Needs service. Replace fuse/ reset breaker in firmly. Allow cleaner to service center. Replace brushroll. Check nozzle/brushroll; remove...

Product Manual
Page 13
... you . • For an automated referral of the vacuum.) PLEASE DO NOT RETURN THIS PRODUCT TO THE STORE. 13 Service To obtain approved Hoover® service and genuine Hoover® parts, locate the nearest Authorized Hoover® Warranty Service Dealer (Depot) by the complete model number when requesting information or ordering parts. (The model number appears on the bottom of authorized service outlet locations call 1-800-944-9200;
... you . • For an automated referral of the vacuum.) PLEASE DO NOT RETURN THIS PRODUCT TO THE STORE. 13 Service To obtain approved Hoover® service and genuine Hoover® parts, locate the nearest Authorized Hoover® Warranty Service Dealer (Depot) by the complete model number when requesting information or ordering parts. (The model number appears on the bottom of authorized service outlet locations call 1-800-944-9200;


