Manual
Page 1
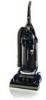
Self-Propelled WindTunnel™ Bagless with Powered Hand Tool by HOOVER ® This product was designed for easy Assembly (See page 3) www.hoover.com
Self-Propelled WindTunnel™ Bagless with Powered Hand Tool by HOOVER ® This product was designed for easy Assembly (See page 3) www.hoover.com
Manual
Page 2
... 4 Cleaning Tools 6-7 Embedded Dirt FINDERTM Feature .5 Upright Cleaner 4-6 Self-Propel Feature 4 Important Safeguards 2 Maintenance Authorized Service 13 Cleaning Filters 8-9 Emptying Cup 7-9 Lubrication 13 Replacing Belts 10-11 Replacing Power Hand Tool Belt .12 Replacing Brush Roll 10-11 Replacing Power Hand Tool Agitator Brush Roll 11-12 Replacing Edge Groomers . . . . .13 Replacing Headlight 9 Thermal Protector 13 Trouble Shooting 14 Clearing Blockages 14 Warranty 15 © 2001 The Hoover Company www.hoover.com 2 Important Safeguards! Do not allow vacuum cleaner to...
... 4 Cleaning Tools 6-7 Embedded Dirt FINDERTM Feature .5 Upright Cleaner 4-6 Self-Propel Feature 4 Important Safeguards 2 Maintenance Authorized Service 13 Cleaning Filters 8-9 Emptying Cup 7-9 Lubrication 13 Replacing Belts 10-11 Replacing Power Hand Tool Belt .12 Replacing Brush Roll 10-11 Replacing Power Hand Tool Agitator Brush Roll 11-12 Replacing Edge Groomers . . . . .13 Replacing Headlight 9 Thermal Protector 13 Trouble Shooting 14 Clearing Blockages 14 Warranty 15 © 2001 The Hoover Company www.hoover.com 2 Important Safeguards! Do not allow vacuum cleaner to...
Manual
Page 3
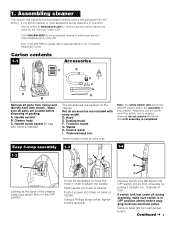
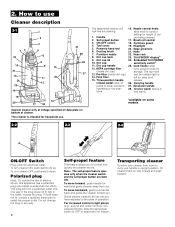
... owner's manual) EI F G H The accessories are packed on front of your cleaner. D. Crevice wand I. B C Remove switch lock (B) above the ON/OFF switch aids in bag with a representative in OFF position (down) before disposing of authorized service outlet locations (U.S. Handle screw packet (in the assembly of handle by pulling it straight out. Powered hand tool *some models include an extra hose Note: The white switch lock above ONOFF switch (C) on the cleaner...
... owner's manual) EI F G H The accessories are packed on front of your cleaner. D. Crevice wand I. B C Remove switch lock (B) above the ON/OFF switch aids in bag with a representative in OFF position (down) before disposing of authorized service outlet locations (U.S. Handle screw packet (in the assembly of handle by pulling it straight out. Powered hand tool *some models include an extra hose Note: The white switch lock above ONOFF switch (C) on the cleaner...
Manual
Page 4
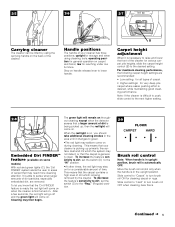
...-OFF switch 18. Edge groomers 6. Final filter left for height of operation. Nozzle control knob: look like the drawing. Powered hand tool 20. Dirt cup latch 9. Hose rack 23. 'Dirt FINDER' display* 24. rear wand. *available on bottom of electric shock, this appliance has a polarized plug (one way. For increased control in tight places (e.g., around hooks for household use. 2-2 2-3 The assembled cleaner will fit in upright position, tilt cleaner...
...-OFF switch 18. Edge groomers 6. Final filter left for height of operation. Nozzle control knob: look like the drawing. Powered hand tool 20. Dirt cup latch 9. Hose rack 23. 'Dirt FINDER' display* 24. rear wand. *available on bottom of electric shock, this appliance has a polarized plug (one way. For increased control in tight places (e.g., around hooks for household use. 2-2 2-3 The assembled cleaner will fit in upright position, tilt cleaner...
Manual
Page 5
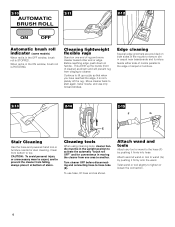
... to turn brush roll ON for reaching under low furniture. Step on some models) With red and green lights (C), the 'Dirt FINDER' system alerts the user to turn brush roll OFF when cleaning bare floors. To increase the feature's sensitivity to dirt, set the switch (D) to lower handle. B Carpet height adjustment When it is on, you know that a larger amount of your cleaner is picking up ; 2-5 2-6 2-7 CARPET HEIGHT BRUSH ROLL ON OFF AUTOMATIC BRUSH ROLL ON...
... to turn brush roll ON for reaching under low furniture. Step on some models) With red and green lights (C), the 'Dirt FINDER' system alerts the user to turn brush roll OFF when cleaning bare floors. To increase the feature's sensitivity to dirt, set the switch (D) to lower handle. B Carpet height adjustment When it is on, you know that a larger amount of your cleaner is picking up ; 2-5 2-6 2-7 CARPET HEIGHT BRUSH ROLL ON OFF AUTOMATIC BRUSH ROLL ON...
Manual
Page 6
... AUTOMATIC BRUSH ROLL ON OFF Automatic brush roll indicator (some models) When red is in moving the cleaner from one end of rug and move cleaner toward other end or edge. Guide either side of nozzle parallel to the edge of carpet or furniture. 2-13 2-14 2-15 F G E Stair Cleaning Use the hose and powered hand tool or furniture nozzle for convenience in the OFF window, brush roll is STOPPED. Cleaning tools When using cleaning tools, cleaner handle must...
... AUTOMATIC BRUSH ROLL ON OFF Automatic brush roll indicator (some models) When red is in moving the cleaner from one end of rug and move cleaner toward other end or edge. Guide either side of nozzle parallel to the edge of carpet or furniture. 2-13 2-14 2-15 F G E Stair Cleaning Use the hose and powered hand tool or furniture nozzle for convenience in the OFF window, brush roll is STOPPED. Cleaning tools When using cleaning tools, cleaner handle must...
Manual
Page 7
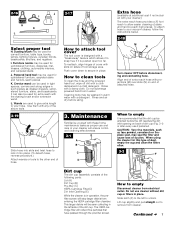
... powered hand tool in place. CAUTION: Very fine materials, such as proper use cleaner without dirt cup or filters in water. The HEPA cartridge filter will stop larger debris from entering the HEPA cartridge filter chamber. J. Powered hand tool may be used for carved furniture, table tops, books, lamps, lighting fixtures, venetian blinds, baseboards, shutters, and registers. Wands are used for this type of dust, empty the cup and clean the filters often. 3-2 F Dirt cup The dirt cup assembly consists of suction. To attach hose...
... powered hand tool in place. CAUTION: Very fine materials, such as proper use cleaner without dirt cup or filters in water. The HEPA cartridge filter will stop larger debris from entering the HEPA cartridge filter chamber. J. Powered hand tool may be used for carved furniture, table tops, books, lamps, lighting fixtures, venetian blinds, baseboards, shutters, and registers. Wands are used for this type of dust, empty the cup and clean the filters often. 3-2 F Dirt cup The dirt cup assembly consists of suction. To attach hose...

Manual
Page 8
... snap free if it away from the pre-filter into cleaner cavity. Push lid down on the lid as described in handle area of lid with a "breakaway" feature which allows it to empty dirt cup" should sufficiently remove dust and fine particles from the HEPA filter, turn . Turning the knob on area indicated (H) to clean filter assembly Remove dirt cup and open dirt cup lid. Allow pre-filter to dry thoroughly. 3-9 How to open dirt cup...
... snap free if it away from the pre-filter into cleaner cavity. Push lid down on the lid as described in handle area of lid with a "breakaway" feature which allows it to empty dirt cup" should sufficiently remove dust and fine particles from the HEPA filter, turn . Turning the knob on area indicated (H) to clean filter assembly Remove dirt cup and open dirt cup lid. Allow pre-filter to dry thoroughly. 3-9 How to open dirt cup...
Manual
Page 9
...-assemble filter assembly, place large knob of HEPA cartridge filter in hole on bottom of dirt cup. Do not operate cleaner without the filter in the channels next to the brush roll (Fig. 3-27). Note: If dirt cup lid does not close all the way. Then, turn knob on pre-filter frame with the two screws. Using a screwdriver, remove the two screws as follows: Disconnect cleaner from electrical outlet. Push new...
...-assemble filter assembly, place large knob of HEPA cartridge filter in hole on bottom of dirt cup. Do not operate cleaner without the filter in the channels next to the brush roll (Fig. 3-27). Note: If dirt cup lid does not close all the way. Then, turn knob on pre-filter frame with the two screws. Using a screwdriver, remove the two screws as follows: Disconnect cleaner from electrical outlet. Push new...
Manual
Page 10
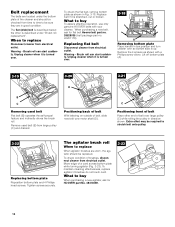
... check condition of belt over . 3-18 A Removing bottom plate Place handle in good condition. What to replace When agitator brushes are in low position and turn cleaner over . Warning - Unplug cleaner when it is stretched, cut or broken. The agitator brush roll When to buy When purchasing a new agitator, ask for flat belt Hoover belt part no. 38528035 (belt package part no. 40201170). the other end of brushes, disconnect cleaner from electrical outlet. To maintain cleaning effectiveness, replace agitator if brushes do...
... check condition of belt over . 3-18 A Removing bottom plate Place handle in good condition. What to replace When agitator brushes are in low position and turn cleaner over . Warning - Unplug cleaner when it is stretched, cut or broken. The agitator brush roll When to buy When purchasing a new agitator, ask for flat belt Hoover belt part no. 38528035 (belt package part no. 40201170). the other end of brushes, disconnect cleaner from electrical outlet. To maintain cleaning effectiveness, replace agitator if brushes do...
Manual
Page 11
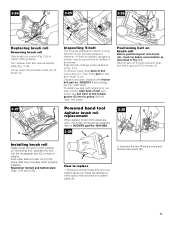
... agitator brush roll brushes are worn, the brush roll should be replaced. Unscrew the two Phillips screws and remove belt guard (B). 11 Press the latches on brush roll Before positioning belt onto brush roll, check for a long time and is designed to replace 1. 3-24 3-25 3-26 F D Replacing brush roll Removing brush roll Slide brush roll control (Fig. 2-9) to pulley. Positioning belt on either side of brush roll (H) into place. Push other side of tool and remove bottom plate (A). 2. To install new belt (with Hoover belt part...
... agitator brush roll brushes are worn, the brush roll should be replaced. Unscrew the two Phillips screws and remove belt guard (B). 11 Press the latches on brush roll Before positioning belt onto brush roll, check for a long time and is designed to replace 1. 3-24 3-25 3-26 F D Replacing brush roll Removing brush roll Slide brush roll control (Fig. 2-9) to pulley. Positioning belt on either side of brush roll (H) into place. Push other side of tool and remove bottom plate (A). 2. To install new belt (with Hoover belt part...
Manual
Page 12
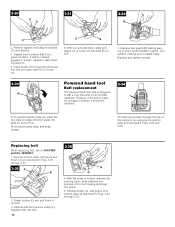
... retainers into place. 5. The belt can be replaced. 3-34 8. Remove belt from turbine pulley (F). Remove agitator including end plates (C) and discard. 4. Grasp turbine (E) and pull firmly to last a long time and is cracked, gouged or broken, replace it rotates freely. Replace and tighten screws. 3-33 A Powered hand tool Belt replacement The powered hand tool belt is designed to remove. 3. Replacing belt When replacing belt, ask for HOOVER part No. 38528037. 1. Insert brush roll through the top of turbine...
... retainers into place. 5. The belt can be replaced. 3-34 8. Remove belt from turbine pulley (F). Remove agitator including end plates (C) and discard. 4. Grasp turbine (E) and pull firmly to last a long time and is cracked, gouged or broken, replace it rotates freely. Replace and tighten screws. 3-33 A Powered hand tool Belt replacement The powered hand tool belt is designed to remove. 3. Replacing belt When replacing belt, ask for HOOVER part No. 38528037. 1. Insert brush roll through the top of turbine...
Manual
Page 13
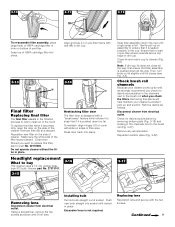
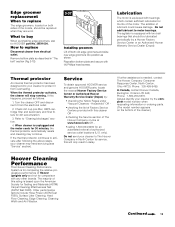
How to replace Disconnect cleaner from overheating. Reposition bottom plate and secure with this happens, proceed as shown. Thermal protector An internal thermal protector has been designed into position as follows: 1. Check dirt cup pre-filter, HEPA cartridge filter and secondary and final filters for HOOVER part No. 39511004. Other performance factors include Hose Power (ASTM Test F558), Surface Litter Cleaning, Hard Floor Cleaning, Edge Cleaning, Cleaning Width and Air Filtration. The agitator is equipped with two...
How to replace Disconnect cleaner from overheating. Reposition bottom plate and secure with this happens, proceed as shown. Thermal protector An internal thermal protector has been designed into position as follows: 1. Check dirt cup pre-filter, HEPA cartridge filter and secondary and final filters for HOOVER part No. 39511004. Other performance factors include Hose Power (ASTM Test F558), Surface Litter Cleaning, Hard Floor Cleaning, Edge Cleaning, Cleaning Width and Air Filtration. The agitator is equipped with two...

Manual
Page 14
... decrease of the dirt cup and prevent the dirt from electrical outlet. 1. Replace belt turbine, brush roll, belt guard and bottom plate. Refer to the following steps to a Hoover Factory Service Center or an Authorized Hoover Warranty Service Dealer (Depot). empty cup and clean filters if needed. 4-1 C Checking under "Cleaner suction low". Look into hose end and remove any screws. If a blockage occurs during powered hand tool use : Turn cleaner OFF and disconnect from turbine channel (D). Look into opening (C) for blockages continuing...
... decrease of the dirt cup and prevent the dirt from electrical outlet. 1. Replace belt turbine, brush roll, belt guard and bottom plate. Refer to the following steps to a Hoover Factory Service Center or an Authorized Hoover Warranty Service Dealer (Depot). empty cup and clean filters if needed. 4-1 C Checking under "Cleaner suction low". Look into hose end and remove any screws. If a blockage occurs during powered hand tool use : Turn cleaner OFF and disconnect from turbine channel (D). Look into opening (C) for blockages continuing...
Manual
Page 15
... following authorized warranty service outlets. While this warranty gives you specific legal rights, you , all labor and parts to state. Military Exchange. Proof of purchase. S. If further assistance is used in a commercial or rental application. In Canada, contact Hoover Canada, Burlington, Ontario L7R 4A8, 1-800-263-6376. 15 This warranty provides, at www.hoover.com This warranty does not cover pick up...
... following authorized warranty service outlets. While this warranty gives you specific legal rights, you , all labor and parts to state. Military Exchange. Proof of purchase. S. If further assistance is used in a commercial or rental application. In Canada, contact Hoover Canada, Burlington, Ontario L7R 4A8, 1-800-263-6376. 15 This warranty provides, at www.hoover.com This warranty does not cover pick up...


