Manual
Page 1
PLEASE DO NOT RETURN THIS PRODUCT TO THE STORE. THIS PRODUCT IS INTENDED FOR HOUSEHOLD USE ONLY. For assistance, please call Customer Service at 1-800-944-9200 Mon-Fri 8am-7pm EST. IF USED COMMERCIALLY WARRANTY IS VOID. ©2010 Techtronic Floor Care Technology Limited. All rights reserved. #56511C68 ID101013-R0 Owner's Manual Operating and Servicing Instructions Español - página E1 hoover.com IMPORTANT: READ CAREFULLY BEFORE ASSEMBLY AND USE. Questions or concerns?
PLEASE DO NOT RETURN THIS PRODUCT TO THE STORE. THIS PRODUCT IS INTENDED FOR HOUSEHOLD USE ONLY. For assistance, please call Customer Service at 1-800-944-9200 Mon-Fri 8am-7pm EST. IF USED COMMERCIALLY WARRANTY IS VOID. ©2010 Techtronic Floor Care Technology Limited. All rights reserved. #56511C68 ID101013-R0 Owner's Manual Operating and Servicing Instructions Español - página E1 hoover.com IMPORTANT: READ CAREFULLY BEFORE ASSEMBLY AND USE. Questions or concerns?
Manual
Page 2
... Use...6 Cleaner Descriptions 6 Embedded Dirt FINDER™ Feature 7 Carpet Height Adjustment 8 Cleaning Tools...9 Maintenance...10 Filter Bag...10 Filters...11 Headlight...12 Belts...13 Brushroll...14 Powered Hand Tool 15 Edge Groomer...15 Clearing Blockages 16 Lubrication...16 Troubleshooting...17 Service...18 If you for choosing a HOOVER® product. only) or to register by phone. Please enter the complete model and Manufacturing Code in China Manufacturing code (Label located on lower handle of Hoover...
... Use...6 Cleaner Descriptions 6 Embedded Dirt FINDER™ Feature 7 Carpet Height Adjustment 8 Cleaning Tools...9 Maintenance...10 Filter Bag...10 Filters...11 Headlight...12 Belts...13 Brushroll...14 Powered Hand Tool 15 Edge Groomer...15 Clearing Blockages 16 Lubrication...16 Troubleshooting...17 Service...18 If you for choosing a HOOVER® product. only) or to register by phone. Please enter the complete model and Manufacturing Code in China Manufacturing code (Label located on lower handle of Hoover...

Manual
Page 3
... or corners. Do not place product on stairs. Keep cord away from openings and moving parts. keep children away from product, and do not allow to prevent the cleaner from outlet when not in use and before cleaning or servicing. • Do not use without dust bag and/or Filters in the upright position. • Turn off all parts of California to continuing use in areas where they may...
... or corners. Do not place product on stairs. Keep cord away from openings and moving parts. keep children away from product, and do not allow to prevent the cleaner from outlet when not in use and before cleaning or servicing. • Do not use without dust bag and/or Filters in the upright position. • Turn off all parts of California to continuing use in areas where they may...
Manual
Page 4
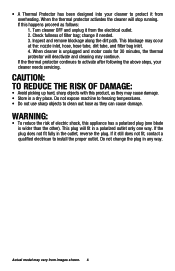
... and motor cools for 30 minutes, the thermal protector will stop running. Do not change if needed. 3. If this product, as follows: 1. If it from images shown. 4 Inspect and remove blockage along the dirt path. change the plug in a dry place. Actual model may occur at the: nozzle inlet, hose, hose tube, dirt tube, and filter bag inlet. 4. This plug will fit in the outlet, reverse the plug. • A Thermal Protector has been designed into your cleaner needs servicing. Turn cleaner...
... and motor cools for 30 minutes, the thermal protector will stop running. Do not change if needed. 3. If this product, as follows: 1. If it from images shown. 4 Inspect and remove blockage along the dirt path. change the plug in a dry place. Actual model may occur at the: nozzle inlet, hose, hose tube, dirt tube, and filter bag inlet. 4. This plug will fit in the outlet, reverse the plug. • A Thermal Protector has been designed into your cleaner needs servicing. Turn cleaner...
Manual
Page 5
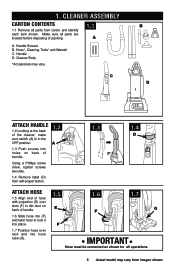
1. Hose*, Cleaning Tools* and Wands* C. Handle D. Cleaner ASSEMBLY Carton contents 1.1 Remove all parts from images shown. Cleaner Body *Accessories may vary from carton and identify each item shown. C B D Attach handle 1.2 Looking at the back of the cleaner, make sure switch (A) is in the OFF position. 1.3 Push screws into holes on back of handle. 1.2 A Using a Phillips screw driver, tighten screws securely. 1.4 Remove label (D) from self-propel button. 1.3 1.4 D Attach hose 1.5 Align end of hose with projection (E) over...
1. Hose*, Cleaning Tools* and Wands* C. Handle D. Cleaner ASSEMBLY Carton contents 1.1 Remove all parts from images shown. Cleaner Body *Accessories may vary from carton and identify each item shown. C B D Attach handle 1.2 Looking at the back of the cleaner, make sure switch (A) is in the OFF position. 1.3 Push screws into holes on back of handle. 1.2 A Using a Phillips screw driver, tighten screws securely. 1.4 Remove label (D) from self-propel button. 1.3 1.4 D Attach hose 1.5 Align end of hose with projection (E) over...
Manual
Page 6
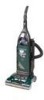
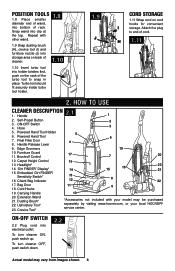
... USE Cleaner Description 2.1 1. Powered Hand Tool Holder 5 6. Handle Release Lever 9. Brushroll Control 7 20 12. Carpet Height Control 16 13. Upholstery Tool* 23. ON-OFF Switch 2.2 Plug cord into clip at the top. To turn cleaner OFF, push switch down. 2.2 Actual model may be purchased separately by visiting www.hoover.com, or your model may vary from images shown. 6 To turn cleaner ON, push switch up. Bag Door 11 9 18. Cord Hooks 19. Dusting Brush* 22. Turbo tool...
... USE Cleaner Description 2.1 1. Powered Hand Tool Holder 5 6. Handle Release Lever 9. Brushroll Control 7 20 12. Carpet Height Control 16 13. Upholstery Tool* 23. ON-OFF Switch 2.2 Plug cord into clip at the top. To turn cleaner OFF, push switch down. 2.2 Actual model may be purchased separately by visiting www.hoover.com, or your model may vary from images shown. 6 To turn cleaner ON, push switch up. Bag Door 11 9 18. Cord Hooks 19. Dusting Brush* 22. Turbo tool...
Manual
Page 7
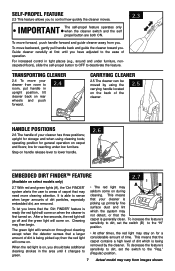
... on during need more cleaning attention. low for storage and when using the carrying handle located on . It is first turned on the back of the cleaner. 2.5 Handle positions 2.6 The handle of dirt is embedded dirt, are both ON. surface dust and lint which is generally clean. To move forward, push handle forward and guide cleaner away from you . upright for reaching under furniture, noncarpeted floors), slide the self-propel button to...
... on during need more cleaning attention. low for storage and when using the carrying handle located on . It is first turned on the back of the cleaner. 2.5 Handle positions 2.6 The handle of dirt is embedded dirt, are both ON. surface dust and lint which is generally clean. To move forward, push handle forward and guide cleaner away from you . upright for reaching under furniture, noncarpeted floors), slide the self-propel button to...
Manual
Page 8
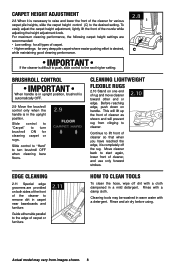
... necessary to turn brushroll ON for all types of rug and move cleaner toward other end or edge. Cleaning tools may vary from clinging to cleaner. 2.10 Continue to lift front of carpet or furniture. 2.11 How to the desired setting. Rinse and air dry before using. Actual model may be washed in the upright position. Carpet height adjustment 2.8 When it is completely off dirt with...
... necessary to turn brushroll ON for all types of rug and move cleaner toward other end or edge. Cleaning tools may vary from clinging to cleaner. 2.10 Continue to lift front of carpet or furniture. 2.11 How to the desired setting. Rinse and air dry before using. Actual model may be washed in the upright position. Carpet height adjustment 2.8 When it is completely off dirt with...
Manual
Page 9
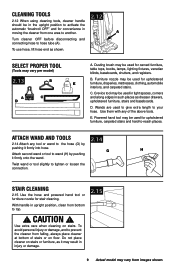
... above tools. A Turn cleaner OFF before disconnecting and connecting hose to top. 2.15 ! Dusting brush may be used to give extra length to tighten or loosen the connection. Use them with any tool or wand to -reach places. Powered hand tool may be used for stair cleaning. With handle in upright position, clean from images shown. Crevice tool may vary from bottom to hose tube (A). Stair Cleaning 2.15 Use the hose and powered hand tool or furniture nozzle...
... above tools. A Turn cleaner OFF before disconnecting and connecting hose to top. 2.15 ! Dusting brush may be used to give extra length to tighten or loosen the connection. Use them with any tool or wand to -reach places. Powered hand tool may be used for stair cleaning. With handle in upright position, clean from images shown. Crevice tool may vary from bottom to hose tube (A). Stair Cleaning 2.15 Use the hose and powered hand tool or furniture nozzle...
Manual
Page 10
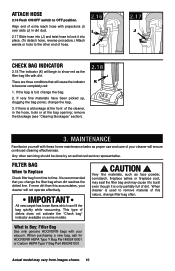
....) Attach wands or tools to the other servicing should be done by an authorized service representative. It is used to Replace Check filter bag from images shown. 10 When cleaner is recommended that will begin to Buy: Filter Bag Use only genuine HOOVER® bags with your vacuum. There are three conditions that you change filter bag often. Filter bag When to remove material of dirt. CAUTION ! When purchasing a new bag, ask for HOOVER® HEPA Type Y Bag Part #902419001 or Carbon HEPA Type Y Bag Part...
....) Attach wands or tools to the other servicing should be done by an authorized service representative. It is used to Replace Check filter bag from images shown. 10 When cleaner is recommended that will begin to Buy: Filter Bag Use only genuine HOOVER® bags with your vacuum. There are three conditions that you change filter bag often. Filter bag When to remove material of dirt. CAUTION ! When purchasing a new bag, ask for HOOVER® HEPA Type Y Bag Part #902419001 or Carbon HEPA Type Y Bag Part...
Manual
Page 11
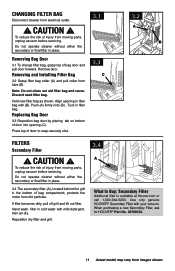
... vacuum before servicing. Use only genuine HOOVER® Secondary Filter with (B). Remove door. If filter becomes dirty, pull off grill and lift out filter. CAUTION ! To reduce the risk of bag compartment, protects the motor from electrical outlet. ! Hand wash filter in filter bag. Note: Do not clean out old filter bag and reuse. When purchasing a new Secondary Filter, ask for Hoover® Part No. 38765023. 11 Actual model may vary from tube (B). Changing filter bag Disconnect cleaner from dirt...
... vacuum before servicing. Use only genuine HOOVER® Secondary Filter with (B). Remove door. If filter becomes dirty, pull off grill and lift out filter. CAUTION ! To reduce the risk of bag compartment, protects the motor from electrical outlet. ! Hand wash filter in filter bag. Note: Do not clean out old filter bag and reuse. When purchasing a new Secondary Filter, ask for Hoover® Part No. 38765023. 11 Actual model may vary from tube (B). Changing filter bag Disconnect cleaner from dirt...
Manual
Page 12
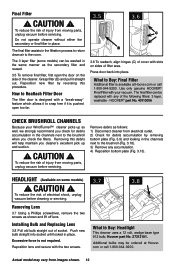
... your WindTunnel™ cleaner picks up and suction. ! Final Filter ! CAUTION ! Excessive force is pushed open the door on some models) can be washed in the filtration process to return clean air to Buy: Headlight This cleaner uses a 12 volt, wedge base type 912 bulb, Hoover part No. 27313101. The final filter assists in the same manner as shown and lift off lens. Reposition new filter by removing bottom plate (Fig...
... your WindTunnel™ cleaner picks up and suction. ! Final Filter ! CAUTION ! Excessive force is pushed open the door on some models) can be washed in the filtration process to return clean air to Buy: Headlight This cleaner uses a 12 volt, wedge base type 912 bulb, Hoover part No. 27313101. The final filter assists in the same manner as shown and lift off lens. Reposition new filter by removing bottom plate (Fig...
Manual
Page 13
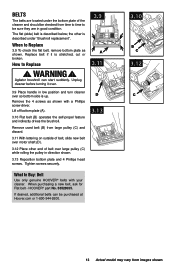
... to Replace ! Agitator brushroll can be sure they are located under "Brushroll replacement". Tighten screws securely. HOOVER® part No. 38528035. How to Buy: Belt Use only genuine HOOVER® belts with a Phillips screw driver. Lift off bottom plate (A). 3.10 Flat belt (B) operates the self-propel feature and indirectly drives the brushroll. Remove used belt (B) from time to time to Replace 3.9 To check the flat belt, remove bottom plate as shown with your cleaner. When purchasing a new belt, ask...
... to Replace ! Agitator brushroll can be sure they are located under "Brushroll replacement". Tighten screws securely. HOOVER® part No. 38528035. How to Buy: Belt Use only genuine HOOVER® belts with a Phillips screw driver. Lift off bottom plate (A). 3.10 Flat belt (B) operates the self-propel feature and indirectly drives the brushroll. Remove used belt (B) from time to time to Replace 3.9 To check the flat belt, remove bottom plate as shown with your cleaner. When purchasing a new belt, ask...
Manual
Page 14
... Remove 3.14 To remove V-belt, slide back of belt toward groove (E) next to Buy: Brushroll When purchasing a new brushroll, ask for a long time and is not normally replaced. Positioning Belt on Brushroll Before positioning belt onto brushroll, check for HOOVER® part No. 38528034. If desired, additional belts can start suddenly. Unplug cleaner before turning it over pulley and pull front of belt over and remove bottom plate (Fig. 3.9). Belt...
... Remove 3.14 To remove V-belt, slide back of belt toward groove (E) next to Buy: Brushroll When purchasing a new brushroll, ask for a long time and is not normally replaced. Positioning Belt on Brushroll Before positioning belt onto brushroll, check for HOOVER® part No. 38528034. If desired, additional belts can start suddenly. Unplug cleaner before turning it over pulley and pull front of belt over and remove bottom plate (Fig. 3.9). Belt...
Manual
Page 15
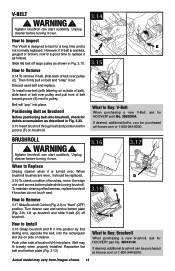
... (Fig. 3.13). Agitator brushroll can be used for HOOVER® part No. 39411018. Rotate the latches (A) on both old edge groomers and slide new edge groomers into locked position. 3.21 3.20 B Edge groomer ! If desired, additional Edge Groomer can start suddenly. Rotate latches back into position as described in Fig. 3.9. Powered Hand Tool ! CAUTION ! Not to Replace Remove bottom plate as shown.
... (Fig. 3.13). Agitator brushroll can be used for HOOVER® part No. 39411018. Rotate the latches (A) on both old edge groomers and slide new edge groomers into locked position. 3.21 3.20 B Edge groomer ! If desired, additional Edge Groomer can start suddenly. Rotate latches back into position as described in Fig. 3.9. Powered Hand Tool ! CAUTION ! Not to Replace Remove bottom plate as shown.
Manual
Page 16
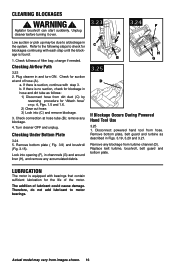
... the motor. Turn cleaner OFF and unplug. Look into (C) and remove blockage. 3. Remove any blockage. 4. Plug cleaner in Figs. 3.19, 3.20 and 3.21. If there is found: 1. Remove bottom plate ( Fig. 3.9) and brushroll (Fig. 3.15). C H B G 3.25 D If Blockage Occurs During Powered Hand Tool Use 3.25 1. Lubrication The motor is no suction, check for suction at hose tube (B); Checking Airflow Path 3.23 2. Disconnect powered hand tool from images shown. 16 remove any blockage from dirt duct...
... the motor. Turn cleaner OFF and unplug. Look into (C) and remove blockage. 3. Remove any blockage. 4. Plug cleaner in Figs. 3.19, 3.20 and 3.21. If there is found: 1. Remove bottom plate ( Fig. 3.9) and brushroll (Fig. 3.15). C H B G 3.25 D If Blockage Occurs During Powered Hand Tool Use 3.25 1. Lubrication The motor is no suction, check for suction at hose tube (B); Checking Airflow Path 3.23 2. Disconnect powered hand tool from images shown. 16 remove any blockage from dirt duct...
Manual
Page 17
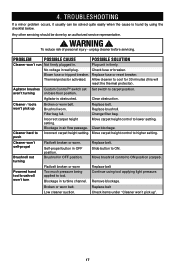
... to lower setting. Move carpet height control to carpet position. Replace belt Low cleaner suction. Agitator brushes Custom Control™ switch set Set switch to higher setting. Powered hand tool brushroll won 't pick up ". 17 Blockage in wall plug. Remove blockage. Replace fuse or reset breaker. No voltage in turbine channel. Agitator is found by an authorized service representative. ! Clear obstruction. Slide button to tool. Change filter bag. PROBLEM POSSIBLE CAUSE Cleaner won 't self-propel Brushroll not turning Flat belt broken or...
... to lower setting. Move carpet height control to carpet position. Replace belt Low cleaner suction. Agitator brushes Custom Control™ switch set Set switch to higher setting. Powered hand tool brushroll won 't pick up ". 17 Blockage in wall plug. Remove blockage. Replace fuse or reset breaker. No voltage in turbine channel. Agitator is found by an authorized service representative. ! Clear obstruction. Slide button to tool. Change filter bag. PROBLEM POSSIBLE CAUSE Cleaner won 't self-propel Brushroll not turning Flat belt broken or...
Manual
Page 18
... 8am-7pm EST. Follow the service center link to Hoover®, Inc., Company in delay. Customers) or hoover.ca (Canadian customers). Service To obtain approved Hoover® service and genuine Hoover® parts, locate the nearest Authorized Hoover® Warranty Service Dealer (Depot) by the complete model number when requesting information or ordering parts. (Label located on lower handle of authorized service outlet locations call 1-800-944-9200; This...
... 8am-7pm EST. Follow the service center link to Hoover®, Inc., Company in delay. Customers) or hoover.ca (Canadian customers). Service To obtain approved Hoover® service and genuine Hoover® parts, locate the nearest Authorized Hoover® Warranty Service Dealer (Depot) by the complete model number when requesting information or ordering parts. (Label located on lower handle of authorized service outlet locations call 1-800-944-9200; This...


