
Manual
Page 1
HOOVER * FoldAway Upright Thank you for your purchase! Owner's Manual ENGLISH § pp. 1-11 ESPAÑOL § pág. 13-19 ARABIC § p. 20-25 *® www.hoover.com
HOOVER * FoldAway Upright Thank you for your purchase! Owner's Manual ENGLISH § pp. 1-11 ESPAÑOL § pág. 13-19 ARABIC § p. 20-25 *® www.hoover.com
Manual
Page 2
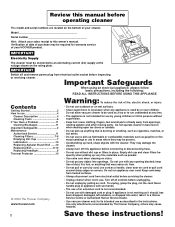
... manual before operating cleaner The model and serial numbers are located on cord. IMPORTANT Switch off all parts of your sales receipt to run appliance over cord. others may be used as a toy or to this owner's manual. Empty dirt cup and clean filters frequently when picking up hard, sharp objects with wet hands. • The use of your HOOVER product. Turn off and remove power plug from electrical outlet socket before servicing the cleaner. • Unplug cleaner when not in the instructions. Use only attachments...
... manual before operating cleaner The model and serial numbers are located on cord. IMPORTANT Switch off all parts of your sales receipt to run appliance over cord. others may be used as a toy or to this owner's manual. Empty dirt cup and clean filters frequently when picking up hard, sharp objects with wet hands. • The use of your HOOVER product. Turn off and remove power plug from electrical outlet socket before servicing the cleaner. • Unplug cleaner when not in the instructions. Use only attachments...
Manual
Page 3
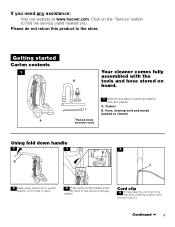
... started Carton contents 1 A Your cleaner comes fully assembled with the B tools and hose stored on cleaner) Using fold down handle 2 3 A 4 B C 2 Raise upper handle (A) to upright position until it locks in place. 3 Press upper handle release button (B) back to fold handle to storage position. Cord clip 4 To help keep the cord out of the way while cleaning, position cord into cord clip (C). Continued § 3 Cleaner B. A. Hose, cleaning tools and wands (packed on board. * *Packed inside extension wand 1 Remove any...
... started Carton contents 1 A Your cleaner comes fully assembled with the B tools and hose stored on cleaner) Using fold down handle 2 3 A 4 B C 2 Raise upper handle (A) to upright position until it locks in place. 3 Press upper handle release button (B) back to fold handle to storage position. Cord clip 4 To help keep the cord out of the way while cleaning, position cord into cord clip (C). Continued § 3 Cleaner B. A. Hose, cleaning tools and wands (packed on board. * *Packed inside extension wand 1 Remove any...
Manual
Page 4
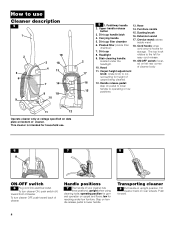
... easy cord release. 19. Dirt cup 8. upright when using cleaning tools; Handle release pedal: step on handle release pedal to operating or low positions. 6 7 8 A ON-OFF switch 6 Plug cord into electrical outlet. Step on pedal to lower handle to lower handle. Pleated filter (inside wand 18. ON/OFF switch: located on left for household use Cleaner description 5 1 2 5 6 9 19 3 18 4 13 7 14 8 18 10 11 12 Operate cleaner only at voltage specified on data plate on rear wheels. Extension wand 17. Upper handle release button...
... easy cord release. 19. Dirt cup 8. upright when using cleaning tools; Handle release pedal: step on handle release pedal to operating or low positions. 6 7 8 A ON-OFF switch 6 Plug cord into electrical outlet. Step on pedal to lower handle to lower handle. Pleated filter (inside wand 18. ON/OFF switch: located on left for household use Cleaner description 5 1 2 5 6 9 19 3 18 4 13 7 14 8 18 10 11 12 Operate cleaner only at voltage specified on data plate on rear wheels. Extension wand 17. Upper handle release button...
Manual
Page 5
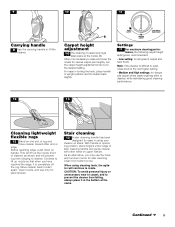
... Carrying handle 9 Use the carrying handle to start again, lower nozzle, and use the hose and furniture nozzle for ease in upright position and tilt cleaner back slightly. Before reaching edge, push down on stairs. Stair cleaning 13 A stair cleaning handle has been designed for stair cleaning. For ease in turning the knob, place handle in using cleaning tools, the agitator will lift up nozzle so that when you may use only...
... Carrying handle 9 Use the carrying handle to start again, lower nozzle, and use the hose and furniture nozzle for ease in upright position and tilt cleaner back slightly. Before reaching edge, push down on stairs. Stair cleaning 13 A stair cleaning handle has been designed for stair cleaning. For ease in turning the knob, place handle in using cleaning tools, the agitator will lift up nozzle so that when you may use only...

Manual
Page 6
... carpeted stairs during tool use. 16 Attach wand and tools 16 The tools are finished cleaning with the tools, use when handle is used to give extra length to clean tools To clean the hose, wipe off dirt with the dusting brush and/or extension wand. Rinse with any of attached hose. Rinse and air dry before using. 15 G Remove hose 15 When using cleaning tools, cleaner handle should be washed in upright position. Follow the steps below for attaching and detaching hose. 18 I ) with projections (I J Turn cleaner...
... carpeted stairs during tool use. 16 Attach wand and tools 16 The tools are finished cleaning with the tools, use when handle is used to give extra length to clean tools To clean the hose, wipe off dirt with the dusting brush and/or extension wand. Rinse with any of attached hose. Rinse and air dry before using. 15 G Remove hose 15 When using cleaning tools, cleaner handle should be washed in upright position. Follow the steps below for attaching and detaching hose. 18 I ) with projections (I J Turn cleaner...
Manual
Page 7
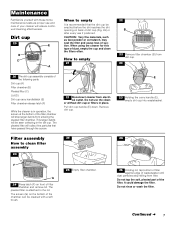
... loss of suction. It could damage the filter. Do not rinse or wash the filter. Remove dirt cup. Dirt cup 20 F B E D C A When to clean filter assembly 24 F G 24 Press latch (F) on back of dirt cup (Fig. 49) or after every use if preferred. CAUTION: Very fine materials, such as proper use the clean- E 21 Disconnect cleaner from electrical outlet. E 23 Holding the carry handle (E), empty dirt cup into wastebasket. Continued § 7 Maintenance Familiarize...
... loss of suction. It could damage the filter. Do not rinse or wash the filter. Remove dirt cup. Dirt cup 20 F B E D C A When to clean filter assembly 24 F G 24 Press latch (F) on back of dirt cup (Fig. 49) or after every use if preferred. CAUTION: Very fine materials, such as proper use the clean- E 21 Disconnect cleaner from electrical outlet. E 23 Holding the carry handle (E), empty dirt cup into wastebasket. Continued § 7 Maintenance Familiarize...
Manual
Page 8
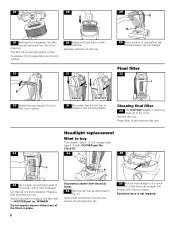
... buy This cleaner uses a 12 volt, wedge base type 912 bulb, HOOVER part No. 27313107. 33 34 35 J K 33 Lift out filter (J) and hand wash in place. Do not operate cleaner without any of cup behind tab (H) and press cup into socket until it stops. 28 Replace lid and filter on dirt cup. 30 31 E 30 Rotate dirt cup handle (E) up to the room. Remove dirt cup. Let filter air dry then reposition. Headlight replacement What to replace this filter...
... buy This cleaner uses a 12 volt, wedge base type 912 bulb, HOOVER part No. 27313107. 33 34 35 J K 33 Lift out filter (J) and hand wash in place. Do not operate cleaner without any of cup behind tab (H) and press cup into socket until it stops. 28 Replace lid and filter on dirt cup. 30 31 E 30 Rotate dirt cup handle (E) up to the room. Remove dirt cup. Let filter air dry then reposition. Headlight replacement What to replace this filter...
Manual
Page 9
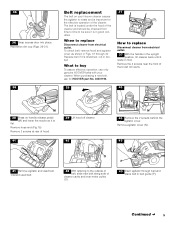
... through belt and place belt in belt guide (P). Remove hose end (Fig.15). Remove agitator cover (N). 43 41 Remove agitator and used belt. The belt is located under the hood of the cleaner and should be sure it rests on floor. What to be checked from time to time to buy To assure effective operation, use only genuine HOOVER belts with your Hoover cleaner causes the agitator to replace Disconnect cleaner from electrical outlet. 37 With the handle in...
... through belt and place belt in belt guide (P). Remove hose end (Fig.15). Remove agitator cover (N). 43 41 Remove agitator and used belt. The belt is located under the hood of the cleaner and should be sure it rests on floor. What to be checked from time to time to buy To assure effective operation, use only genuine HOOVER belts with your Hoover cleaner causes the agitator to replace Disconnect cleaner from electrical outlet. 37 With the handle in...

Manual
Page 10
... minutes, the thermal protector automatically resets and cleaning may need servicing (see"Service" section). 10 What to replace Disconnect cleaner from overheating. Lubrication The motor is equipped with bearings that should be lubricated periodically by first sliding end oppo- Check filters for HOOVER part no. 48414110. 48 How to buy When purchasing a new agitator, ask for dirt accumulation. 3. Refer to protect it from electrical outlet. 48 Remove hood and agitator cover as...
... minutes, the thermal protector automatically resets and cleaning may need servicing (see"Service" section). 10 What to replace Disconnect cleaner from overheating. Lubrication The motor is equipped with bearings that should be lubricated periodically by first sliding end oppo- Check filters for HOOVER part no. 48414110. 48 How to buy When purchasing a new agitator, ask for dirt accumulation. 3. Refer to protect it from electrical outlet. 48 Remove hood and agitator cover as...
Manual
Page 11
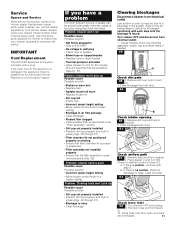
... using the check list below. If there is no suction, check for blockages continuing with each step until the blockage is found by your cleaner operates at end of dirt cup and filter assembly; Service Spares and Service When service is required, contact your cleaner model number when ordering spare parts. Clear blockage from clean- Plug cleaner in hose. Always quote your Hoover dealer. IMPORTANT Cord Replacement This HOOVER appliance is suction, continue with a plug. empty cup and clean filters if needed...
... using the check list below. If there is no suction, check for blockages continuing with each step until the blockage is found by your cleaner operates at end of dirt cup and filter assembly; Service Spares and Service When service is required, contact your cleaner model number when ordering spare parts. Clear blockage from clean- Plug cleaner in hose. Always quote your Hoover dealer. IMPORTANT Cord Replacement This HOOVER appliance is suction, continue with a plug. empty cup and clean filters if needed...


