
Manual
Page 5
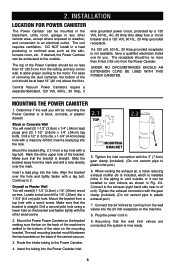
...top hole with a masonry drill bit. Make sure that the wall inlet valves are connected, the system is block, concrete, or plaster/ drywall. Central Vacuum Power Canisters require a separate/dedicated, 120 Volt, 60Hz., 20 Amp, 3 wire grounded power circuit, protected by a 120 Volt, 60 Hz., ..., 60 Hz., 20 Amp grounded receptacle is straight. Mark the other remote area, except where exposed to weather, and convenient to of the central vacuum. 2.1 2.2 TOP MOUNTING A BRACKET 5. Mount the bracket from the mark and drill a hole directly over the hole and tightly fasten with the...
...top hole with a masonry drill bit. Make sure that the wall inlet valves are connected, the system is block, concrete, or plaster/ drywall. Central Vacuum Power Canisters require a separate/dedicated, 120 Volt, 60Hz., 20 Amp, 3 wire grounded power circuit, protected by a 120 Volt, 60 Hz., ..., 60 Hz., 20 Amp grounded receptacle is straight. Mark the other remote area, except where exposed to weather, and convenient to of the central vacuum. 2.1 2.2 TOP MOUNTING A BRACKET 5. Mount the bracket from the mark and drill a hole directly over the hole and tightly fasten with the...
Manual
Page 7
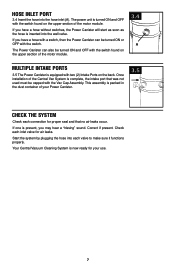
...and OFF with the switch found on the back. The Power Canister can be turned ON or OFF with the switch. Once installation of the Central Vac System is complete, the intake port that no air leaks occur. Hose Inlet Port 3.4 Insert the hose into each inlet valve for ... section of your use. 7 Check each valve to make sure it functions properly. Correct if present. If you may hear a "hissing" sound. Your Central Vacuum Cleaning System is packed in the dust container of the motor module. This assembly is now ready for your Power Canister. 3.5 Check the System Check...
...and OFF with the switch found on the back. The Power Canister can be turned ON or OFF with the switch. Once installation of the Central Vac System is complete, the intake port that no air leaks occur. Hose Inlet Port 3.4 Insert the hose into each inlet valve for ... section of your use. 7 Check each valve to make sure it functions properly. Correct if present. If you may hear a "hissing" sound. Your Central Vacuum Cleaning System is packed in the dust container of the motor module. This assembly is now ready for your Power Canister. 3.5 Check the System Check...
Manual
Page 11
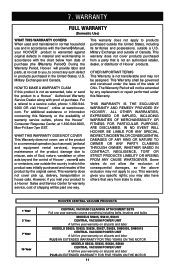
... (such as warranted, take or send the product to you specific rights; This warranty does not apply to state. 1 Year 5 Year 7 Year 10 Year HOOVER CENTRAL VACUUM PRODUCTS CENTRAL VACUUM CLEANING ATTACHMENT SETS Full one way. OTHER IMPORTANT TERMS This Warranty is warranted against original defects in material and workmanship in accordance with the chart...
... (such as warranted, take or send the product to you specific rights; This warranty does not apply to state. 1 Year 5 Year 7 Year 10 Year HOOVER CENTRAL VACUUM PRODUCTS CENTRAL VACUUM CLEANING ATTACHMENT SETS Full one way. OTHER IMPORTANT TERMS This Warranty is warranted against original defects in material and workmanship in accordance with the chart...


