
Manual
Page 1
For assistance, please call Customer Service at 1-800-944-9200 Mon-Fri 8am-7pm EST before returning this product to the store. THIS PRODUCT IS INTENDED FOR HOUSEHOLD USE ONLY. Questions or concerns? All rights reserved. #961109001 ID100474-R0 IF USED COMMERCIALLY WARRANTY IS VOID. ©2010 Techtronic Floor Care Technology Limited. página E1 www.hoover.com IMPORTANT: READ CAREFULLY BEFORE ASSEMBLY AND USE. Owner's Manual Operating and Servicing Instructions Español -
For assistance, please call Customer Service at 1-800-944-9200 Mon-Fri 8am-7pm EST before returning this product to the store. THIS PRODUCT IS INTENDED FOR HOUSEHOLD USE ONLY. Questions or concerns? All rights reserved. #961109001 ID100474-R0 IF USED COMMERCIALLY WARRANTY IS VOID. ©2010 Techtronic Floor Care Technology Limited. página E1 www.hoover.com IMPORTANT: READ CAREFULLY BEFORE ASSEMBLY AND USE. Owner's Manual Operating and Servicing Instructions Español -
Manual
Page 2
... product online at Hoover.com or call 1-800-944-9200 to this product to individual brance circuit. Model MFG. from ceiling. Please do not use ...6 Grounding Instructions 6 Wall Inlet Valve 6 Hose Inlet Port 7 Multiple Intake Ports 7 Check the Sytem 7 Maintenance...8 Filter...8 Clearing Blockages 8 Lubrication...9 Thermal Protector 9 Troubleshooting 9 Service...10 Warranty...11 If you for warranty service of electric shock do not return this owner's manual. Be sure to register your HOOVER® product...
... product online at Hoover.com or call 1-800-944-9200 to this product to individual brance circuit. Model MFG. from ceiling. Please do not use ...6 Grounding Instructions 6 Wall Inlet Valve 6 Hose Inlet Port 7 Multiple Intake Ports 7 Check the Sytem 7 Maintenance...8 Filter...8 Clearing Blockages 8 Lubrication...9 Thermal Protector 9 Troubleshooting 9 Service...10 Warranty...11 If you for warranty service of electric shock do not return this owner's manual. Be sure to register your HOOVER® product...
Manual
Page 3
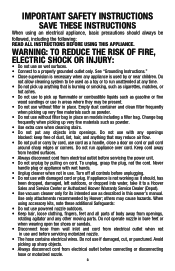
... openings blocked: keep free of body away from electrical outlet before unplugging. • Do not use with damaged cord or plug. Do not operate nozzle in bare feet or when wearing open toe shoes or sandals. • Disconnect hose from wall inlet and cord from electrical outlet before servicing motorized nozzle. • The hose contains electrical wires. To unplug, grasp the plug, not the cord. Never handle plug or appliance with wet hands. • Unplug cleaner...
... openings blocked: keep free of body away from electrical outlet before unplugging. • Do not use with damaged cord or plug. Do not operate nozzle in bare feet or when wearing open toe shoes or sandals. • Disconnect hose from wall inlet and cord from electrical outlet before servicing motorized nozzle. • The hose contains electrical wires. To unplug, grasp the plug, not the cord. Never handle plug or appliance with wet hands. • Unplug cleaner...
Manual
Page 4
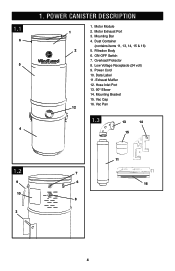
Mounting Bar 4. Overload Protector 8. Mounting Bracket 15. 1.1 6 5 4 1. POWER CANISTER DESCRIPTION 1 1 2 12 1. Filtration Body 6. Motor Exhaust Port 3. Hose Inlet Port 13. 90° Elbow 14. Motor Module 2. Exhaust Muffler 12. Power Cord 10. Vac Pan 1.3 13 14 15 1.2 9 10 3 11 7 6 16 8 4 Dust Container (contains items 11, 13, 14, 15 & 16) 5. ON-OFF Switch 7. Low Voltage Receptacle (24 volt) 9. Data Label 11. Vac Cap 16.
Mounting Bar 4. Overload Protector 8. Mounting Bracket 15. 1.1 6 5 4 1. POWER CANISTER DESCRIPTION 1 1 2 12 1. Filtration Body 6. Motor Exhaust Port 3. Hose Inlet Port 13. 90° Elbow 14. Motor Module 2. Exhaust Muffler 12. Power Cord 10. Vac Pan 1.3 13 14 15 1.2 9 10 3 11 7 6 16 8 4 Dust Container (contains items 11, 13, 14, 15 & 16) 5. ON-OFF Switch 7. Low Voltage Receptacle (24 volt) 9. Data Label 11. Vac Cap 16.
Manual
Page 5
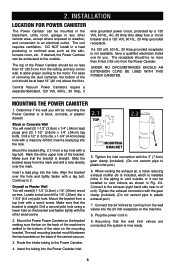
... bracket is now ready. 3. 2. For ease of removing the dust container, the bottom of the central vacuum. 2.1 2.2 TOP MOUNTING A BRACKET 5. Block or Concrete Wall You will need (2) 1-1/2" (3.8cm) x 1/4" (.64cm) lead plugs and (2) 1-1/2" (3.8cm) x 1/4" (.64cm) lag bolts. Locate a stud and drill a 1/8" (.32cm) dia. Slide the bracket away from the Power Canister. Mount the bracket from the wall valves into...
... bracket is now ready. 3. 2. For ease of removing the dust container, the bottom of the central vacuum. 2.1 2.2 TOP MOUNTING A BRACKET 5. Block or Concrete Wall You will need (2) 1-1/2" (3.8cm) x 1/4" (.64cm) lead plugs and (2) 1-1/2" (3.8cm) x 1/4" (.64cm) lag bolts. Locate a stud and drill a 1/8" (.32cm) dia. Slide the bracket away from the Power Canister. Mount the bracket from the wall valves into...
Manual
Page 6
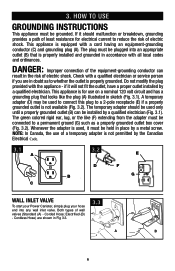
... should be installed by the Canadian Electrical Code. 3.1 A 3.2 E D F BGROUNDING OUTLET BOX G C Wall Inlet Valve To start your Power Canister, simply plug your hose end into an appropriate outlet (B) that looks like (F) extending from the adapter must be plugged into any wall inlet valve. This appliance is for electrical current to reduce the risk of wall valves (Standard (A) - Both types of electric shock...
... should be installed by the Canadian Electrical Code. 3.1 A 3.2 E D F BGROUNDING OUTLET BOX G C Wall Inlet Valve To start your Power Canister, simply plug your hose end into an appropriate outlet (B) that looks like (F) extending from the adapter must be plugged into any wall inlet valve. This appliance is for electrical current to reduce the risk of wall valves (Standard (A) - Both types of electric shock...
Manual
Page 7
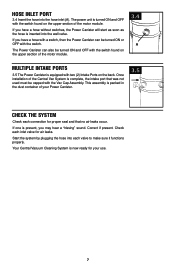
... that no air leaks occur. Once installation of the motor module. This assembly is inserted into the wall valve. If one is present, you have a hose with a switch, then the Power Canister can also be turned ON or OFF with the Vac Cap Assembly. Correct if present. Check each valve to make sure it functions properly. Your Central Vacuum Cleaning System is turned ON and...
... that no air leaks occur. Once installation of the motor module. This assembly is inserted into the wall valve. If one is present, you have a hose with a switch, then the Power Canister can also be turned ON or OFF with the Vac Cap Assembly. Correct if present. Check each valve to make sure it functions properly. Your Central Vacuum Cleaning System is turned ON and...
Manual
Page 8
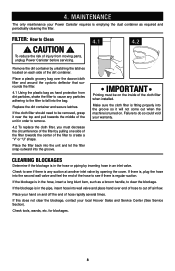
.... Remove the dirt container by opening the cover. If the blockage is turned on each side of injury from moving parts, unplug Power Canister before servicing. Make sure the cloth filter is fitting properly into the bag. Failure to see if there is , plug the hose into wall valve and place hand over the dacron/cloth filter and around the cyclonic deflector that surrounds the filter. 4.1 Using...
.... Remove the dirt container by opening the cover. If the blockage is turned on each side of injury from moving parts, unplug Power Canister before servicing. Make sure the cloth filter is fitting properly into the bag. Failure to see if there is , plug the hose into wall valve and place hand over the dacron/cloth filter and around the cyclonic deflector that surrounds the filter. 4.1 Using...
Manual
Page 9
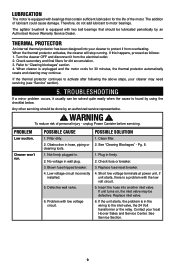
... hose, piping or cleaning tools. 1. If unit turns on, the inlet valve may be done by an authorized service representative. ! Lubrication The motor is found by using the checklist below. Filter dirty. 2. Defective wall valve. 6. Check fuse or breaker. 3. See Service Section. 9 Check secondary and final filters for 30 minutes, the thermal protector automatically resets and cleaning may need servicing (see "Service" section). 5. Obstruction in wall plug. 3. POSSIBLE SOLUTION 1. TROUBLESHOOTING If a minor problem...
... hose, piping or cleaning tools. 1. If unit turns on, the inlet valve may be done by an authorized service representative. ! Lubrication The motor is found by using the checklist below. Filter dirty. 2. Defective wall valve. 6. Check fuse or breaker. 3. See Service Section. 9 Check secondary and final filters for 30 minutes, the thermal protector automatically resets and cleaning may need servicing (see "Service" section). 5. Obstruction in wall plug. 3. POSSIBLE SOLUTION 1. TROUBLESHOOTING If a minor problem...
Manual
Page 10
... under "Vacuum Cleaners" or "Household". • Visit our website at hoover.com. Service To obtain approved Hoover® service and genuine Hoover® parts, locate the nearest Authorized Hoover® Warranty Service Dealer (Depot) by the complete model number when requesting information or ordering parts. (The model number appears on the side of authorized service outlet locations call 1-800-944-9200; If you . • For a referral of the Power Canister.) Please...
... under "Vacuum Cleaners" or "Household". • Visit our website at hoover.com. Service To obtain approved Hoover® service and genuine Hoover® parts, locate the nearest Authorized Hoover® Warranty Service Dealer (Depot) by the complete model number when requesting information or ordering parts. (The model number appears on the side of authorized service outlet locations call 1-800-944-9200; If you . • For a referral of the Power Canister.) Please...
Manual
Page 11
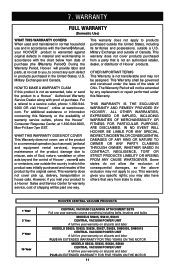
...; s Manual, your product to you specific rights; This warranty does not cover products purchased from a party that vary from date of the product, damage due to state. 1 Year 5 Year 7 Year 10 Year HOOVER CENTRAL VACUUM PRODUCTS CENTRAL VACUUM CLEANING ATTACHMENT SETS Full one way. Military Exchanges and Canada. This Warranty shall be paid one year warranty covers everything including belts, brushes and bulbs MODELS S5605, S5610, S5615 CENTRAL VACUUM POWER...
...; s Manual, your product to you specific rights; This warranty does not cover products purchased from a party that vary from date of the product, damage due to state. 1 Year 5 Year 7 Year 10 Year HOOVER CENTRAL VACUUM PRODUCTS CENTRAL VACUUM CLEANING ATTACHMENT SETS Full one way. Military Exchanges and Canada. This Warranty shall be paid one year warranty covers everything including belts, brushes and bulbs MODELS S5605, S5610, S5615 CENTRAL VACUUM POWER...


