
Manual
Page 3
... contains chemicals known to the State of cleaner. • Do not leave appliance when plugged in this appliance before connecting or disconnecting either hose or motorized nozzle. • Unplug before unplugging. • Use extra care when cleaning on cord, or pull cord around sharp edges or corners. Do not attempt to...
... contains chemicals known to the State of cleaner. • Do not leave appliance when plugged in this appliance before connecting or disconnecting either hose or motorized nozzle. • Unplug before unplugging. • Use extra care when cleaning on cord, or pull cord around sharp edges or corners. Do not attempt to...
Manual
Page 6
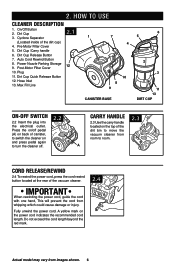
Dirt Cup /Carry handle 6. Post-Motor Filter Cover 10. Press the on/off pedal (A) on back of canister, to switch the cleaner on and press pedal again to room. 2.3 A Cord Release/... vacuum cleaner. Do not exceed the cord length beyond the red mark. 2.4 Actual model may vary from whipping which could cause damage or injury. Pre-Motor Filter Cover 5. Dirt Cup Release Button 7. Max Fill Line 7 4 10 8 9 CANISTER BASE 6 5 2 3 Max 11 13 DIRT Cup ON-OFF switch 2.2 Insert the plug into the...
Dirt Cup /Carry handle 6. Post-Motor Filter Cover 10. Press the on/off pedal (A) on back of canister, to switch the cleaner on and press pedal again to room. 2.3 A Cord Release/... vacuum cleaner. Do not exceed the cord length beyond the red mark. 2.4 Actual model may vary from whipping which could cause damage or injury. Pre-Motor Filter Cover 5. Dirt Cup Release Button 7. Max Fill Line 7 4 10 8 9 CANISTER BASE 6 5 2 3 Max 11 13 DIRT Cup ON-OFF switch 2.2 Insert the plug into the...
Manual
Page 8
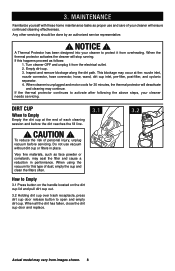
... into your cleaner to activate after following the above steps, your cleaner will ensure continued cleaning effectiveness. Empty dirt cup. 3. When cleaner is unplugged and motor cools for this happens proceed as proper use vacuum without dirt cup or filters in performance. How to Empty 3.1 Press button on the handle located...
... into your cleaner to activate after following the above steps, your cleaner will ensure continued cleaning effectiveness. Empty dirt cup. 3. When cleaner is unplugged and motor cools for this happens proceed as proper use vacuum without dirt cup or filters in performance. How to Empty 3.1 Press button on the handle located...
Manual
Page 9
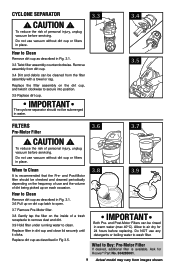
... water to secure into position. 3.5 Replace dirt cup. When to air dry for Hoover® Part No. 304285001. 9 Actual model may vary from the filter assembly with a towel or rag. and Post-Motor filter should not be cleaned from images shown. Replace dirt cup as described in Fig... cup and close lid securely until it clockwise to wash filter. Allow to Clean It is available. CAUTION ! IMPORTANT Both Pre- and Post-Motor Filters can be submerged in place. CAUTION ! Replace the filter assembly on each occasion. 3.8 3.9 How to clean. What to Clean Remove ...
... water to secure into position. 3.5 Replace dirt cup. When to air dry for Hoover® Part No. 304285001. 9 Actual model may vary from the filter assembly with a towel or rag. and Post-Motor filter should not be cleaned from images shown. Replace dirt cup as described in Fig... cup and close lid securely until it clockwise to wash filter. Allow to Clean It is available. CAUTION ! IMPORTANT Both Pre- and Post-Motor Filters can be submerged in place. CAUTION ! Replace the filter assembly on each occasion. 3.8 3.9 How to clean. What to Clean Remove ...
Manual
Page 10
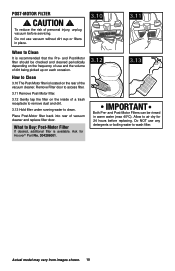
... vacuum without dirt cup or filters in warm water (max 40°C). To reduce the risk of personal injury, unplug vacuum before replacing. and Post-Motor filter should be rinsed in place. 3.10 3.11 When to wash filter. What to clean. Remove Filter door to access filter. 3.11 Remove Post... images shown. 10 Do not use any detergents or boiling water to Clean It is recommended that the Pre- Allow to Clean 3.10 The Post-Motor filter is available. POST-Motor Filter ! How to air dry for Hoover® Part No. 304286001. 3.12 3.13 IMPORTANT Both Pre-
... vacuum without dirt cup or filters in warm water (max 40°C). To reduce the risk of personal injury, unplug vacuum before replacing. and Post-Motor filter should be rinsed in place. 3.10 3.11 When to wash filter. What to clean. Remove Filter door to access filter. 3.11 Remove Post... images shown. 10 Do not use any detergents or boiling water to Clean It is recommended that the Pre- Allow to Clean 3.10 The Post-Motor filter is available. POST-Motor Filter ! How to air dry for Hoover® Part No. 304286001. 3.12 3.13 IMPORTANT Both Pre-
Manual
Page 12
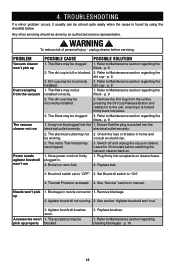
... cup is locked firmly back into the electrical outlet correctly. Refer to Maintenance section regarding the filters - Refer to Maintenance section regarding the filters - The motor Thermostat may be incorrectly 3. Switch off and unplug the vacuum cleaner. See "Service" section in home and consult an electrician. 3. p. 10 12 The filters may...
... cup is locked firmly back into the electrical outlet correctly. Refer to Maintenance section regarding the filters - Refer to Maintenance section regarding the filters - The motor Thermostat may be incorrectly 3. Switch off and unplug the vacuum cleaner. See "Service" section in home and consult an electrician. 3. p. 10 12 The filters may...


