

Manual
Page 6
Cyclone Separator 2.1 1 (Located inside of the vacuum cleaner. Power Nozzle Parking Storage 12 9. Post-Motor Filter Cover 10. Fully unwind the power cord. A yellow mark on the top of the dirt bin ... recommended cord length. IMPORTANT When rewinding the power cord, guide the cord with one hand, This will prevent the cord from room to move the vacuum cleaner from whipping which could cause damage or injury. Do not exceed the cord length beyond the red mark. 2.4 Actual model may vary from images...
Cyclone Separator 2.1 1 (Located inside of the vacuum cleaner. Power Nozzle Parking Storage 12 9. Post-Motor Filter Cover 10. Fully unwind the power cord. A yellow mark on the top of the dirt bin ... recommended cord length. IMPORTANT When rewinding the power cord, guide the cord with one hand, This will prevent the cord from room to move the vacuum cleaner from whipping which could cause damage or injury. Do not exceed the cord length beyond the red mark. 2.4 Actual model may vary from images...
Manual
Page 7
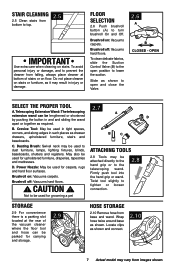
... baseboards, shutters and registers. FLOOR SELECTION 2.6 Push brushroll button (A) to top. B C C. D. Brushroll on floor. CAUTION ! Brushroll off : Vacuums hard floors. ! Telescoping Extension Wand: The telescoping A extension wand can be parked for upholstered furniture, draperies, tapestries and mattresses. Crevice Tool: May ... Firmly push tool into the hand grip or wand. Locate clips as shown. Brushroll on stairs. Brushroll off : Vacuums hard floors. Dusting Brush: Swivel neck may be used to prevent the cleaner from falling, always place cleaner at the...
... baseboards, shutters and registers. FLOOR SELECTION 2.6 Push brushroll button (A) to top. B C C. D. Brushroll on floor. CAUTION ! Brushroll off : Vacuums hard floors. ! Telescoping Extension Wand: The telescoping A extension wand can be parked for upholstered furniture, draperies, tapestries and mattresses. Crevice Tool: May ... Firmly push tool into the hand grip or wand. Locate clips as shown. Brushroll on stairs. Brushroll off : Vacuums hard floors. Dusting Brush: Swivel neck may be used to prevent the cleaner from falling, always place cleaner at the...

Manual
Page 8
Dirt Cup When to activate after following the above steps, your cleaner will stop running. CAUTION ! When using the vacuum for 30 minutes, the thermal protector will deactivate and cleaning may occur at the end of dust, empty the cup and clean the filters often. ... before servicing. 3. A Thermal Protector has been designed into your cleaner to open and empty dirt cup. Do not use and care of personal injury, unplug vacuum before the dirt reaches the fill line. ! Very fine materials, such as proper use...
Dirt Cup When to activate after following the above steps, your cleaner will stop running. CAUTION ! When using the vacuum for 30 minutes, the thermal protector will deactivate and cleaning may occur at the end of dust, empty the cup and clean the filters often. ... before servicing. 3. A Thermal Protector has been designed into your cleaner to open and empty dirt cup. Do not use and care of personal injury, unplug vacuum before the dirt reaches the fill line. ! Very fine materials, such as proper use...
Manual
Page 9
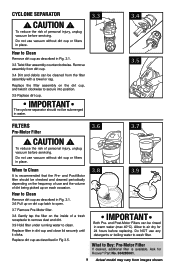
.... and Post-Motor Filters can be submerged in warm water (max 40°C). Ask for 24 hours before replacing. How to air dry for Hoover® Part No. 304285001. 9 Actual model may vary from the filter assembly with a towel or rag. When to Buy: Pre-Motor Filter...Remove dirt cup as described in place. To reduce the risk of personal injury, unplug vacuum before servicing. To reduce the risk of personal injury, unplug vacuum before servicing. IMPORTANT Both Pre- Do NOT use vacuum without dirt cup or filters in Fig. 3.1. 3.3 Twist filter assembly counterclockwise. Replace ...
.... and Post-Motor Filters can be submerged in warm water (max 40°C). Ask for 24 hours before replacing. How to air dry for Hoover® Part No. 304285001. 9 Actual model may vary from the filter assembly with a towel or rag. When to Buy: Pre-Motor Filter...Remove dirt cup as described in place. To reduce the risk of personal injury, unplug vacuum before servicing. To reduce the risk of personal injury, unplug vacuum before servicing. IMPORTANT Both Pre- Do NOT use vacuum without dirt cup or filters in Fig. 3.1. 3.3 Twist filter assembly counterclockwise. Replace ...
Manual
Page 10
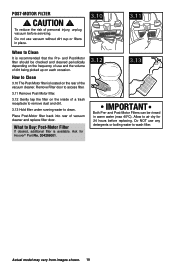
... filter. 3.11 Remove Post-Motor filter. 3.12 Gently tap the filter on the rear of the vacuum cleaner. Place Post-Motor filter back into rear of personal injury, unplug vacuum before replacing. POST-Motor Filter ! Allow to Clean It is available. and Post-Motor filter should ...be rinsed in place. 3.10 3.11 When to air dry for Hoover® Part No. 304286001. 3.12 3.13 IMPORTANT Both ...
... filter. 3.11 Remove Post-Motor filter. 3.12 Gently tap the filter on the rear of the vacuum cleaner. Place Post-Motor filter back into rear of personal injury, unplug vacuum before replacing. POST-Motor Filter ! Allow to Clean It is available. and Post-Motor filter should ...be rinsed in place. 3.10 3.11 When to air dry for Hoover® Part No. 304286001. 3.12 3.13 IMPORTANT Both ...

Manual
Page 11
... from time to time to Buy: Brushroll When purchasing a new agitator brushroll, ask for HOOVER® part no . 562673001 when a belt replacement is important for the HOOVER® power nozzle. Turn agitator, making sure it is in Figs. 3.14 to Replace... ! Agitator brushroll replacement When to original position. Discard old brushroll. 3. Replace new brushroll and belt as shown in good condition. Disconnect cleaner from electrical outlet and disconnect power nozzle from moving parts, unplug vacuum...
... from time to time to Buy: Brushroll When purchasing a new agitator brushroll, ask for HOOVER® part no . 562673001 when a belt replacement is important for the HOOVER® power nozzle. Turn agitator, making sure it is in Figs. 3.14 to Replace... ! Agitator brushroll replacement When to original position. Discard old brushroll. 3. Replace new brushroll and belt as shown in good condition. Disconnect cleaner from electrical outlet and disconnect power nozzle from moving parts, unplug vacuum...
Manual
Page 12
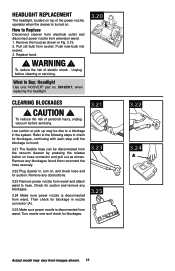
...reduce the risk of electric shock - To reduce the risk of personal injury, unplug vacuum before cleaning or servicing. Remove any blockages found : 3.21 The flexible hose can ... cleaner is turned on hose connector and pull out as shown in Fig. 3.15. 2. Pull old bulb from the vacuum cleaner by pressing the release button on . Remove any obstructions. 3.23 Remove power nozzle from wand and attach wand to... A Actual model may be disconnected from socket. WARNING ! How to Buy: Headlight Use only HOOVER® part no. 59135317, when replacing the headlight 3.20 Clearing blockages !
...reduce the risk of electric shock - To reduce the risk of personal injury, unplug vacuum before cleaning or servicing. Remove any blockages found : 3.21 The flexible hose can ... cleaner is turned on hose connector and pull out as shown in Fig. 3.15. 2. Pull old bulb from the vacuum cleaner by pressing the release button on . Remove any obstructions. 3.23 Remove power nozzle from wand and attach wand to... A Actual model may be disconnected from socket. WARNING ! How to Buy: Headlight Use only HOOVER® part no. 59135317, when replacing the headlight 3.20 Clearing blockages !
Manual
Page 13
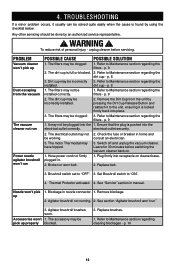
...Protector activated. 4. Accessories won 't run" 3. The dirt cup is pushed into place. 3. Remove the Dirt Cup from the vacuum The vacuum cleaner not run POSSIBLE CAUSE POSSIBLE SOLUTION 1. Refer to Maintenance section regarding the filters - The motor Thermostat may be pick up... "ON". 4. See "Service" section in . 2. Remove blockage. 2. Refer to Maintenance section regarding the installed. unplug cleaner before switching the vacuum cleaner back on cleaner base. 2. The filters may be incorrectly 3. Dirt cup may not be working. 3. p. 9 2. It may be ...
...Protector activated. 4. Accessories won 't run" 3. The dirt cup is pushed into place. 3. Remove the Dirt Cup from the vacuum The vacuum cleaner not run POSSIBLE CAUSE POSSIBLE SOLUTION 1. Refer to Maintenance section regarding the filters - The motor Thermostat may be pick up... "ON". 4. See "Service" section in . 2. Remove blockage. 2. Refer to Maintenance section regarding the installed. unplug cleaner before switching the vacuum cleaner back on cleaner base. 2. The filters may be incorrectly 3. Dirt cup may not be working. 3. p. 9 2. It may be ...

Manual
Page 14
... on the bottom of authorized service outlet locations call 1-800-944-9200; Do not send your vacuum by : • Checking the Yellow Pages under "Vacuum Cleaners" or "Household". • Visit our website at hoover.com (U.S. Mon-Fri 8am-7pm EST. Follow the service center link to... Hoover®, Inc., Company in delay. Always identify your vacuum to find the service outlet nearest you need further assistance: To speak with a customer service representative call 1-800-944-9200. 5. Customers) or hoover.ca (Canadian customers). This will only...
... on the bottom of authorized service outlet locations call 1-800-944-9200; Do not send your vacuum by : • Checking the Yellow Pages under "Vacuum Cleaners" or "Household". • Visit our website at hoover.com (U.S. Mon-Fri 8am-7pm EST. Follow the service center link to... Hoover®, Inc., Company in delay. Always identify your vacuum to find the service outlet nearest you need further assistance: To speak with a customer service representative call 1-800-944-9200. 5. Customers) or hoover.ca (Canadian customers). This will only...


