Manual
Page 5
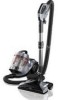
FEATURES 1. FEATURES Canister 1 Hose Inlet (Front Of Canister) 2 Dirt Cup 3 Dirt Cup Handle/Carry Handle 4 Dirt Cup Release Button 5 Auto Cord Rewind Pedal 6 Power Ready Light 7 Power Cord 8 Exhaust Filter Cover Power Nozzle 9 Reset Button 10 Floor Selector Indicator Light 11 Floor Selector Pedal 12 Wand Release ... Tool Storage Accessories 22 Crevice Tool 23 Dusting Brush 24 Hard Floor Brush 25 Turbine Hand Tool (Included in all models) 1.1 2 1 Canister 10 11 9 Power Nozzle 3 4 Hose/Hand Grip/Wand/ Accessories (stored on 15 hand grip) 5 6 16 7 17 8 18 12 Accessories 13 24 14...
FEATURES 1. FEATURES Canister 1 Hose Inlet (Front Of Canister) 2 Dirt Cup 3 Dirt Cup Handle/Carry Handle 4 Dirt Cup Release Button 5 Auto Cord Rewind Pedal 6 Power Ready Light 7 Power Cord 8 Exhaust Filter Cover Power Nozzle 9 Reset Button 10 Floor Selector Indicator Light 11 Floor Selector Pedal 12 Wand Release ... Tool Storage Accessories 22 Crevice Tool 23 Dusting Brush 24 Hard Floor Brush 25 Turbine Hand Tool (Included in all models) 1.1 2 1 Canister 10 11 9 Power Nozzle 3 4 Hose/Hand Grip/Wand/ Accessories (stored on 15 hand grip) 5 6 16 7 17 8 18 12 Accessories 13 24 14...

Manual
Page 6
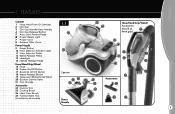
CARTON CONTENTS Remove all parts are located before disposing of packing material. 2.1 A D A Canister B Hose C Telescopic/Bidirectional Wand B C D Power Nozzle E Turbine Hand Tool F Crevice Tool G Dusting Brush E F G H H Hard Floor Brush 6 Make sure all parts from carton and identify each item shown. CARTON CONTENTS 2.
CARTON CONTENTS Remove all parts are located before disposing of packing material. 2.1 A D A Canister B Hose C Telescopic/Bidirectional Wand B C D Power Nozzle E Turbine Hand Tool F Crevice Tool G Dusting Brush E F G H H Hard Floor Brush 6 Make sure all parts from carton and identify each item shown. CARTON CONTENTS 2.

Manual
Page 7
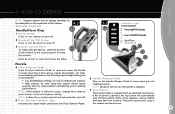
Connect Wand 3.2 Push Hand Grip (D) firmly into Power Nozzle. To disconnect hose from Hose, press on Wand Releases Button (F) on sides of Wand (E) until Latch clicks. NOTE: The flexible hose contains electrical wires for connection to disconnect from nozzle. 3.1 3.3 B 3.2 D A E F C G H 7 HOW TO ASSEMBLE Connect ...to the Power Nozzle and should not be used if damaged, cut or punctured. Connect Nozzle 3.3 Push the opposite end of Wand (G) firmly into end of Hose Connector and pull out. To remove Wand from cleaner, press release buttons (C) on end of cleaner. To...
Connect Wand 3.2 Push Hand Grip (D) firmly into Power Nozzle. To disconnect hose from Hose, press on Wand Releases Button (F) on sides of Wand (E) until Latch clicks. NOTE: The flexible hose contains electrical wires for connection to disconnect from nozzle. 3.1 3.3 B 3.2 D A E F C G H 7 HOW TO ASSEMBLE Connect ...to the Power Nozzle and should not be used if damaged, cut or punctured. Connect Nozzle 3.3 Push the opposite end of Wand (G) firmly into end of Hose Connector and pull out. To remove Wand from cleaner, press release buttons (C) on end of cleaner. To...
Manual
Page 9
... run until handle is released. 7 Reset Button This power nozzle is equipped with an electrical reset button. Press the reset button, plug in the cleaner and resume use. 9 HOW TO OPERATE 4. If this happens, unplug cleaner and clear jam from brushroll. For maximum cleaning performance,... on the Handle Release Pedal to the next highest setting. HOW TO OPERATE NOTE: Operate cleaner only at voltage specified on the data plate on the underside of the cleaner. 4.3 Vacuum Controls Handle/Hose Grip 1 1 Power Button Push to turn cleaner on and off the brushroll motor.
... run until handle is released. 7 Reset Button This power nozzle is equipped with an electrical reset button. Press the reset button, plug in the cleaner and resume use. 9 HOW TO OPERATE 4. If this happens, unplug cleaner and clear jam from brushroll. For maximum cleaning performance,... on the Handle Release Pedal to the next highest setting. HOW TO OPERATE NOTE: Operate cleaner only at voltage specified on the data plate on the underside of the cleaner. 4.3 Vacuum Controls Handle/Hose Grip 1 1 Power Button Push to turn cleaner on and off the brushroll motor.
Manual
Page 10
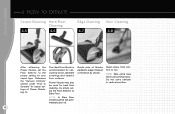
...canister in vertical position. 10 HOW TO OPERATE Carpet Cleaning Hard Floor Cleaning 4.5 4.6 Edge Cleaning 4.7 Stair Cleaning 4.8 B After attaching the Power Nozzle, set the Floor Selector to Bare Floor. NOTE: In Bare Floor mode brushroll will automatically shut off. Guide side of Nozzle parallel to edge of Power Nozzle.... (pg. 9) The Hard Floor Brush is recommended for vacuuming wood, laminate coverings and ceramic floor surfaces. Power Nozzle may also be used for hard floor cleaning...
...canister in vertical position. 10 HOW TO OPERATE Carpet Cleaning Hard Floor Cleaning 4.5 4.6 Edge Cleaning 4.7 Stair Cleaning 4.8 B After attaching the Power Nozzle, set the Floor Selector to Bare Floor. NOTE: In Bare Floor mode brushroll will automatically shut off. Guide side of Nozzle parallel to edge of Power Nozzle.... (pg. 9) The Hard Floor Brush is recommended for vacuuming wood, laminate coverings and ceramic floor surfaces. Power Nozzle may also be used for hard floor cleaning...

Manual
Page 11
...) C. Hard Floor Brush may be used to dust furniture, lamps, lighting fixtures, blinds, baseboards, shutters and registers. E. ners, and along edges in tight spaces, cor- Power Nozzle may be attached directly to the hand grip or to tighten or loosen connection. 11 HOW TO OPERATE 4. HOW TO OPERATE Select the Proper Tool...
...) C. Hard Floor Brush may be used to dust furniture, lamps, lighting fixtures, blinds, baseboards, shutters and registers. E. ners, and along edges in tight spaces, cor- Power Nozzle may be attached directly to the hand grip or to tighten or loosen connection. 11 HOW TO OPERATE 4. HOW TO OPERATE Select the Proper Tool...

Manual
Page 18
.... has been tripped See "Vacuum Controls" section, number 7 on Hand Grip. Motor Thermal Protector has tripped. Switch off in the Nozzle or Nozzle Connector. Leave for an authorized HOOVER® Dealer or visit our website at www.hoover.com. Low suction: Canister / Power Nozzle Needs Service. Empty Dirt Cup... plug. Needs Service. No Voltage in manual. Exclusive Hoover Platinum Collection™ Member Services Line 1.877.MYPLTNM (1.877.697.5866) In the event that further assistance is automatically shut off and unplug the vacuum cleaner. Costs of any place of repair are to be ...
.... has been tripped See "Vacuum Controls" section, number 7 on Hand Grip. Motor Thermal Protector has tripped. Switch off in the Nozzle or Nozzle Connector. Leave for an authorized HOOVER® Dealer or visit our website at www.hoover.com. Low suction: Canister / Power Nozzle Needs Service. Empty Dirt Cup... plug. Needs Service. No Voltage in manual. Exclusive Hoover Platinum Collection™ Member Services Line 1.877.MYPLTNM (1.877.697.5866) In the event that further assistance is automatically shut off and unplug the vacuum cleaner. Costs of any place of repair are to be ...


