Manual
Page 2
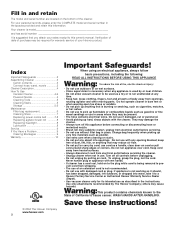
... 3 Connect hose, wand, nozzle 3 Cleaner Description 4 How To Use Canister Cleaner 4-6 Powered Nozzle 4 Cleaning Tools 5 Cleaning Stairs 5 Storage 5,6 Maintenance Filter bag replacement 6 Cleaning filters 7 Replacing power nozzle belt ..........7-8 Replacing agitator brush roll 8 Replacing headlight 8 Lubrication 8 Service 9 If You Have a Problem 9 Clearing Blockages 9 Warranty 10 © 2004 The Hoover Company www.hoover.com 2 Important Safeguards! Do not allow vacuum cleaner to a Hoover Factory Service Center...
... 3 Connect hose, wand, nozzle 3 Cleaner Description 4 How To Use Canister Cleaner 4-6 Powered Nozzle 4 Cleaning Tools 5 Cleaning Stairs 5 Storage 5,6 Maintenance Filter bag replacement 6 Cleaning filters 7 Replacing power nozzle belt ..........7-8 Replacing agitator brush roll 8 Replacing headlight 8 Lubrication 8 Service 9 If You Have a Problem 9 Clearing Blockages 9 Warranty 10 © 2004 The Hoover Company www.hoover.com 2 Important Safeguards! Do not allow vacuum cleaner to a Hoover Factory Service Center...
Manual
Page 3
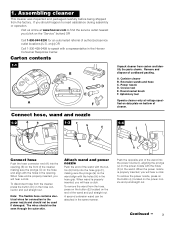
... the hose connector and pull straight out. Upholstery tool Operate cleaner only at www.hoover.com to the power nozzle and should not be attached in the hose grip. Attach wand and power nozzle Push the end of cleaner. 1-4 I ), aligning the prongs (J) on the front of...Extension wands and hose C. Round swivel brush F. Crevice tool E. The wires should not be used if damaged. Remove and dispose of authorized service outlet locations (U.S. Canister cleaner B. When hose end is properly inserted, you (click on the power nozzle and pull straight out. Note: The...
... the hose connector and pull straight out. Upholstery tool Operate cleaner only at www.hoover.com to the power nozzle and should not be attached in the hose grip. Attach wand and power nozzle Push the end of cleaner. 1-4 I ), aligning the prongs (J) on the front of...Extension wands and hose C. Round swivel brush F. Crevice tool E. The wires should not be used if damaged. Remove and dispose of authorized service outlet locations (U.S. Canister cleaner B. When hose end is properly inserted, you (click on the power nozzle and pull straight out. Note: The...

Manual
Page 4
... or MAX. Hold on to rewind cord for household use Cleaner description 2-1 1 2 6 3 4 16 15 3 13 17 18 7 10 5 6 4 20 8 12 14 11 9 21 The assembled cleaner will fit in any way. 2-4 Turning cleaner on the power nozzle and pull handle back. 4 Hand grip 2. Round swivel brush 6. Power nozzle 10. Hose connector 14. Hold plug until cord is being...
... or MAX. Hold on to rewind cord for household use Cleaner description 2-1 1 2 6 3 4 16 15 3 13 17 18 7 10 5 6 4 20 8 12 14 11 9 21 The assembled cleaner will fit in any way. 2-4 Turning cleaner on the power nozzle and pull handle back. 4 Hand grip 2. Round swivel brush 6. Power nozzle 10. Hose connector 14. Hold plug until cord is being...

Manual
Page 5
... connection. Push the switch to clean stairs Clean stairs by the power nozzle ON/OFF switch, located on the extension wand. Push the switch to the "OFF" position to stop the brushes, and to turn the headlight off by placing cleaner on the cleaner. This setting provides the suction and agitator action necessary to -reach...
... connection. Push the switch to clean stairs Clean stairs by the power nozzle ON/OFF switch, located on the extension wand. Push the switch to the "OFF" position to stop the brushes, and to turn the headlight off by placing cleaner on the cleaner. This setting provides the suction and agitator action necessary to -reach...
Manual
Page 7
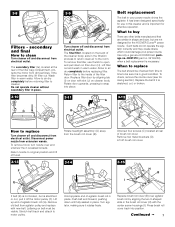
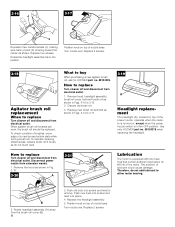
... to buy There are other belts manufactured that are not designed for the HOOVER Duros™ power nozzle. Disconnect power nozzle from agitator pulley and replace with slot (J) on belt must be visible. Lift off and disconnect from electrical outlet. Lettering on cleaner body. Replace brush roll cover (B) over and unscrew the 2 recessed screws. Continued ª 7 Do not...
... to buy There are other belts manufactured that are not designed for the HOOVER Duros™ power nozzle. Disconnect power nozzle from agitator pulley and replace with slot (J) on belt must be visible. Lift off and disconnect from electrical outlet. Lettering on cleaner body. Replace brush roll cover (B) over and unscrew the 2 recessed screws. Continued ª 7 Do not...
Manual
Page 8
... on top of the power nozzle, operates when the cleaner is turned on, except when the power nozzle switch is facing toward the center as shown in Figs. 3-14 to replace Turn cleaner off and disconnect from electrical outlet. What to either motor bearing. Replace new brush roll and belt as shown. Use only HOOVER part no . 59134225...
... on top of the power nozzle, operates when the cleaner is turned on, except when the power nozzle switch is facing toward the center as shown in Figs. 3-14 to replace Turn cleaner off and disconnect from electrical outlet. What to either motor bearing. Replace new brush roll and belt as shown. Use only HOOVER part no . 59134225...
Manual
Page 9
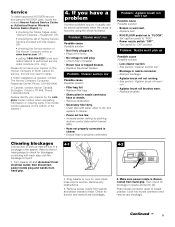
... Yellow Pages under "Vacuum Cleaners - Push nozzle connector down to a blockage in wall plug. • Check fuse or breaker. • Blown fuse or tripped breaker. • Replace fuse/reset breaker. Problem: Cleaner won 't run". • Agitator brush roll brushes worn. • Replace brushes. Turn cleaner off and disconnect from hand grip. 4-1 4-2 A 2. Remove power nozzle from hand grip. Problem: Nozzle won 't run...
... Yellow Pages under "Vacuum Cleaners - Push nozzle connector down to a blockage in wall plug. • Check fuse or breaker. • Blown fuse or tripped breaker. • Replace fuse/reset breaker. Problem: Cleaner won 't run". • Agitator brush roll brushes worn. • Replace brushes. Turn cleaner off and disconnect from hand grip. 4-1 4-2 A 2. Remove power nozzle from hand grip. Problem: Nozzle won 't run...


