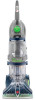
Product Manual
Page 1
Questions or concerns? For assistance, please call Customer Service at 1-800-944-9200 Mon-Fri 8am-7pm EST. página E1 www.hoover.com IMPORTANT: READ CAREFULLY BEFORE ASSEMBLY AND USE. All rights reserved. #56518217 ID100262-R2 Owner's Manual Operating and Servicing Instructions Español - PLEASE DO NOT RETURN THIS PRODUCT TO THE STORE. THIS PRODUCT IS INTENDED FOR HOUSEHOLD USE ONLY. IF USED COMMERCIALLY WARRANTY IS VOID. ©2011 Techtronic Floor Care Technology Limited.
Questions or concerns? For assistance, please call Customer Service at 1-800-944-9200 Mon-Fri 8am-7pm EST. página E1 www.hoover.com IMPORTANT: READ CAREFULLY BEFORE ASSEMBLY AND USE. All rights reserved. #56518217 ID100262-R2 Owner's Manual Operating and Servicing Instructions Español - PLEASE DO NOT RETURN THIS PRODUCT TO THE STORE. THIS PRODUCT IS INTENDED FOR HOUSEHOLD USE ONLY. IF USED COMMERCIALLY WARRANTY IS VOID. ©2011 Techtronic Floor Care Technology Limited.
Product Manual
Page 2
...-9200 to register your product online at hoover.com. Please do not return this owner's manual. Please enter the complete model and Manufacturing Code in China Manufacturing code (Label located on bottom of cleaner) Contents Important Safeguards 3 Cleaner Assembly...5 How To Use...7 Cleaner Description 7 The Tanks...8 How to......18 Troubleshooting...19 Helpful Reminders 19 Service...20 Cleaning Products...21 Warranty...22 If you for an automated referral of Hoover® authorized dealer locations (U.S. only) or to the store. 2 Thank you need assistance: Visit our website at...
...-9200 to register your product online at hoover.com. Please do not return this owner's manual. Please enter the complete model and Manufacturing Code in China Manufacturing code (Label located on bottom of cleaner) Contents Important Safeguards 3 Cleaner Assembly...5 How To Use...7 Cleaner Description 7 The Tanks...8 How to......18 Troubleshooting...19 Helpful Reminders 19 Service...20 Cleaning Products...21 Warranty...22 If you for an automated referral of Hoover® authorized dealer locations (U.S. only) or to the store. 2 Thank you need assistance: Visit our website at...
Product Manual
Page 3
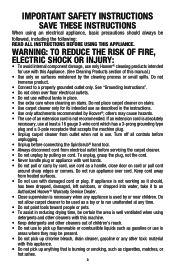
...THE RISK OF FIRE, ELECTRIC SHOCK OR INJURY: • To avoid internal component damage, use only Hoover® cleaning products intended for its intended use without tanks in the instructions. • Use only attachments recommended by pulling on cord or pull cord around sharp edges or corners. If...Keep cord away from heated surfaces. • Do not use cord as it to an Authorized Hoover® Warranty Service Dealer. • Close supervision is burning or smoking, such as described in place. • Use extra care when cleaning on surfaces moistened by the cleaning process...
...THE RISK OF FIRE, ELECTRIC SHOCK OR INJURY: • To avoid internal component damage, use only Hoover® cleaning products intended for its intended use without tanks in the instructions. • Use only attachments recommended by pulling on cord or pull cord around sharp edges or corners. If...Keep cord away from heated surfaces. • Do not use cord as it to an Authorized Hoover® Warranty Service Dealer. • Close supervision is burning or smoking, such as described in place. • Use extra care when cleaning on surfaces moistened by the cleaning process...
Product Manual
Page 4
... colored rigid ear, lug, or the like the plug (A) illustrated in a dry place. Keep children and pets away from the adapter must be used , it will not fit the outlet, have a proper outlet installed by a qualified electrician. This appliance is not available (Fig. 2). A temporary... adapter (D) may reduce air flow. • To help prevent matting and resoiling, avoid contact with the appliance - Whenever the adapter is used to connect this plug to a 2-pole receptacle (E) if a properly grounded outlet is equipped with a qualified electrician or service person if you are...
... colored rigid ear, lug, or the like the plug (A) illustrated in a dry place. Keep children and pets away from the adapter must be used , it will not fit the outlet, have a proper outlet installed by a qualified electrician. This appliance is not available (Fig. 2). A temporary... adapter (D) may reduce air flow. • To help prevent matting and resoiling, avoid contact with the appliance - Whenever the adapter is used to connect this plug to a 2-pole receptacle (E) if a properly grounded outlet is equipped with a qualified electrician or service person if you are...
Product Manual
Page 6
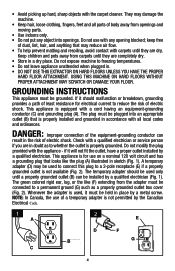
.../cord hook 1.9 1.9 Snap hook onto cleaner. 1.7 1.8 Attach tool caddy (for storage on wall or in closet. 1.10 Store hose 1.12 Start. 1.13 Wrap. 1.14 Finish. Use clips (D) to secure hose and solution tube (E and inset). 1.12 1.13 1.14 D E E D Actual model may vary from images shown. 6 1.11 C B Store tools 1.15 Store Tools...
.../cord hook 1.9 1.9 Snap hook onto cleaner. 1.7 1.8 Attach tool caddy (for storage on wall or in closet. 1.10 Store hose 1.12 Start. 1.13 Wrap. 1.14 Finish. Use clips (D) to secure hose and solution tube (E and inset). 1.12 1.13 1.14 D E E D Actual model may vary from images shown. 6 1.11 C B Store tools 1.15 Store Tools...
Product Manual
Page 7
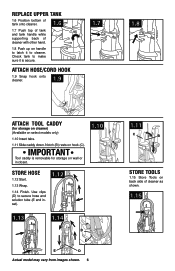
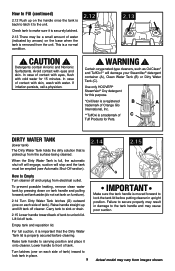
... of nozzle to room, put handle in upright and locked position, tilt cleaner back on bottom 19. DAMAGE YOUR FLOOR. HOW TO USE Cleaner Description 1. Edge Cleaners: provided on pedal (A) to lower handle to operating position. Hose Connection Port 16 24 23 15 18....or your cleaner from images shown. SolutionTrigger: press to allow convenient operation. 2.3 Transporting To move your WITHOUT PROPER ATTACHMENT MAY SCRATCH OR local HOOVER® service center. Dirty Water Tank Handle 8 11. Handle Release Pedal ! To turn cleaner ON, push switch down. SpinScrub® ...
... of nozzle to room, put handle in upright and locked position, tilt cleaner back on bottom 19. DAMAGE YOUR FLOOR. HOW TO USE Cleaner Description 1. Edge Cleaners: provided on pedal (A) to lower handle to operating position. Hose Connection Port 16 24 23 15 18....or your cleaner from images shown. SolutionTrigger: press to allow convenient operation. 2.3 Transporting To move your WITHOUT PROPER ATTACHMENT MAY SCRATCH OR local HOOVER® service center. Dirty Water Tank Handle 8 11. Handle Release Pedal ! To turn cleaner ON, push switch down. SpinScrub® ...
Product Manual
Page 8
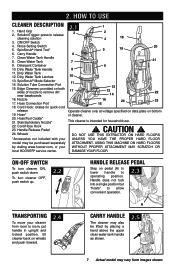
...towards the back of the tank to rinse the carpet or floor. Actual model may harm the machine and void the warranty. IMPORTANT Use only HOOVER® SteamVac® detergents. POWER SCRUB - SpinScrub® mode selector Your SteamVac® cleaner has two agitator brush settings. Push... the top of the tank and tank handle while supporting the back of tank onto cleaner using one hand on tank handle and pull forward. 2.9 F 2.10...
...towards the back of the tank to rinse the carpet or floor. Actual model may harm the machine and void the warranty. IMPORTANT Use only HOOVER® SteamVac® detergents. POWER SCRUB - SpinScrub® mode selector Your SteamVac® cleaner has two agitator brush settings. Push... the top of the tank and tank handle while supporting the back of tank onto cleaner using one hand on tank handle and pull forward. 2.9 F 2.10...
Product Manual
Page 9
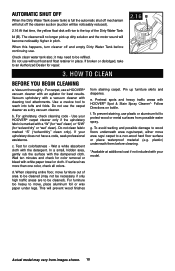
.... ! Certain oxygenated-type cleaners, such as OxiClean* and TuffOxi** will stop and the tank must be a small amount of contact with skin, wash with water. Use only HOOVER® SteamVac® Oxy detergent for 15 minutes. set tank aside (do not set tank on furniture). 2.14 Turn Dirty Water Tank latches (G) outward...
.... ! Certain oxygenated-type cleaners, such as OxiClean* and TuffOxi** will stop and the tank must be a small amount of contact with skin, wash with water. Use only HOOVER® SteamVac® Oxy detergent for 15 minutes. set tank aside (do not set tank on furniture). 2.14 Turn Dirty Water Tank latches (G) outward...
Product Manual
Page 10
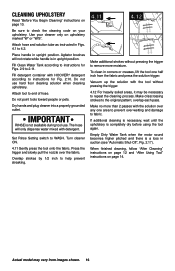
... into tufts and folds. Vacuum upholstery with a vacuum cleaner with a "W" (for "wet" clean) or "S/W" (for best results. Do not use . Use your HOOVER® carpet cleaner only if the upholstery fabric is full the automatic shut off mechanism will shut off and empty Dirty Water Tank before cleaning... check all colors. When this happens, turn cleaner off the cleaner suction (suction will prevent wood finishes from possible water spray. Do not use a HOOVER® vacuum cleaner with white paper towel or cloth. d. When cleaning entire floor, move furniture out of area to be cleaned (may ...
... into tufts and folds. Vacuum upholstery with a vacuum cleaner with a "W" (for "wet" clean) or "S/W" (for best results. Do not use . Use your HOOVER® carpet cleaner only if the upholstery fabric is full the automatic shut off mechanism will shut off and empty Dirty Water Tank before cleaning... check all colors. When this happens, turn cleaner off the cleaner suction (suction will prevent wood finishes from possible water spray. Do not use a HOOVER® vacuum cleaner with white paper towel or cloth. d. When cleaning entire floor, move furniture out of area to be cleaned (may ...
Product Manual
Page 11
... to keep the cleaner on select models only) 3.1a Set Rinse Setting switch to Wash/Auto Rinse. For best results, use more dry strokes. (Continue using dry strokes until little water is visible passing through the Dirty Water Tank lid (Pass over one wet stroke). Do not ... best cleaning results and to aid in suction (see pg. 8). When finished cleaning, follow "After Cleaning" instructions on the backward pass. Always end with Hoover® detergent according to instructions for Figs. 2.10 and 2.11. Select proper SpinScrub® mode (see "Automatic shut-off", Fig. 2.17). Dry ...
... to keep the cleaner on select models only) 3.1a Set Rinse Setting switch to Wash/Auto Rinse. For best results, use more dry strokes. (Continue using dry strokes until little water is visible passing through the Dirty Water Tank lid (Pass over one wet stroke). Do not ... best cleaning results and to aid in suction (see pg. 8). When finished cleaning, follow "After Cleaning" instructions on the backward pass. Always end with Hoover® detergent according to instructions for Figs. 2.10 and 2.11. Select proper SpinScrub® mode (see "Automatic shut-off", Fig. 2.17). Dry ...
Product Manual
Page 12
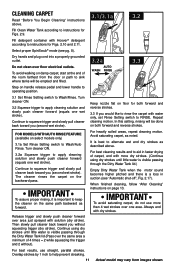
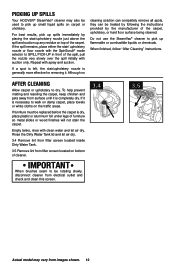
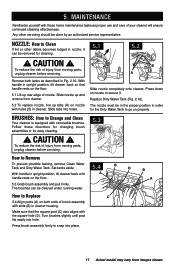
...and let air dry. 3.4 Remove lint from filter screen located inside Dirty Water Tank. 3.5 Remove lint from surface until it . Picking up spills Your HOOVER® SteamVac® cleaner may also be rotating slowly, disconnect cleaner from electical outlet and check and clean this screen. 3.4 3.5 Actual model may vary...so metal slides or wood finishes will not stain the carpet. Empty tanks, rinse with spray and suction. IMPORTANT When brushes seem to be used to pick up any residue on the traffic areas. If the spill remains, place either the stair/ upholstery nozzle or floor nozzle with the...
...and let air dry. 3.4 Remove lint from filter screen located inside Dirty Water Tank. 3.5 Remove lint from surface until it . Picking up spills Your HOOVER® SteamVac® cleaner may also be rotating slowly, disconnect cleaner from electical outlet and check and clean this screen. 3.4 3.5 Actual model may vary...so metal slides or wood finishes will not stain the carpet. Empty tanks, rinse with spray and suction. IMPORTANT When brushes seem to be used to pick up any residue on the traffic areas. If the spill remains, place either the stair/ upholstery nozzle or floor nozzle with the...
Product Manual
Page 14
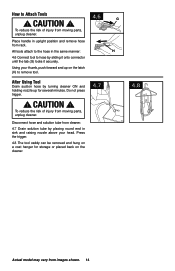
How to remove tool. Using your head. CAUTION ! All tools attach to the hose in the same manner: H 4.6 Connect tool to hose by turning cleaner ON and holding nozzle up ... tool caddy can be removed and hung on a coat hanger for several minutes. CAUTION ! 4.6 G To reduce the risk of injury from images shown. 14 After Using Tool Drain suction hose by sliding it onto connector until the tab (G) locks it securely. To reduce the risk of injury from rack. Disconnect hose...
How to remove tool. Using your head. CAUTION ! All tools attach to the hose in the same manner: H 4.6 Connect tool to hose by turning cleaner ON and holding nozzle up ... tool caddy can be removed and hung on a coat hanger for several minutes. CAUTION ! 4.6 G To reduce the risk of injury from images shown. 14 After Using Tool Drain suction hose by sliding it onto connector until the tab (G) locks it securely. To reduce the risk of injury from rack. Disconnect hose...

Product Manual
Page 15
... stair by 1/2 inch to help prevent streaking. Empty Dirty Water Tank when the motor sound becomes higher pitched and there is completely dry before using the tool again. Attach tool to WASH. WARNING ! Overlap strokes by holding the tool (A) or (B) about one inch above . If additional... clean upper half of stairway and at end of the stairs to alternate wet and dry strokes as instructed in upright position. Always end with HOOVER® detergent according to instructions for Figs. 2.9 to instructions for Fig. 2.11. Place handle in Figs. 4.1 and 4.2. End with more than...
... stair by 1/2 inch to help prevent streaking. Empty Dirty Water Tank when the motor sound becomes higher pitched and there is completely dry before using the tool again. Attach tool to WASH. WARNING ! Overlap strokes by holding the tool (A) or (B) about one inch above . If additional... clean upper half of stairway and at end of the stairs to alternate wet and dry strokes as instructed in upright position. Always end with HOOVER® detergent according to instructions for Figs. 2.9 to instructions for Fig. 2.11. Place handle in Figs. 4.1 and 4.2. End with more than...
Product Manual
Page 16
... Empty Dirty Water Tank when the motor sound becomes higher pitched and there is completely dry before using the tool again. Actual model may be necessary to remove more than 2 passes with HOOVER® detergent according to instructions for Figs. 2.9 to check the cleaning code on page 14.... Do not use . Set Rinse Setting switch to the original pattern; Turn cleaner ON. 4.11 Gently press the ...
... Empty Dirty Water Tank when the motor sound becomes higher pitched and there is completely dry before using the tool again. Actual model may be necessary to remove more than 2 passes with HOOVER® detergent according to instructions for Figs. 2.9 to check the cleaning code on page 14.... Do not use . Set Rinse Setting switch to the original pattern; Turn cleaner ON. 4.11 Gently press the ...
Product Manual
Page 17
... nozzle to snap into place. 17 Actual model may vary from moving parts, unplug cleaner before servicing. 5.3 How to go on both tanks as proper use and care of injury from images shown. The nozzle must be cleaned under running water. 5.4 A B D B A How to Replace C 5.4 Align posts (A) on properly. To reduce the...
... nozzle to snap into place. 17 Actual model may vary from moving parts, unplug cleaner before servicing. 5.3 How to go on both tanks as proper use and care of injury from images shown. The nozzle must be cleaned under running water. 5.4 A B D B A How to Replace C 5.4 Align posts (A) on properly. To reduce the...
Product Manual
Page 19
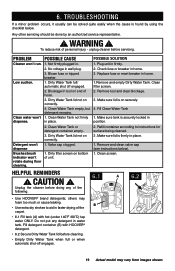
...Clean screen. CAUTION ! Clean Water Tank or detergent container empty. 3. A 6.2 • Use HOOVER® brand detergents; To reduce risk of the carpet. • 6.1 Fill tank (A) with HOOVER® detergent. • 6.2 Secure Dirty Water Tank lid before servicing. PROBLEM POSSIBLE CAUSE Cleaner.../brush indicator won't rotate during floor cleaning. 1. TROUBLESHOOTING If a minor problem occurs, it usually can be done by using the checklist below ). 1. Make sure lid is found by an authorized service representative. ! Refill container according to aid ...
...Clean screen. CAUTION ! Clean Water Tank or detergent container empty. 3. A 6.2 • Use HOOVER® brand detergents; To reduce risk of the carpet. • 6.1 Fill tank (A) with HOOVER® detergent. • 6.2 Secure Dirty Water Tank lid before servicing. PROBLEM POSSIBLE CAUSE Cleaner.../brush indicator won't rotate during floor cleaning. 1. TROUBLESHOOTING If a minor problem occurs, it usually can be done by using the checklist below ). 1. Make sure lid is found by an authorized service representative. ! Refill container according to aid ...
Product Manual
Page 21
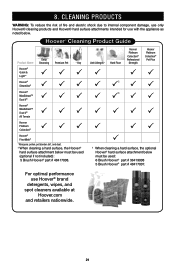
... V® Hoover® MaxExtractTM Dual V® All Terrain Hoover Platinum Collection® Hoover® FloorMate® 1 Allergens: pollen, pet dander, dirt, and dust. 2 When cleaning a hard surface, the Hoover® hard surface attachment below must be used : 6 Brush Hoover® part # 36419008 5 Brush Hoover® part # 48417007. For optimal...
... V® Hoover® MaxExtractTM Dual V® All Terrain Hoover Platinum Collection® Hoover® FloorMate® 1 Allergens: pollen, pet dander, dirt, and dust. 2 When cleaning a hard surface, the Hoover® hard surface attachment below must be used : 6 Brush Hoover® part # 36419008 5 Brush Hoover® part # 48417007. For optimal...
Product Manual
Page 22
...from date of warranty service outlets, phone the Hoover® Consumer Response Center, Phone 1-800-944-9200, Mon-Fri 8am-7pm EST. 9. WARRANTY Limited ONE Year Warranty (Domestic Use) WHAT THIS WARRANTY COVERS When used and maintained in normal household use and in material and workmanship for warranty service,...this product is not transferable and may also have others that is warranted against original defects in accordance with proof of Hoover®, owner's acts or omissions, use of the product in a commercial operation (such as warranted, take or send the product to either...
...from date of warranty service outlets, phone the Hoover® Consumer Response Center, Phone 1-800-944-9200, Mon-Fri 8am-7pm EST. 9. WARRANTY Limited ONE Year Warranty (Domestic Use) WHAT THIS WARRANTY COVERS When used and maintained in normal household use and in material and workmanship for warranty service,...this product is not transferable and may also have others that is warranted against original defects in accordance with proof of Hoover®, owner's acts or omissions, use of the product in a commercial operation (such as warranted, take or send the product to either...


