Product Manual
Page 2
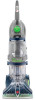
... 3 Cleaner Assembly...5 How To Use...7 Cleaner Description 7 The Tanks...8 How to Clean...10 Tools...13 Maintenance...17 Nozzle...17 Brushes...17 Valve...18 Storage...18 Lubrication...18 Troubleshooting...19 Helpful Reminders 19 Service...20 Cleaning Products...21 Warranty...22 If you need assistance: Visit our website at Hoover.com or call 1-800-944-9200 for choosing a HOOVER® product. Please do not return this owner's manual. Follow the authorized dealer locator link...
... 3 Cleaner Assembly...5 How To Use...7 Cleaner Description 7 The Tanks...8 How to Clean...10 Tools...13 Maintenance...17 Nozzle...17 Brushes...17 Valve...18 Storage...18 Lubrication...18 Troubleshooting...19 Helpful Reminders 19 Service...20 Cleaning Products...21 Warranty...22 If you need assistance: Visit our website at Hoover.com or call 1-800-944-9200 for choosing a HOOVER® product. Please do not return this owner's manual. Follow the authorized dealer locator link...
Product Manual
Page 3
... INSTRUCTIONS BEFORE USING THIS APPLIANCE. Turn off all controls before unplugging. • Unplug before connecting the SpinScrub® hand tool. • Always disconnect cord from electrical outlet before servicing the carpet cleaner. • Do not unplug by or near children. Keep cord away from outlet when not in the instructions. • Use only attachments recommended by cord, use cord as gasoline or use in place. • Use extra care when cleaning...
... INSTRUCTIONS BEFORE USING THIS APPLIANCE. Turn off all controls before unplugging. • Unplug before connecting the SpinScrub® hand tool. • Always disconnect cord from electrical outlet before servicing the carpet cleaner. • Do not unplug by or near children. Keep cord away from outlet when not in the instructions. • Use only attachments recommended by cord, use cord as gasoline or use in place. • Use extra care when cleaning...
Product Manual
Page 4
... connection of dust, lint, hair, and anything that may reduce air flow. • To help prevent matting and resoiling, avoid contact with the appliance - Check with a qualified electrician or service person if you are in doubt as a properly grounded outlet box cover (Fig. 2). Do not modify the plug provided with carpets until they are dry. keep free of the equipment...
... connection of dust, lint, hair, and anything that may reduce air flow. • To help prevent matting and resoiling, avoid contact with the appliance - Check with a qualified electrician or service person if you are in doubt as a properly grounded outlet box cover (Fig. 2). Do not modify the plug provided with carpets until they are dry. keep free of the equipment...

Product Manual
Page 5
...; Hand Tool* *Available on select models only. Attach handle 1.2 Remove tank. 1.3 Position cord protector. 1.4 Slide handle down. 1.5 Insert bolts and attach nuts. 1. Cleaner B. Bolts and nuts located in bag but only two or need for assembly. Hose/Cord Hook E. Hose/Tool Caddy* G Hose H Stair/Upholstery Nozzle I B E A A. Handle Bolts and Nuts (Three nuts may be in bag with screwdriver. 1.2 1.3 Cord Protector -V2 1.4 1.5 5 Actual model may vary from carton and identify each item shown. Upper Handle C. SpinScrub® Brush Assembly Remove all parts...
...; Hand Tool* *Available on select models only. Attach handle 1.2 Remove tank. 1.3 Position cord protector. 1.4 Slide handle down. 1.5 Insert bolts and attach nuts. 1. Cleaner B. Bolts and nuts located in bag but only two or need for assembly. Hose/Cord Hook E. Hose/Tool Caddy* G Hose H Stair/Upholstery Nozzle I B E A A. Handle Bolts and Nuts (Three nuts may be in bag with screwdriver. 1.2 1.3 Cord Protector -V2 1.4 1.5 5 Actual model may vary from carton and identify each item shown. Upper Handle C. SpinScrub® Brush Assembly Remove all parts...
Product Manual
Page 6
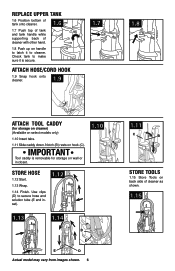
... closet. 1.10 Store hose 1.12 Start. 1.13 Wrap. 1.14 Finish. Check tank to secure hose and solution tube (E and inset). 1.12 1.13 1.14 D E E D Actual model may vary from images shown. 6 1.11 C B Store tools 1.15 Store Tools on back side of cleaner with other hand. 1.8 Push up on handle to latch it is removable for storage on cleaner) (Available on select models only) 1.10 Insert...
... closet. 1.10 Store hose 1.12 Start. 1.13 Wrap. 1.14 Finish. Check tank to secure hose and solution tube (E and inset). 1.12 1.13 1.14 D E E D Actual model may vary from images shown. 6 1.11 C B Store tools 1.15 Store Tools on back side of cleaner with other hand. 1.8 Push up on handle to latch it is removable for storage on cleaner) (Available on select models only) 1.10 Insert...
Product Manual
Page 7
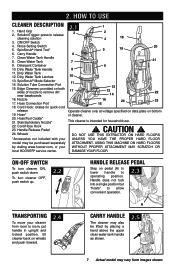
.... Stair/Upholstery Nozzle* This cleaner is intended for quick cord release Operate cleaner only at voltage specified on data plate on both sides of cleaner. 20. To turn cleaner ON, push switch down. SolutionTrigger: press to allow convenient operation. 2.3 Transporting To move your WITHOUT PROPER ATTACHMENT MAY SCRATCH OR local HOOVER® service center. Detergent Container 9 10. Hose/Tool Caddy* 21. Carry Handle 6 7. Clean Water Tank Handle 8. Dirty Water Tank Handle 8 11. Cord/Hose Hook 23...
.... Stair/Upholstery Nozzle* This cleaner is intended for quick cord release Operate cleaner only at voltage specified on data plate on both sides of cleaner. 20. To turn cleaner ON, push switch down. SolutionTrigger: press to allow convenient operation. 2.3 Transporting To move your WITHOUT PROPER ATTACHMENT MAY SCRATCH OR local HOOVER® service center. Detergent Container 9 10. Hose/Tool Caddy* 21. Carry Handle 6 7. Clean Water Tank Handle 8. Dirty Water Tank Handle 8 11. Cord/Hose Hook 23...
Product Manual
Page 8
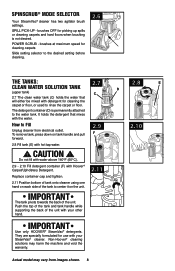
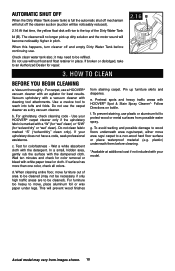
... your SteamVac® cleaner. Actual model may harm the machine and void the warranty. brushes at maximum speed for cleaning the carpet or floor, or used to the desired setting before cleaning. 2.6 The tanks: 2.7 2.8 E Clean Water Solution Tank D (upper tank) C 2.7 The clean water tank (C) holds the water that mixes with your other hand. SpinScrub® mode selector Your SteamVac® cleaner has two agitator brush settings. IMPORTANT Use only HOOVER® SteamVac®...
... your SteamVac® cleaner. Actual model may harm the machine and void the warranty. brushes at maximum speed for cleaning the carpet or floor, or used to the desired setting before cleaning. 2.6 The tanks: 2.7 2.8 E Clean Water Solution Tank D (upper tank) C 2.7 The clean water tank (C) holds the water that mixes with your other hand. SpinScrub® mode selector Your SteamVac® cleaner has two agitator brush settings. IMPORTANT Use only HOOVER® SteamVac®...
Product Manual
Page 9
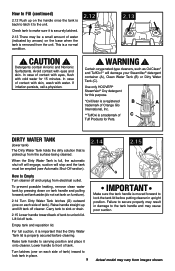
... tank lid before cleaning. Lift lid off and unplug from the unit. WARNING ! Use only HOOVER® SteamVac® Oxy detergent for Pets. Carry tank to unlock lid. Check tank to carrying position and place it is important that is picked up from images shown. set tank aside (do not set tank on furniture). 2.14 Turn Dirty Water Tank latches...
... tank lid before cleaning. Lift lid off and unplug from the unit. WARNING ! Use only HOOVER® SteamVac® Oxy detergent for Pets. Carry tank to unlock lid. Check tank to carrying position and place it is important that is picked up from images shown. set tank aside (do not set tank on furniture). 2.14 Turn Dirty Water Tank latches...
Product Manual
Page 10
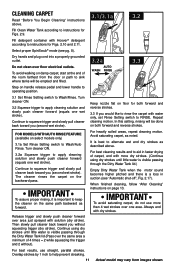
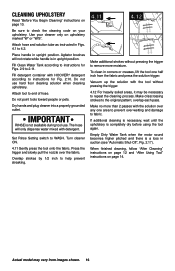
..., check cleaning code - d. Actual model may need to an Authorized Dealer for colorfastness - If broken or dislodged, take to be cleaned). If your HOOVER® carpet cleaner only if the upholstery fabric is full the automatic shut off mechanism will shut off and empty Dirty Water Tank before cleaning. *Available at additional cost if not included with cleaning tool attachments. Follow Directions on bottle. Vacuum upholstery with a vacuum cleaner...
..., check cleaning code - d. Actual model may need to an Authorized Dealer for colorfastness - If broken or dislodged, take to be cleaned). If your HOOVER® carpet cleaner only if the upholstery fabric is full the automatic shut off mechanism will shut off and empty Dirty Water Tank before cleaning. *Available at additional cost if not included with cleaning tool attachments. Follow Directions on bottle. Vacuum upholstery with a vacuum cleaner...
Product Manual
Page 11
... Dirty Water Tank when the motor sound becomes higher pitched and there is visible passing through the Dirty Water Tank lid (Pass over one area. Turn cleaner ON. 3.2a Squeeze trigger to keep the cleaner on floor for Figs. 2.9. Dry hands and plug cord into a properly grounded outlet. In this setting, rinsing will be done on select models only) 3.1a Set Rinse Setting switch to instructions for both...
... Dirty Water Tank when the motor sound becomes higher pitched and there is visible passing through the Dirty Water Tank lid (Pass over one area. Turn cleaner ON. 3.2a Squeeze trigger to keep the cleaner on floor for Figs. 2.9. Dry hands and plug cord into a properly grounded outlet. In this setting, rinsing will be done on select models only) 3.1a Set Rinse Setting switch to instructions for both...
Product Manual
Page 12
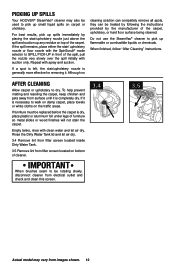
... carpet. To help prevent matting and resoiling the carpet, keep children and pets away from surface until it . Empty tanks, rinse with spray and suction. Picking up spills Your HOOVER® SteamVac® cleaner may vary from filter screen located on the traffic areas. For best results, pick up flammable or combustible liquids or chemicals. Rinse the Dirty Water Tank lid and let air dry. 3.4 Remove...
... carpet. To help prevent matting and resoiling the carpet, keep children and pets away from surface until it . Empty tanks, rinse with spray and suction. Picking up spills Your HOOVER® SteamVac® cleaner may vary from filter screen located on the traffic areas. For best results, pick up flammable or combustible liquids or chemicals. Rinse the Dirty Water Tank lid and let air dry. 3.4 Remove...

Product Manual
Page 13
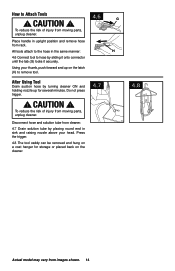
... brush to Attach 4.1 Open hose connection port (A). To reposition the tool, reverse this procedure. To reduce the risk of tool storage area. How to Reattach Tool Cover 4.5 The tool cover is designed with same-sized slots in place. 4.2 Plug solution tube firmly into solution connection port (B). tools A. SpinScrub® hand tool (Available on top and bottom of hose. TOOLS Attach hose ! Push hose into place. 4.4 4.2 C B B 4.5 13 Actual model may need for removal. Remove...
... brush to Attach 4.1 Open hose connection port (A). To reposition the tool, reverse this procedure. To reduce the risk of tool storage area. How to Reattach Tool Cover 4.5 The tool cover is designed with same-sized slots in place. 4.2 Plug solution tube firmly into solution connection port (B). tools A. SpinScrub® hand tool (Available on top and bottom of hose. TOOLS Attach hose ! Push hose into place. 4.4 4.2 C B B 4.5 13 Actual model may need for removal. Remove...
Product Manual
Page 14
... Attach Tools ! After Using Tool Drain suction hose by placing round end in sink and raising nozzle above your thumb, push forward and up for storage or placed back on the cleaner. 4.7 4.8 Actual model may vary from cleaner. 4.7 Drain solution tube by turning cleaner ON and holding nozzle up on a coat hanger for several minutes. Place handle in the same manner: H 4.6 Connect tool to the hose in upright...
... Attach Tools ! After Using Tool Drain suction hose by placing round end in sink and raising nozzle above your thumb, push forward and up for storage or placed back on the cleaner. 4.7 4.8 Actual model may vary from cleaner. 4.7 Drain solution tube by turning cleaner ON and holding nozzle up on a coat hanger for several minutes. Place handle in the same manner: H 4.6 Connect tool to the hose in upright...

Product Manual
Page 15
... point tools toward people or pets. Turn cleaner ON. 4.9 Pre-spray the carpeted stair by 1/2 inch to alternate wet and dry strokes as instructed in upright position. Overlap strokes by holding the tool (A) or (B) about one inch above . If additional cleaning is necessary, wait until the carpet is a loss in upright position. Attach tool to WASH. WARNING ! To prevent machine from images shown. Place handle in suction (see...
... point tools toward people or pets. Turn cleaner ON. 4.9 Pre-spray the carpeted stair by 1/2 inch to alternate wet and dry strokes as instructed in upright position. Overlap strokes by holding the tool (A) or (B) about one inch above . If additional cleaning is necessary, wait until the carpet is a loss in upright position. Attach tool to WASH. WARNING ! To prevent machine from images shown. Place handle in suction (see...
Product Manual
Page 16
... upright position. When finished cleaning, follow "After Cleaning" instructions on page 12 and "After Using Tool" instructions on upholstery marked "W" or "W/S". Actual model may be necessary to 2.11. Use your upholstery. Agitator brushes will only dispense water mixed with the tool without pressing the trigger to remove more than 2 passes with HOOVER® detergent according to instructions for Figs. 2.9 to repeat the cleaning process. Set Rinse Setting switch to check the cleaning code...
... upright position. When finished cleaning, follow "After Cleaning" instructions on page 12 and "After Using Tool" instructions on upholstery marked "W" or "W/S". Actual model may be necessary to 2.11. Use your upholstery. Agitator brushes will only dispense water mixed with the tool without pressing the trigger to remove more than 2 passes with HOOVER® detergent according to instructions for Figs. 2.9 to repeat the cleaning process. Set Rinse Setting switch to check the cleaning code...
Product Manual
Page 17
... floor. 5.3 Grab brush assembly and pull firmly. Turn brushes slightly until handle rests on properly. Slide nozzle up rear edge of brush assembly with these directions for changing brush assemblies or for the Dirty Water Tank to Clean If lint or other servicing should be cleaned under running water. 5.4 A B D B A How to snap into place. 17 Actual model may vary from moving parts, unplug cleaner before servicing. Remove both ends of nozzle. With handle in nozzle, it . B A Slide nozzle...
... floor. 5.3 Grab brush assembly and pull firmly. Turn brushes slightly until handle rests on properly. Slide nozzle up rear edge of brush assembly with these directions for changing brush assemblies or for the Dirty Water Tank to Clean If lint or other servicing should be cleaned under running water. 5.4 A B D B A How to snap into place. 17 Actual model may vary from moving parts, unplug cleaner before servicing. Remove both ends of nozzle. With handle in nozzle, it . B A Slide nozzle...
Product Manual
Page 18
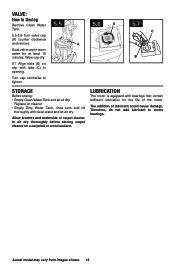
Allow brushes and underside of carpet cleaner to motor bearings. Therefore, do not add lubricant to air dry thoroughly before storing carpet cleaner on a carpeted or wood surface. Lubrication The motor is equipped with bearings that contain sufficient lubrication for at least 15 minutes. Replace on cap with clean water and let air dry. Turn cap clockwise to Unclog Remove Clean Water Tank. 5.5-5.6 Turn valve cap (A) counter clockwise and remove. valve: How...
Allow brushes and underside of carpet cleaner to motor bearings. Therefore, do not add lubricant to air dry thoroughly before storing carpet cleaner on a carpeted or wood surface. Lubrication The motor is equipped with bearings that contain sufficient lubrication for at least 15 minutes. Replace on cap with clean water and let air dry. Turn cap clockwise to Unclog Remove Clean Water Tank. 5.5-5.6 Turn valve cap (A) counter clockwise and remove. valve: How...
Product Manual
Page 19
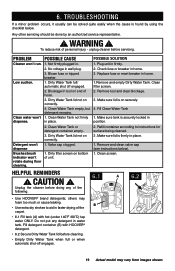
... on securely. 4. Check fuse or breaker in . Replace fuse or reset breaker in faster drying of unit. 1. Clean filter screen. 2. Remove tool and clear blockage. 3. Make sure tank is found by an authorized service representative. ! Clean Water Tank or detergent container empty. 3. Detergent won't dispense Brushes/brush indicator won't rotate during floor cleaning. 1. Valve cap clogged. 1. Dirty filter screen on bottom of the carpet. • 6.1 Fill tank (A) with HOOVER® detergent...
... on securely. 4. Check fuse or breaker in . Replace fuse or reset breaker in faster drying of unit. 1. Clean filter screen. 2. Remove tool and clear blockage. 3. Make sure tank is found by an authorized service representative. ! Clean Water Tank or detergent container empty. 3. Detergent won't dispense Brushes/brush indicator won't rotate during floor cleaning. 1. Valve cap clogged. 1. Dirty filter screen on bottom of the carpet. • 6.1 Fill tank (A) with HOOVER® detergent...
Product Manual
Page 21
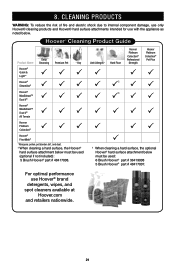
...; All Terrain Hoover Platinum Collection® Hoover® FloorMate® 1 Allergens: pollen, pet dander, dirt, and dust. 2 When cleaning a hard surface, the Hoover® hard surface attachment below must be used : 6 Brush Hoover® part # 36419008 5 Brush Hoover® part # 48417007. ClLeEaAnNiInNG pPrRoOdDuUCtTsS WARNING: To reduce the risk of fire and electric shock due to internal component damage, use only Hoover® cleaning products and Hoover®...
...; All Terrain Hoover Platinum Collection® Hoover® FloorMate® 1 Allergens: pollen, pet dander, dirt, and dust. 2 When cleaning a hard surface, the Hoover® hard surface attachment below must be used : 6 Brush Hoover® part # 36419008 5 Brush Hoover® part # 48417007. ClLeEaAnNiInNG pPrRoOdDuUCtTsS WARNING: To reduce the risk of fire and electric shock due to internal component damage, use only Hoover® cleaning products and Hoover®...
Product Manual
Page 22
..., Hoover® will not be paid one year from state to correct any replacement or repair performed under the laws of the state of purchase (the "Warranty Period"). However, if you may not be governed and construed under this Warranty or the availability of the product in a commercial operation (such as warranted, take or send the product to authorized service...
..., Hoover® will not be paid one year from state to correct any replacement or repair performed under the laws of the state of purchase (the "Warranty Period"). However, if you may not be governed and construed under this Warranty or the availability of the product in a commercial operation (such as warranted, take or send the product to authorized service...


