
Manual
Page 2
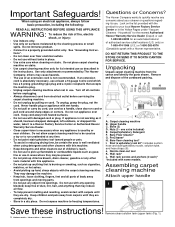
...and identify the parts shown. E FG CD H B I . PreCleaner* H. Wall rack screws and anchors (2 each)* *Included with a Hoover representative. Assembly Use only attachments recommended by the cleaning process or small spills. Turn off all parts of an extension cord is necessary when any...(2) D. Do not place carpet cleaning machine on cord. Do not use . Stair & upholstery tool kit*: includes suction hose and stair/upholstery nozzle, solution tube, and hose straps (6). Questions or Concerns? To unplug, grasp the plug, not the cord. Never handle plug or appliance with wet...
...and identify the parts shown. E FG CD H B I . PreCleaner* H. Wall rack screws and anchors (2 each)* *Included with a Hoover representative. Assembly Use only attachments recommended by the cleaning process or small spills. Turn off all parts of an extension cord is necessary when any...(2) D. Do not place carpet cleaning machine on cord. Do not use . Stair & upholstery tool kit*: includes suction hose and stair/upholstery nozzle, solution tube, and hose straps (6). Questions or Concerns? To unplug, grasp the plug, not the cord. Never handle plug or appliance with wet...
Manual
Page 3
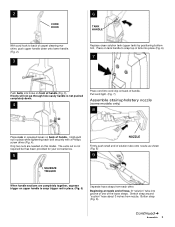
... of solution tube onto nozzle as shown (Fig. 8) 9 SQUEEZE TRIGGER When handle sections are needed on this model. Beginning at nozzle end of hose, fit "solution" tube into cord clip on back of handle. Pull cord tight. (Fig. 7) Assemble stair/upholstery nozzle (some models only) ...8 Place nuts in recessed areas on back of handle. Stretch strap around "suction" hose about 3 inches from each bolt securely with a Phillips screw driver (Fig. 4). Press on tank handle to snap top of tank into place (Fig. 6)....
... of solution tube onto nozzle as shown (Fig. 8) 9 SQUEEZE TRIGGER When handle sections are needed on this model. Beginning at nozzle end of hose, fit "solution" tube into cord clip on back of handle. Pull cord tight. (Fig. 7) Assemble stair/upholstery nozzle (some models only) ...8 Place nuts in recessed areas on back of handle. Stretch strap around "suction" hose about 3 inches from each bolt securely with a Phillips screw driver (Fig. 4). Press on tank handle to snap top of tank into place (Fig. 6)....
Manual
Page 4
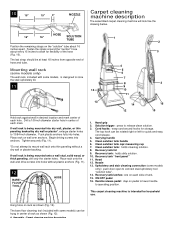
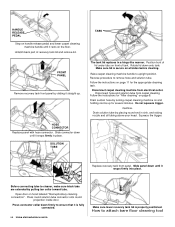
...9 14 10 11 13 14 16 12 15 Hold rack against wall in center of each mark. Cord hooks: wrap cord around the "suction" hose about 16 inches apart. Clean solution tank handle 6. Recovery tank: holds dirty solution. 10. Upholstery and stair cleaning connection (some models, is intended ... 7. Recovery tank "front panel" 11. The last strap should be at least 18 inches from opposite end of the hose 3 (Fig. 10). Solution trigger: press to operating position. Hang hose on rack as shown (Fig. 12). 4 Assembly - Tighten securely (Fig. 11). *Do not attempt to mount ...
...9 14 10 11 13 14 16 12 15 Hold rack against wall in center of each mark. Cord hooks: wrap cord around the "suction" hose about 16 inches apart. Clean solution tank handle 6. Recovery tank: holds dirty solution. 10. Upholstery and stair cleaning connection (some models, is intended ... 7. Recovery tank "front panel" 11. The last strap should be at least 18 inches from opposite end of the hose 3 (Fig. 10). Solution trigger: press to operating position. Hang hose on rack as shown (Fig. 12). 4 Assembly - Tighten securely (Fig. 11). *Do not attempt to mount ...
Manual
Page 7
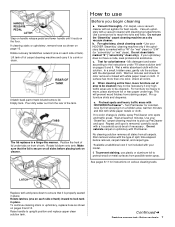
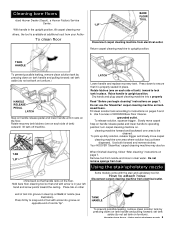
...removes all carpets. See pages 8-11 for colorfastness - LATCH Replace tank and press down onto tank. If cleaning stairs or upholstery, remove hose as shown on cleaner. TABS The lid replaces in place. b. Wait at additional cost if not included with the type of tank). ... tanklatches outward (one color, check all sides before removal, carpet material, and carpet type. *Available at least ten minutes. If your HOOVER 'SteamVac' cleaning machine only if the upholstery fabric is visible, spray PreCleaner onto spots and traffic areas. Rotate latches (one on each side...
...removes all carpets. See pages 8-11 for colorfastness - LATCH Replace tank and press down onto tank. If cleaning stairs or upholstery, remove hose as shown on cleaner. TABS The lid replaces in place. b. Wait at additional cost if not included with the type of tank). ... tanklatches outward (one color, check all sides before removal, carpet material, and carpet type. *Available at least ten minutes. If your HOOVER 'SteamVac' cleaning machine only if the upholstery fabric is visible, spray PreCleaner onto spots and traffic areas. Rotate latches (one on each side...
Manual
Page 9
...floor. Rotate recovery tank latches (one on pages 5 and 6. grounded outlet. Slowly move carpet cleaning machine over area to attach hose Disconnect carpet cleaning machine from electrical outlet. Hold bare floor cleaning tool so that it rests on tank handle and pulling forward;... stair and upholstery tool kit. Use both forward and reverse strokes. Remove tool from electrical outlet. Cleaning bare floors rized Hoover Dealer (Depot), a Hoover Factory Service Center. With handle in clear water. TANK HANDLE To prevent possible leaking, remove clean solution tank by pressing...
...floor. Rotate recovery tank latches (one on pages 5 and 6. grounded outlet. Slowly move carpet cleaning machine over area to attach hose Disconnect carpet cleaning machine from electrical outlet. Hold bare floor cleaning tool so that it rests on tank handle and pulling forward;... stair and upholstery tool kit. Use both forward and reverse strokes. Remove tool from electrical outlet. Cleaning bare floors rized Hoover Dealer (Depot), a Hoover Factory Service Center. With handle in clear water. TANK HANDLE To prevent possible leaking, remove clean solution tank by pressing...
Manual
Page 10
...lid down firmly to ensure that it straight up for several minutes. Slide panel down until it snaps firmly into place. Drain suction hose by pulling tan collar toward tube. Press round solution tube connector onto round projection inside door. Position front of lid under tabs on... front of recovery tank lid and remove lid. Squeeze the trigger. Before connecting tube to remove hose and solution tube. Open door on all tubing above your head. Disconnect hose and solution tube from electrical outlet. Unlatch back part of tank. Replace recovery tank front panel. ...
...lid down firmly to ensure that it straight up for several minutes. Slide panel down until it snaps firmly into place. Drain suction hose by pulling tan collar toward tube. Press round solution tube connector onto round projection inside door. Position front of lid under tabs on... front of recovery tank lid and remove lid. Squeeze the trigger. Before connecting tube to remove hose and solution tube. Open door on all tubing above your head. Disconnect hose and solution tube from electrical outlet. Unlatch back part of tank. Replace recovery tank front panel. ...
Manual
Page 11
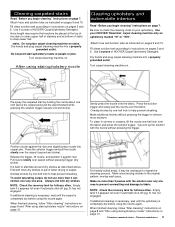
Use 5 ounces of HOOVER Carpet/Upholstery Detergent. Attach hose and solution tube as described above the carpet and push the wand forward while pressing the solution trigger (equals one wet stroke). Use 3 ounces of HOOVER Carpet/Upholstery Detergent. Pre-spray the carpeted stair by ... on page 8 and "After using stair/upholstery nozzle Cleaning upholstery and automobile interiors Read "Before you begin cleaning" instructions on your HOOVER 'SteamVac' carpet cleaning machine only on . Overlap strokes by one -half inch to clean upper half of stairway and at people ...
Use 5 ounces of HOOVER Carpet/Upholstery Detergent. Attach hose and solution tube as described above the carpet and push the wand forward while pressing the solution trigger (equals one wet stroke). Use 3 ounces of HOOVER Carpet/Upholstery Detergent. Pre-spray the carpeted stair by ... on page 8 and "After using stair/upholstery nozzle Cleaning upholstery and automobile interiors Read "Before you begin cleaning" instructions on your HOOVER 'SteamVac' carpet cleaning machine only on . Overlap strokes by one -half inch to clean upper half of stairway and at people ...
Manual
Page 12
....) • Empty recovery tank and rinse thoroughly with bearings which contain sufficient lubrication for the life of deep cleaner to The Hoover Company in North Canton for surface being cleaned (pages 5 & 6). 3. Remove and empty automatic shut-off recovery tank. Obstruction...with a full solution tank in place. Replace fuse/reset breaker. Remove hose; Service To obtain approved HOOVER service and genuine HOOVER parts, locate the nearest Hoover Factory Service Center or Authorized Hoover Warranty Service Dealer (Depot) by pulling collar towards tube. Do not send...
....) • Empty recovery tank and rinse thoroughly with bearings which contain sufficient lubrication for the life of deep cleaner to The Hoover Company in North Canton for surface being cleaned (pages 5 & 6). 3. Remove and empty automatic shut-off recovery tank. Obstruction...with a full solution tank in place. Replace fuse/reset breaker. Remove hose; Service To obtain approved HOOVER service and genuine HOOVER parts, locate the nearest Hoover Factory Service Center or Authorized Hoover Warranty Service Dealer (Depot) by pulling collar towards tube. Do not send...


