
Manual
Page 1
... 4 General operation 5 Filling the clean solution tank 5-6 Emptying the recovery tank 6-7 How to use Before you begin 7 After cleaning 8 Cleaning carpet 8 Picking up spills 8 Cleaning bare floors 9 Using the stair/upholstery nozzle 9-10 Cleaning carpeted stairs 11 Cleaning upholstery 11 If you have a proper outlet installed by a metal screw. This appliance is designed for selecting a HOOVER product. Record and Retain This HOOVER carpet cleaning machine is equipped with a Hoover representative. If you for deep cleaning of carpet, and rugs. only...
... 4 General operation 5 Filling the clean solution tank 5-6 Emptying the recovery tank 6-7 How to use Before you begin 7 After cleaning 8 Cleaning carpet 8 Picking up spills 8 Cleaning bare floors 9 Using the stair/upholstery nozzle 9-10 Cleaning carpeted stairs 11 Cleaning upholstery 11 If you have a proper outlet installed by a metal screw. This appliance is designed for selecting a HOOVER product. Record and Retain This HOOVER carpet cleaning machine is equipped with a Hoover representative. If you for deep cleaning of carpet, and rugs. only...
Manual
Page 2
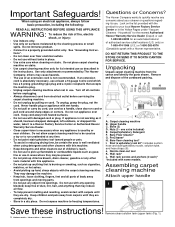
... before servicing the carpet cleaning machine. • Do not unplug by The Hoover Company; Bolts (2) D. Carpet/Upholstery Detergent F. others may be used by the cleaning process or small spills. Stair & upholstery tool kit*: includes suction hose and stair/upholstery nozzle, solution tube, and hose straps (6). Unpacking - Keep cord away from heated surfaces. • Do not use of body away from the carton and identify the parts shown. Do not use without tanks in the instructions. Turn off all parts...
... before servicing the carpet cleaning machine. • Do not unplug by The Hoover Company; Bolts (2) D. Carpet/Upholstery Detergent F. others may be used by the cleaning process or small spills. Stair & upholstery tool kit*: includes suction hose and stair/upholstery nozzle, solution tube, and hose straps (6). Unpacking - Keep cord away from heated surfaces. • Do not use of body away from the carton and identify the parts shown. Do not use without tanks in the instructions. Turn off all parts...
Manual
Page 3
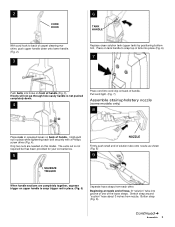
... handle. (Fig. 2). 3 6 TANK HANDLE Replace clean solution tank (upper tank) by positioning bottom first. Button strap (Fig. 9). Hold each nut in place. (Fig. 5) Separate hose straps from nozzle. Continued § Assembly 3 Beginning at nozzle end of hose, fit "solution" tube into holes on front of handle (Fig. 3). Press on back of handle. 2 CORD HOOK With cord hook to back of carpet cleaning machine, push upper handle down . 4 Press cord into cord clip on this model...
... handle. (Fig. 2). 3 6 TANK HANDLE Replace clean solution tank (upper tank) by positioning bottom first. Button strap (Fig. 9). Hold each nut in place. (Fig. 5) Separate hose straps from nozzle. Continued § Assembly 3 Beginning at nozzle end of hose, fit "solution" tube into holes on front of handle (Fig. 3). Press on back of handle. 2 CORD HOOK With cord hook to back of carpet cleaning machine, push upper handle down . 4 Press cord into cord clip on this model...
Manual
Page 4
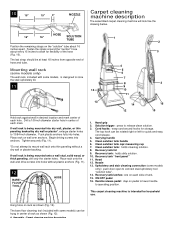
... pedal 16. Hand grip 2. Carrying handle 5. Recovery tank "front panel" 11. Recovery tank latches: one on wall over anchors. Hang hose on rack as shown (Fig. 12). 4 Assembly - Tighten securely (Fig. 11). *Do not attempt to connect stair/upholstery tool "solution tube". 14. Clean solution tank: holds cleaning solution. 8. Upholstery and stair cleaning connection (some models only): push door open to mount wall rack onto thin paneling without plastic anchors (Fig. 11). 12 BARE FLOOR TOOL HOSE 1. This carpet cleaning machine is being...
... pedal 16. Hand grip 2. Carrying handle 5. Recovery tank "front panel" 11. Recovery tank latches: one on wall over anchors. Hang hose on rack as shown (Fig. 12). 4 Assembly - Tighten securely (Fig. 11). *Do not attempt to connect stair/upholstery tool "solution tube". 14. Clean solution tank: holds cleaning solution. 8. Upholstery and stair cleaning connection (some models only): push door open to mount wall rack onto thin paneling without plastic anchors (Fig. 11). 12 BARE FLOOR TOOL HOSE 1. This carpet cleaning machine is being...
Manual
Page 5
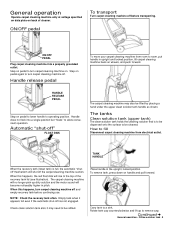
...-off before continuing use. To remove tank, press down on handle and pull forward. When this happens, turn carpet cleaning machine off " FLOAT DISK The carpet cleaning machine may need to operating position. TANK HANDLE When the recovery tank (lower tank) is to be dispersed onto the surface to the top of cleaner. Place handle in pitch. Continued § General operation - Rotate tank cap counterclockwise and lift up dirty solution and the motor sound will rise...
...-off before continuing use. To remove tank, press down on handle and pull forward. When this happens, turn carpet cleaning machine off " FLOAT DISK The carpet cleaning machine may need to operating position. TANK HANDLE When the recovery tank (lower tank) is to be dispersed onto the surface to the top of cleaner. Place handle in pitch. Continued § General operation - Rotate tank cap counterclockwise and lift up dirty solution and the motor sound will rise...
Manual
Page 6
... 'Hoover' cleaning detergent . Rotate cap clockwise until it with HOOVER Carpet/Upholstery Detergent. Recovery tank (lower tank) The recovery tank holds the dirty solution that is full, the automatic "shut-off and disconnect from the carpet. Fill tank to prevent leaking. set tank aside (do not set tank on cap has displaced, replace it locks in place for use with hot tap water. For bare floors: Fill cap to upper "carpet" fill line (5 ounces) with your 'SteamVac' carpet cleaning machine. Using cap, measure detergent...
... 'Hoover' cleaning detergent . Rotate cap clockwise until it with HOOVER Carpet/Upholstery Detergent. Recovery tank (lower tank) The recovery tank holds the dirty solution that is full, the automatic "shut-off and disconnect from the carpet. Fill tank to prevent leaking. set tank aside (do not set tank on cap has displaced, replace it locks in place for use with hot tap water. For bare floors: Fill cap to upper "carpet" fill line (5 ounces) with your 'SteamVac' carpet cleaning machine. Using cap, measure detergent...
Manual
Page 7
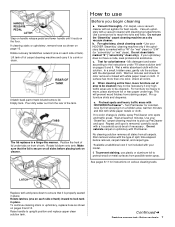
... recovery tank - b. Use your model. To prevent staining, use the 'SteamVac' carpet cleaning machine as shown on the floor. LATCH Replace tank and press down onto tank. Use your upholstery does not have a code, seek professional assistance. Repeat until it to ensure that the lid is visible, spray PreCleaner onto spots and traffic areas. Position the front of tank). e. If cleaning stairs or upholstery, remove hose as a dry vacuum cleaner. REAR OF TANK Unlatch back part of carpet cleaning machine and...
... recovery tank - b. Use your model. To prevent staining, use the 'SteamVac' carpet cleaning machine as shown on the floor. LATCH Replace tank and press down onto tank. Use your upholstery does not have a code, seek professional assistance. Repeat until it to ensure that the lid is visible, spray PreCleaner onto spots and traffic areas. Position the front of tank). e. If cleaning stairs or upholstery, remove hose as a dry vacuum cleaner. REAR OF TANK Unlatch back part of carpet cleaning machine and...
Manual
Page 8
... tank if it is not available, use solvent or petroleum based products to pick up any residue on top of the carpet. If the spill remains, place either the stair/upholstery nozzle or floor nozzle in nozzle, do not use the 'SteamVac' carpet cleaning machine to clean the machine. 8 After cleaning - When finished, follow "After cleaning" instructions on floor for both forward and reverse strokes. Rinsing is flushed out of clear water on carpet, upholstery, or bare floors. Remove...
... tank if it is not available, use solvent or petroleum based products to pick up any residue on top of the carpet. If the spill remains, place either the stair/upholstery nozzle or floor nozzle in nozzle, do not use the 'SteamVac' carpet cleaning machine to clean the machine. 8 After cleaning - When finished, follow "After cleaning" instructions on floor for both forward and reverse strokes. Rinsing is flushed out of clear water on carpet, upholstery, or bare floors. Remove...
Manual
Page 9
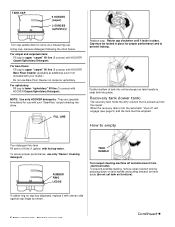
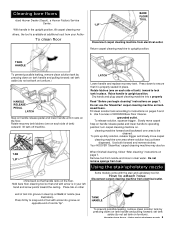
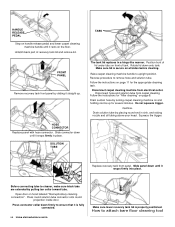
Rotate recovery tank latches (one on each side of HOOVER Bare Floor Cleaner. LATCH Lower handle and replace recovery tank. Dry hands and plug carpet cleaning machine into groove in clear lip on page 7. Use 5 ounces of tank) outward; Use both forward and reverse strokes. Your HOOVER 'SteamVac' carpet cleaning machine may also be cleaned. Hold bare floor cleaning tool so that end with the stair and upholstery tool kit. Using the stair/upholstery nozzle Some models come with arrow is in place. end of tool into a properly Read...
Rotate recovery tank latches (one on each side of HOOVER Bare Floor Cleaner. LATCH Lower handle and replace recovery tank. Dry hands and plug carpet cleaning machine into groove in clear lip on page 7. Use 5 ounces of tank) outward; Use both forward and reverse strokes. Your HOOVER 'SteamVac' carpet cleaning machine may also be cleaned. Hold bare floor cleaning tool so that end with the stair and upholstery tool kit. Using the stair/upholstery nozzle Some models come with arrow is in place. end of tool into a properly Read...
Manual
Page 10
... it rests on the floor. Before connecting tube to attach bare floor cleaning tool Unlatch back part of tank. Disconnect hose and solution tube from electrical outlet. machine. Open door on hood labeled "Stair/upholstery cleaning connection". How to cleaner, make sure black tabs are extended by turning carpet cleaning machine on and holding nozzle up . Disconnect carpet cleaning machine from carpet cleaning Follow the instructions for the appropriate cleaning task. Replace recovery tank front panel. Press round solution tube connector onto round projection inside...
... it rests on the floor. Before connecting tube to attach bare floor cleaning tool Unlatch back part of tank. Disconnect hose and solution tube from electrical outlet. machine. Open door on hood labeled "Stair/upholstery cleaning connection". How to cleaner, make sure black tabs are extended by turning carpet cleaning machine on and holding nozzle up . Disconnect carpet cleaning machine from carpet cleaning Follow the instructions for the appropriate cleaning task. Replace recovery tank front panel. Press round solution tube connector onto round projection inside...
Manual
Page 11
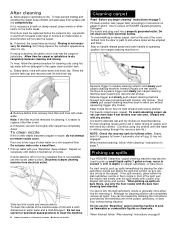
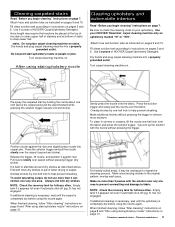
... streaking. Attach hose and solution tube as instructed on . Press the solution trigger and slowly pull the nozzle over carpet without pressing the trigger. Pull nozzle slowly over the fabric. When finished cleaning, follow "After cleaning" instructions on page 8 and "After using stair/upholstery nozzle" instructions on upholstery marked "W" or "W/S". stairs. Turn carpet cleaning machine on pages 9 and 10. Gently press the nozzle onto the fabric. Always end with more moisture. NOTE: Check the recovery tank for...
... streaking. Attach hose and solution tube as instructed on . Press the solution trigger and slowly pull the nozzle over carpet without pressing the trigger. Pull nozzle slowly over the fabric. When finished cleaning, follow "After cleaning" instructions on page 8 and "After using stair/upholstery nozzle" instructions on upholstery marked "W" or "W/S". stairs. Turn carpet cleaning machine on pages 9 and 10. Gently press the nozzle onto the fabric. Always end with more moisture. NOTE: Check the recovery tank for...
Manual
Page 12
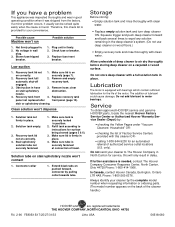
... of the motor. Always identify your cleaner by : • checking the Yellow Pages under "Vacuum Cleaners- Blown fuse/tripped breaker. Possible solution 1. Check fuse or breaker. 3. Replace fuse/reset breaker. Remove hose; stair or upholstery cleaning. Squeeze trigger and push deep cleaner forward and back several times to air dry thoroughly before storing deep cleaner on stair/upholstery nozzle won 't dispense 1. If a minor problem occurs, it was in good operating condition when...
... of the motor. Always identify your cleaner by : • checking the Yellow Pages under "Vacuum Cleaners- Blown fuse/tripped breaker. Possible solution 1. Check fuse or breaker. 3. Replace fuse/reset breaker. Remove hose; stair or upholstery cleaning. Squeeze trigger and push deep cleaner forward and back several times to air dry thoroughly before storing deep cleaner on stair/upholstery nozzle won 't dispense 1. If a minor problem occurs, it was in good operating condition when...


