Manual
Page 1
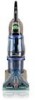
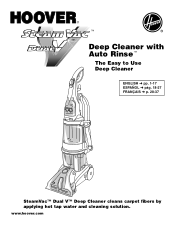
www.hoover.com ™ ® ™ Deep Cleaner with Auto Rinse™ The Easy to Use Deep Cleaner ENGLISH § pp. 1-17 ESPAÑOL § pág. 18-27 FRANÇAIS § p. 28-37 SteamVac™ Dual V™ Deep Cleaner cleans carpet fibers by applying hot tap water and cleaning solution.
www.hoover.com ™ ® ™ Deep Cleaner with Auto Rinse™ The Easy to Use Deep Cleaner ENGLISH § pp. 1-17 ESPAÑOL § pág. 18-27 FRANÇAIS § p. 28-37 SteamVac™ Dual V™ Deep Cleaner cleans carpet fibers by applying hot tap water and cleaning solution.

Manual
Page 2
... Electrical Code. DANGER- NOTE: In Canada, the use . Do not place deep cleaner on cord. others may be used only until they may be present. • Do not pick up chlorine bleach, drain cleaner, gasoline or any time. • Do not point tools toward people or pets. • Use only commercially available Hoover SteamVac™ cleaners intended for machine application. Save these instructions! 2 Grounding Instructions A B C This...
... Electrical Code. DANGER- NOTE: In Canada, the use . Do not place deep cleaner on cord. others may be used only until they may be present. • Do not pick up chlorine bleach, drain cleaner, gasoline or any time. • Do not point tools toward people or pets. • Use only commercially available Hoover SteamVac™ cleaners intended for machine application. Save these instructions! 2 Grounding Instructions A B C This...
Manual
Page 3
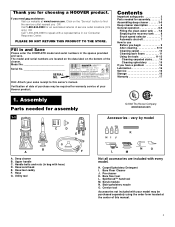
... THIS PRODUCT TO THE STORE. Hint: Attach your model may be purchased separately using the order form located at www.hoover.com. Contents Important safeguards 2 Parts needed for assembly 3 Assembling deep cleaner 3-5 Deep cleaner description 6 General operation 6-8 Filling the clean water tank . . . 7-8 Emptying the recovery tank . . . . 8 Brush speed selector 7 Automatic shut-off 7 How to speak with hose) D. Deep cleaner B. Handle bolts and nuts (in bag with a representative in the spaces provided and save. Bare floor tool L. Stair/upholstery nozzle O. Model No...
... THIS PRODUCT TO THE STORE. Hint: Attach your model may be purchased separately using the order form located at www.hoover.com. Contents Important safeguards 2 Parts needed for assembly 3 Assembling deep cleaner 3-5 Deep cleaner description 6 General operation 6-8 Filling the clean water tank . . . 7-8 Emptying the recovery tank . . . . 8 Brush speed selector 7 Automatic shut-off 7 How to speak with hose) D. Deep cleaner B. Handle bolts and nuts (in bag with a representative in the spaces provided and save. Bare floor tool L. Stair/upholstery nozzle O. Model No...

Manual
Page 4
.... 1-3 C B A Attach upper handle Remove clean water tank (upper tank) from the front of the handle) with assembly of cleaner. Snap hook onto cleaner. 4 Slide tabs (E) on caddy into slots on back of cleaner. If bolts will look like this 1-2 drawing. The extra nut is not required but has been provided for your deep cleaner. Hold each nut in place while tightening each bolt securely (from deep cleaner. Replace clean water tank...
.... 1-3 C B A Attach upper handle Remove clean water tank (upper tank) from the front of the handle) with assembly of cleaner. Snap hook onto cleaner. 4 Slide tabs (E) on caddy into slots on back of cleaner. If bolts will look like this 1-2 drawing. The extra nut is not required but has been provided for your deep cleaner. Hold each nut in place while tightening each bolt securely (from deep cleaner. Replace clean water tank...
Manual
Page 5
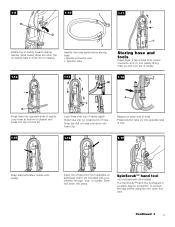
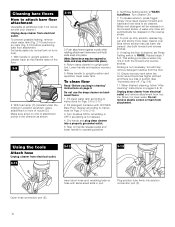
... hose parts before using the tool, open tool door. Solution tube I Storing hose and tools Press hose, a few inches from nozzle connector end (I), into opposite side of caddy. Insert top of bare floor tool (available at bottom of cleaner and press into opposite side of clip. 1-15 1-16 1-17 Snap stair/upholstery nozzle onto caddy. SpinScrub™ hand tool (not included with your cleaner) through "loop" on hose connector into place. J Repeat on cleaner. Nozzle...
... hose parts before using the tool, open tool door. Solution tube I Storing hose and tools Press hose, a few inches from nozzle connector end (I), into opposite side of caddy. Insert top of bare floor tool (available at bottom of cleaner and press into opposite side of clip. 1-15 1-16 1-17 Snap stair/upholstery nozzle onto caddy. SpinScrub™ hand tool (not included with your cleaner) through "loop" on hose connector into place. J Repeat on cleaner. Nozzle...

Manual
Page 6
How to reattach tool cover The tool cover is designed with holes on sides of cover with a breakaway feature which allows it to snap free if it is pushed open too far. To reattach, align hinges of tool storage area. 1-18 1-19 Pull tool down and outward. To reposition the tool, reverse this procedure. Snap door into place. 6
How to reattach tool cover The tool cover is designed with holes on sides of cover with a breakaway feature which allows it to snap free if it is pushed open too far. To reattach, align hinges of tool storage area. 1-18 1-19 Pull tool down and outward. To reposition the tool, reverse this procedure. Snap door into place. 6

Manual
Page 7
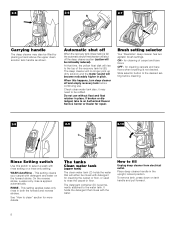
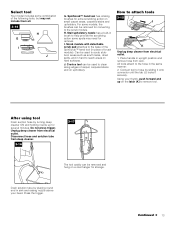
Solution trigger: press to operating position. Clean water tank handle 8. Hose connection port 17. Stair/upholstery nozzle 21. A Handle release pedal Step on pedal (A) to lower handle to release cleaning solution 3. Clean water tank 9. Recovery tank latches 13. Hose 19. Bare floor tool (available at voltage specified on data plate on wheels and push forward. Plug deep cleaner into a single position but "floats" to allow convenient operation. To turn cleaner ON, push switch down. Model with all models) 6. ON/OFF switch 4. Continued...
Solution trigger: press to operating position. Clean water tank handle 8. Hose connection port 17. Stair/upholstery nozzle 21. A Handle release pedal Step on pedal (A) to lower handle to release cleaning solution 3. Clean water tank 9. Recovery tank latches 13. Hose 19. Bare floor tool (available at voltage specified on data plate on wheels and push forward. Plug deep cleaner into a single position but "floats" to allow convenient operation. To turn cleaner ON, push switch down. Model with all models) 6. ON/OFF switch 4. Continued...
Manual
Page 8
... happens, turn deep cleaner off and empty recovery tank before cleaning. 2-8 2-9 2-10 WASH AUTO RINSE OFF C D Rinse ON Rinse Setting switch Use this switch to select a wash with rinse setting or a rinse only setting. If broken or dislodged, take to fill Unplug deep cleaner from electrical outlet. for cleaning carpets and bare floors when brushing is permanently attached to the water tank. for cleaning of the recovery tank lid (B). WASH-AutoRinse - The detergent container (D) is not desired. To remove tank, press down...
... happens, turn deep cleaner off and empty recovery tank before cleaning. 2-8 2-9 2-10 WASH AUTO RINSE OFF C D Rinse ON Rinse Setting switch Use this switch to select a wash with rinse setting or a rinse only setting. If broken or dislodged, take to fill Unplug deep cleaner from electrical outlet. for cleaning carpets and bare floors when brushing is permanently attached to the water tank. for cleaning of the recovery tank lid (B). WASH-AutoRinse - The detergent container (D) is not desired. To remove tank, press down...
Manual
Page 9
..., flush with HOOVER Carpet/Upholstery Detergent or HOOVER Bare Floor Cleaner. Do not use with hot tap water. Avoid contact with your 'SteamVac' deep cleaner. For full suction, it rests on tank handle and pulling forward; Lower handle to front of deep cleaner to snap it onto deep cleaner. Replace container cap and tighten. When the recovery tank is properly secured before cleaning. Replace tank cap and tighten. Carry tank to a sink. Raise handle of tank. To prevent possible leaking, remove clean water tank (Fig...
..., flush with HOOVER Carpet/Upholstery Detergent or HOOVER Bare Floor Cleaner. Do not use with hot tap water. Avoid contact with your 'SteamVac' deep cleaner. For full suction, it rests on tank handle and pulling forward; Lower handle to front of deep cleaner to snap it onto deep cleaner. Replace container cap and tighten. When the recovery tank is properly secured before cleaning. Replace tank cap and tighten. Carry tank to a sink. Raise handle of tank. To prevent possible leaking, remove clean water tank (Fig...
Manual
Page 10
... to wood floors underneath area rugs/carpet, either move , place aluminum foil or wax paper under legs of area to be cleaned (may be replaced before cleaning. If it out. e. e. Wait at additional cost if not included with cleaning tool attachments. To prevent staining, use a HOOVER vacuum cleaner with an agitator for color removal or bleed with a "W" (for "wet" clean) or "S/W" (for colorfastness by the deep cleaner's brushes. 10 plastic...
... to wood floors underneath area rugs/carpet, either move , place aluminum foil or wax paper under legs of area to be cleaned (may be replaced before cleaning. If it out. e. e. Wait at additional cost if not included with cleaning tool attachments. To prevent staining, use a HOOVER vacuum cleaner with an agitator for color removal or bleed with a "W" (for "wet" clean) or "S/W" (for colorfastness by the deep cleaner's brushes. 10 plastic...
Manual
Page 11
... WASH AUTO RINSE 3-8 11. In this setting, rinsing will help remove detergent residue and help prevent streaking. Rinsing is best to rinse the carpet with solution (dry stroke). Avoid saturating carpet, as forward. 9. Note: To avoid saturating carpet, do not use straight, parallel strokes as described in upright position, tilt cleaner back so that handle rests on the floor. Always end with holes (B) in faster drying of nozzle. For best cleaning...
... WASH AUTO RINSE 3-8 11. In this setting, rinsing will help remove detergent residue and help prevent streaking. Rinsing is best to rinse the carpet with solution (dry stroke). Avoid saturating carpet, as forward. 9. Note: To avoid saturating carpet, do not use straight, parallel strokes as described in upright position, tilt cleaner back so that handle rests on the floor. Always end with holes (B) in faster drying of nozzle. For best cleaning...
Manual
Page 12
..., set tank on the floor. 3-9 C D RBAROETA TEFLOOR ON 2. Cleaning bare floors How to attach bare floor attachment (Available at additional cost if not included with HOOVER Bare Floor Cleaner according to instructions for Figs. 2-13 to 2-15. 3. Push attachment against nozzle while rotating attachment downward until both forward and reverse strokes. 9. Fill detergent container with your cleaner.) Unplug deep cleaner from electrical outlet. Set Rinse Setting switch to upright position. Water and detergent will help remove detergent residue from nozzle. If rinsing the floor...
..., set tank on the floor. 3-9 C D RBAROETA TEFLOOR ON 2. Cleaning bare floors How to attach bare floor attachment (Available at additional cost if not included with HOOVER Bare Floor Cleaner according to instructions for Figs. 2-13 to 2-15. 3. Push attachment against nozzle while rotating attachment downward until both forward and reverse strokes. 9. Fill detergent container with your cleaner.) Unplug deep cleaner from electrical outlet. Set Rinse Setting switch to upright position. Water and detergent will help remove detergent residue from nozzle. If rinsing the floor...
Manual
Page 13
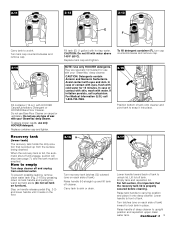
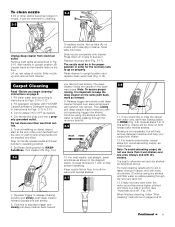
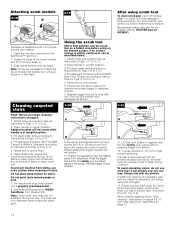
... handle in upright position and remove hose from electrical outlet. 1. After using tool Drain suction hose by placing round end in hard to reach areas on a coat hanger for extra scrubbing action on the latch (K) to remove tool. Disconnect hose and solution tube from electrical outlet. How to the scrub module. Using your head. H. Drain solution tube by turning deep cleaner ON and holding nozzle up on small carpet areas, carpeted stairs and upholstery. Press the trigger. Stair/upholstery nozzle...
... handle in upright position and remove hose from electrical outlet. 1. After using tool Drain suction hose by placing round end in hard to reach areas on a coat hanger for extra scrubbing action on the latch (K) to remove tool. Disconnect hose and solution tube from electrical outlet. How to the scrub module. Using your head. H. Drain solution tube by turning deep cleaner ON and holding nozzle up on small carpet areas, carpeted stairs and upholstery. Press the trigger. Stair/upholstery nozzle...
Manual
Page 14
... using the tool again. 13. Available at end of hose. 6. Open the tool door and remove the SpinScrub™ hand tool. 2. Attach tool to 3-13. 2. Do not point tools toward people or pets. 7. Fill detergent container with your cleaner. 1. Hold scrub tool above the carpet and push it will not rotate while handle is visible, continue to module. End with mild detergent. Turn cleaner ON. Attach hose and solution tube as shown. 3-20 A B 9. Place handle in upright position...
... using the tool again. 13. Available at end of hose. 6. Open the tool door and remove the SpinScrub™ hand tool. 2. Attach tool to 3-13. 2. Do not point tools toward people or pets. 7. Fill detergent container with your cleaner. 1. Hold scrub tool above the carpet and push it will not rotate while handle is visible, continue to module. End with mild detergent. Turn cleaner ON. Attach hose and solution tube as shown. 3-20 A B 9. Place handle in upright position...
Manual
Page 15
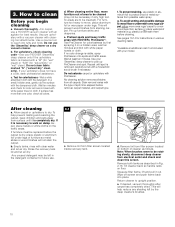
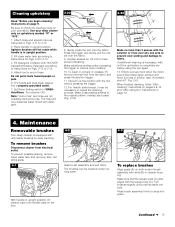
... of brush assembly with HOOVER Carpet/Upholstery Detergent according to instructions for easy cleaning. Agitator brushes will only dispense water mixed with the square hole (D). Maintenance Removable brushes Your deep cleaner is completely dry before using tool" instructions on the floor. 4-2 Grab brush assembly and pull firmly. Make additional strokes without pressing the trigger. 12. Attach tool to snap into place. Dry hands and plug deep cleaner into hole. Place handle in upright position. Overlap strokes by 1/2 inch to WASHAutoRinse. Set Rinse Setting...
... of brush assembly with HOOVER Carpet/Upholstery Detergent according to instructions for easy cleaning. Agitator brushes will only dispense water mixed with the square hole (D). Maintenance Removable brushes Your deep cleaner is completely dry before using tool" instructions on the floor. 4-2 Grab brush assembly and pull firmly. Make additional strokes without pressing the trigger. 12. Attach tool to snap into place. Dry hands and plug deep cleaner into hole. Place handle in upright position. Overlap strokes by 1/2 inch to WASHAutoRinse. Set Rinse Setting...
Manual
Page 16
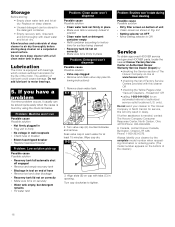
... model number appears on securely • Water tank empty, but detergent remains • Fill water tank Problem: Clean water won 't rotate during floor cleaning Possible cause Possible solution • Dirty filter screen on bottom of The Hoover Company on OFF • Move setting selector to instruc- Problem: Machine won 't dispense Possible cause Possible solution • Valve cap clogged • Remove and clean valve cap (see fol- tions for an automated referral of the cleaner.) 16 lowing instructions...
... model number appears on securely • Water tank empty, but detergent remains • Fill water tank Problem: Clean water won 't rotate during floor cleaning Possible cause Possible solution • Dirty filter screen on bottom of The Hoover Company on OFF • Move setting selector to instruc- Problem: Machine won 't dispense Possible cause Possible solution • Valve cap clogged • Remove and clean valve cap (see fol- tions for an automated referral of the cleaner.) 16 lowing instructions...
Manual
Page 17
... warranted period. Full One Year Warranty (Domestic Use) Your HOOVER® appliance is warranted in normal household use, in accordance with the Owner's Manual against original defects in material and workmanship for warranty service, transportation will be required before service is used in a commercial or rental application. Military Exchange. Hoover Factory Service Centers. 2. This warranty applies when the appliance is needed, or if there are...
... warranted period. Full One Year Warranty (Domestic Use) Your HOOVER® appliance is warranted in normal household use, in accordance with the Owner's Manual against original defects in material and workmanship for warranty service, transportation will be required before service is used in a commercial or rental application. Military Exchange. Hoover Factory Service Centers. 2. This warranty applies when the appliance is needed, or if there are...


