
Manual
Page 3
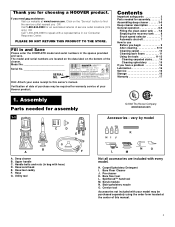
... 1-800-944-9200 for an automated referral of this owner's manual. Crevice tool Accessories not included with every model. Assembly Parts needed for choosing a HOOVER product. Deep cleaner B. Hose/cord hook E. Hose/tool caddy F. Scrub module N. If you for assembly .... Verification of date of purchase may be required for assembly 1-1 © 2002 The Hoover Company www.hoover.com Accessories - Contents Important safeguards 2 Parts needed for warranty service of the cleaner. vary by model C D E G B A F A. Handle bolts and nuts (in bag with a representative...
... 1-800-944-9200 for an automated referral of this owner's manual. Crevice tool Accessories not included with every model. Assembly Parts needed for choosing a HOOVER product. Deep cleaner B. Hose/cord hook E. Hose/tool caddy F. Scrub module N. If you for assembly .... Verification of date of purchase may be required for assembly 1-1 © 2002 The Hoover Company www.hoover.com Accessories - Contents Important safeguards 2 Parts needed for warranty service of the cleaner. vary by model C D E G B A F A. Handle bolts and nuts (in bag with a representative...

Manual
Page 4
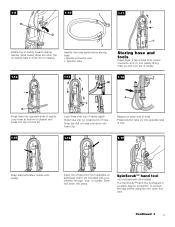
... the caddy. Replace clean water tank (upper tank) by positioning bottom first. If bolts will look like this model. Only two nuts are not going to Fig. 1-10 for your deep cleaner. Model with a Phillips screw driver. Place nuts in place while tightening each bolt securely (from the front of deep cleaner...
... the caddy. Replace clean water tank (upper tank) by positioning bottom first. If bolts will look like this model. Only two nuts are not going to Fig. 1-10 for your deep cleaner. Model with a Phillips screw driver. Place nuts in place while tightening each bolt securely (from the front of deep cleaner...
Manual
Page 5
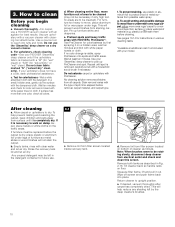
... parts before using the tool, open tool door. Loop hose at bottom of bare floor tool (available at additional cost if not included with all models) The SpinScrub™ hand tool is shipped in hook (H) on caddy. Press solution tube (J) into place. Insert top of cleaner and press into caddy. Nozzle...
... parts before using the tool, open tool door. Loop hose at bottom of bare floor tool (available at additional cost if not included with all models) The SpinScrub™ hand tool is shipped in hook (H) on caddy. Press solution tube (J) into place. Insert top of cleaner and press into caddy. Nozzle...

Manual
Page 7
... 2-1 1 3 2 4 17 5 19 18 6 7 9 20 8 21 10 11 16 15 12 22 14 12 13 23 The assembled deep cleaner will look like the drawing. Model with all models) 6. Hose/tool caddy 20. Operate deep cleaner only at additional cost if not included with your deep cleaner from room to allow convenient operation...
... 2-1 1 3 2 4 17 5 19 18 6 7 9 20 8 21 10 11 16 15 12 22 14 12 13 23 The assembled deep cleaner will look like the drawing. Model with all models) 6. Hose/tool caddy 20. Operate deep cleaner only at additional cost if not included with your deep cleaner from room to allow convenient operation...
Manual
Page 10
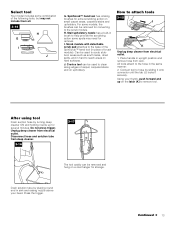
... removes all stains from surface until spot is visible, spray PreCleaner onto spots and traffic areas. To prevent staining, use a HOOVER vacuum cleaner with white paper towel or cloth. If it out. Remove both tanks as described in the detergent container for "solvent...clean). 3. Vacuum thoroughly - Use a crevice tool to a nonwood bare floor surface or place waterproof material (e.g. Use your model. Pretreat spots and heavy traffic areas with HOOVER ® PreCleaner*Test PreCleaner for color removal or bleed with an agitator for colorfastness - Do not saturate carpet or upholstery ...
... removes all stains from surface until spot is visible, spray PreCleaner onto spots and traffic areas. To prevent staining, use a HOOVER vacuum cleaner with white paper towel or cloth. If it out. Remove both tanks as described in the detergent container for "solvent...clean). 3. Vacuum thoroughly - Use a crevice tool to a nonwood bare floor surface or place waterproof material (e.g. Use your model. Pretreat spots and heavy traffic areas with HOOVER ® PreCleaner*Test PreCleaner for color removal or bleed with an agitator for colorfastness - Do not saturate carpet or upholstery ...
Manual
Page 13
... some spots may not include them all. 3-14 H G I . H. Can be removed for several minutes. Place handle in brush to help provide the scrubbing action some models, the brushes can be used to clean along edges of carpet, carpeted stairs and on upholstery. After using tool Drain suction hose by turning deep...
... some spots may not include them all. 3-14 H G I . H. Can be removed for several minutes. Place handle in brush to help provide the scrubbing action some models, the brushes can be used to clean along edges of carpet, carpeted stairs and on upholstery. After using tool Drain suction hose by turning deep...
Manual
Page 16
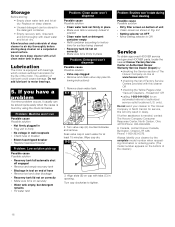
... detergent container. • Empty recovery tank, rinse tank and lid thoroughly with bearings which contain sufficient lubrication for the life of The Hoover Company on a carpeted or wood surface. Remove clean water tank. 5-1 A A 2. Always identify your cleaner to tighten. Lubrication The... and genuine HOOVER parts, locate the nearest Hoover Factory Service Center or Authorized Hoover Warranty Service Dealer (Depot) by using the check list below. Do not send your cleaner by the complete model number when requesting information or ordering parts. (The model number appears on...
... detergent container. • Empty recovery tank, rinse tank and lid thoroughly with bearings which contain sufficient lubrication for the life of The Hoover Company on a carpeted or wood surface. Remove clean water tank. 5-1 A A 2. Always identify your cleaner to tighten. Lubrication The... and genuine HOOVER parts, locate the nearest Hoover Factory Service Center or Authorized Hoover Warranty Service Dealer (Depot) by using the check list below. Do not send your cleaner by the complete model number when requesting information or ordering parts. (The model number appears on...


