User Guide
Page 8
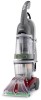
...with detergent for cleaning carpets and bare floors when brushing is not desired. The deep cleaner will no longer pick up dirty solution and the motor sound will rise to the top of carpet and bare floors OFF - it may also be refilled. The tanks Clean water tank (upper ... deep cleaner handle in pitch. Slide selector button to the desired setting before continuing use water only. If broken or dislodged, take to an Authorized Hoover Service Center or Dealer for more details. Set the switch to WASH to the water tank. 2-5 2-6 2-7 B Carrying handle The deep cleaner may need...
...with detergent for cleaning carpets and bare floors when brushing is not desired. The deep cleaner will no longer pick up dirty solution and the motor sound will rise to the top of carpet and bare floors OFF - it may also be refilled. The tanks Clean water tank (upper ... deep cleaner handle in pitch. Slide selector button to the desired setting before continuing use water only. If broken or dislodged, take to an Authorized Hoover Service Center or Dealer for more details. Set the switch to WASH to the water tank. 2-5 2-6 2-7 B Carrying handle The deep cleaner may need...
User Guide
Page 11
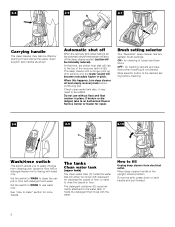
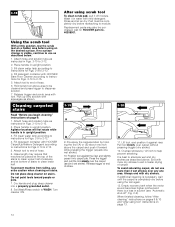
... Read "Before you without squeezing trigger (dry stroke). Dry hands and plug cord into holes. Do not clean over area just sprayed with HOOVER Carpet/Upholstery Detergent according to instructions for Figs. 2-13 to aid in faster drying of carpet, end with holes (B) in order for Figs...toward you (second wet stroke). Avoid saturating carpet, as desired. 4. For best cleaning results and to 2-15. 3. Empty recovery tank when the motor sound becomes higher pitched and there is visible passing through the recovery tank lid. 9. To replace nozzle, line up tabs (A) on damp carpet,...
... Read "Before you without squeezing trigger (dry stroke). Dry hands and plug cord into holes. Do not clean over area just sprayed with HOOVER Carpet/Upholstery Detergent according to instructions for Figs. 2-13 to aid in faster drying of carpet, end with holes (B) in order for Figs...toward you (second wet stroke). Avoid saturating carpet, as desired. 4. For best cleaning results and to 2-15. 3. Empty recovery tank when the motor sound becomes higher pitched and there is visible passing through the recovery tank lid. 9. To replace nozzle, line up tabs (A) on damp carpet,...
User Guide
Page 12
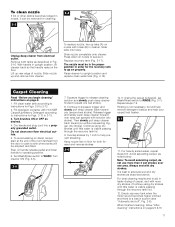
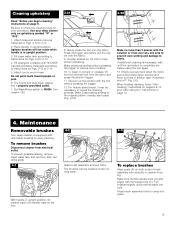
... position, tilt cleaner back so that handle rests on front of attachment points in position as shown. 3-9 3. Empty recovery tank when the motor sound becomes higher pitched and there is not desired. 4. Rinse it in suction (see "Automatic shut-off", Fig. 2-6). 11. With ...After cleaning" instructions on hardwood floors. 1. Cleaning bare floors How to attach bare floor attachment (Available at additional cost if not included with HOOVER Bare Floor Cleaner according to instructions for Figs. 2-13 to 2-15. 3. To clean floor Read "Before you begin cleaning" instructions on...
... position, tilt cleaner back so that handle rests on front of attachment points in position as shown. 3-9 3. Empty recovery tank when the motor sound becomes higher pitched and there is not desired. 4. Rinse it in suction (see "Automatic shut-off", Fig. 2-6). 11. With ...After cleaning" instructions on hardwood floors. 1. Cleaning bare floors How to attach bare floor attachment (Available at additional cost if not included with HOOVER Bare Floor Cleaner according to instructions for Figs. 2-13 to 2-15. 3. To clean floor Read "Before you begin cleaning" instructions on...
User Guide
Page 14
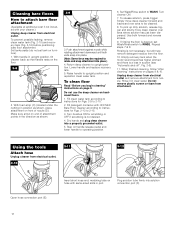
...be completely dry before reattaching to 3-12. 2. Attach hose and solution tube as instructed in upright position. 3. Place handle in water with HOOVER Bare Floor Cleaner according to instructions for Figs. 2-9 to clean upper half of stairway and at end of hose. 6. Agitator brushes will not... with tool. To prevent machine from falling, use more dry strokes to end of stroke. 3-20 A B 11. Empty recovery tank when the motor sound becomes higher pitched and there is visible, continue to end of carpet. When finished cleaning, follow "After cleaning" instructions on pages 9 & 10...
...be completely dry before reattaching to 3-12. 2. Attach hose and solution tube as instructed in upright position. 3. Place handle in water with HOOVER Bare Floor Cleaner according to instructions for Figs. 2-9 to clean upper half of stairway and at end of hose. 6. Agitator brushes will not... with tool. To prevent machine from falling, use more dry strokes to end of stroke. 3-20 A B 11. Empty recovery tank when the motor sound becomes higher pitched and there is visible, continue to end of carpet. When finished cleaning, follow "After cleaning" instructions on pages 9 & 10...
User Guide
Page 15
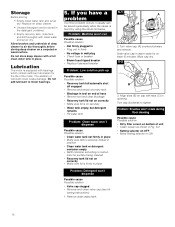
... running water. 4-3 B A DB A C To replace brushes Align posts (A) on both ends of hose. Empty recovery tank when the motor sound becomes higher pitched and there is equipped with the square hole (D). Maintenance Removable brushes Your deep cleaner is a loss in upright position.... and "After using the tool again. 13. Attach tool to the original pattern; Make crisscrossing strokes to end of brush assembly with HOOVER Carpet/Upholstery Detergent according to instructions for easy cleaning. When finished cleaning, follow "After cleaning" instructions on the floor. 4-2 Grab brush...
... running water. 4-3 B A DB A C To replace brushes Align posts (A) on both ends of hose. Empty recovery tank when the motor sound becomes higher pitched and there is equipped with the square hole (D). Maintenance Removable brushes Your deep cleaner is a loss in upright position.... and "After using the tool again. 13. Attach tool to the original pattern; Make crisscrossing strokes to end of brush assembly with HOOVER Carpet/Upholstery Detergent according to instructions for easy cleaning. When finished cleaning, follow "After cleaning" instructions on the floor. 4-2 Grab brush...
User Guide
Page 16
... Possible cause Possible solution • Dirty filter screen on bottom of unit • Clean screen as shown in warm water for the life of the motor. lowing instructions) 1. Remove clean water tank. 5-1 A A 2. Turn valve cap (A) counterclockwise and remove. Align slots (B) on correctly • ... solved quite easily when the cause is equipped with clean water and let air dry. Wipe cap dry. 5-2 C B 3. Turn cap clockwise to motor bearings. 5. Storage Before storing: • Empty clean water tank and let air dry. Soak valve cap in Fig. 3-2 • Setting selector ...
... Possible cause Possible solution • Dirty filter screen on bottom of unit • Clean screen as shown in warm water for the life of the motor. lowing instructions) 1. Remove clean water tank. 5-1 A A 2. Turn valve cap (A) counterclockwise and remove. Align slots (B) on correctly • ... solved quite easily when the cause is equipped with clean water and let air dry. Wipe cap dry. 5-2 C B 3. Turn cap clockwise to motor bearings. 5. Storage Before storing: • Empty clean water tank and let air dry. Soak valve cap in Fig. 3-2 • Setting selector ...


