User Guide
Page 3
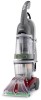
... If you need any assistance: Visit our website at the center of this owner's manual. vary by model C D F Carpet Upholstery Cleaner Bare floor cleaner PreCleaner G HI J B A A. Hose F. Bare Floor Cleaner I. Utility tool M. The model and serial numbers are included with your Hoover product. Verification of date of purchase may be required for warranty service of your...
... If you need any assistance: Visit our website at the center of this owner's manual. vary by model C D F Carpet Upholstery Cleaner Bare floor cleaner PreCleaner G HI J B A A. Hose F. Bare Floor Cleaner I. Utility tool M. The model and serial numbers are included with your Hoover product. Verification of date of purchase may be required for warranty service of your...
User Guide
Page 4
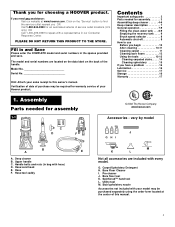
... the tools are needed on this 1-2 drawing. If bolts will look like this model. Press tank into place. 1-8 E F Attach hose/cord hook Insert tabs on hook into holes on front of handle. Snap hook onto cleaner. 4 Slide tabs (E) on caddy into slots (F) on back of handle should become... hose/tool caddy is not pushed completely down onto lower handle. 1-7 Push bolts into slots on back of cleaner. Replace clean water tank (upper tank) by positioning bottom first. Model with a Phillips screw driver. Place nuts in place while tightening each nut in recessed areas on back of...
... the tools are needed on this 1-2 drawing. If bolts will look like this model. Press tank into place. 1-8 E F Attach hose/cord hook Insert tabs on hook into holes on front of handle. Snap hook onto cleaner. 4 Slide tabs (E) on caddy into slots (F) on back of handle should become... hose/tool caddy is not pushed completely down onto lower handle. 1-7 Push bolts into slots on back of cleaner. Replace clean water tank (upper tank) by positioning bottom first. Model with a Phillips screw driver. Place nuts in place while tightening each nut in recessed areas on back of...

User Guide
Page 5
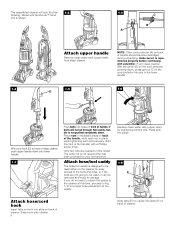
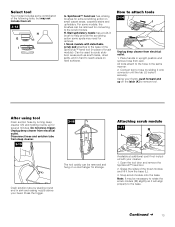
...G Rotate top of hook (K). Loop hose at additional cost if not included with all models) The SpinScrub™ hand tool is shipped in hook (H) on hose connector into top...(G) on other end of bare floor tool (available at bottom of cleaner and press into hose clip. SpinScrub™ hand tool (not included with your cleaner) through "loop" on caddy. J Identify the hose parts before... using the tool, open tool door. 5 Slide hose clip (L) toward cleaner handle. I ), into opposite side of hose. Snap stair/upholstery nozzle onto caddy. Nozzle connector...
...G Rotate top of hook (K). Loop hose at additional cost if not included with all models) The SpinScrub™ hand tool is shipped in hook (H) on hose connector into top...(G) on other end of bare floor tool (available at bottom of cleaner and press into hose clip. SpinScrub™ hand tool (not included with your cleaner) through "loop" on caddy. J Identify the hose parts before... using the tool, open tool door. 5 Slide hose clip (L) toward cleaner handle. I ), into opposite side of hose. Snap stair/upholstery nozzle onto caddy. Nozzle connector...
User Guide
Page 7
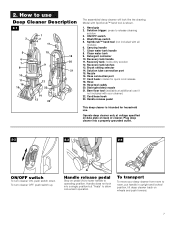
... latches 13. Stair/upholstery nozzle 21. Recovery tank handle 11. Hose/tool caddy 20. To transport To move your cleaner) 22. Model with all models) 6. Wash/Rinse switch 5. Solution tube connection port 15. Nozzle 16. Cord/hose hook 23. Plug deep... cleaner into a single position but "floats" to operating position. To turn cleaner ON, push switch down. How to release cleaning solution 3. ON/OFF switch 4. Clean water tank 9. Recovery...
... latches 13. Stair/upholstery nozzle 21. Recovery tank handle 11. Hose/tool caddy 20. To transport To move your cleaner) 22. Model with all models) 6. Wash/Rinse switch 5. Solution tube connection port 15. Nozzle 16. Cord/hose hook 23. Plug deep... cleaner into a single position but "floats" to operating position. To turn cleaner ON, push switch down. How to release cleaning solution 3. ON/OFF switch 4. Clean water tank 9. Recovery...
User Guide
Page 10
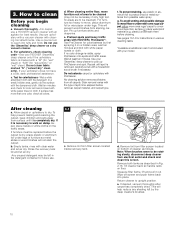
Vacuum upholstery with a vacuum cleaner with a household scrub brush if necessary. c. Use your model. carefully scrub with cleaning tool attachments. Stain removal varies with PreCleaner. See pages 10-14 for instructions on various cleaning tasks. *Available at least...any shading left in Fig. 2-16. Use a crevice tool to walk on damp carpet, place towels or white cloths on floor. If your HOOVER 'SteamVac' deep cleaner only if the upholstery fabric is necessary to reach into place. In a small, hidden area, gently rub the surface with clear water and let...
Vacuum upholstery with a vacuum cleaner with a household scrub brush if necessary. c. Use your model. carefully scrub with cleaning tool attachments. Stain removal varies with PreCleaner. See pages 10-14 for instructions on various cleaning tasks. *Available at least...any shading left in Fig. 2-16. Use a crevice tool to walk on damp carpet, place towels or white cloths on floor. If your HOOVER 'SteamVac' deep cleaner only if the upholstery fabric is necessary to reach into place. In a small, hidden area, gently rub the surface with clear water and let...
User Guide
Page 13
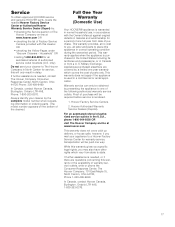
...connector until the tab (J) locks it from electrical outlet. 1. I G. Using your thumb, push forward and up for several minutes. Unplug deep cleaner from deep cleaner. 3-15 3-16 The tool caddy can be necessary to rotate the scrub module (M) slightly so it will align properly to remove tool. After ...some spots may need for removal. For some models, the brushes can be used to scrub stubborn areas such as scuff marks, dried spills, and in brush to the scrub module. How to the hose in sink and raising nozzle above your cleaner. 1. Continued § 13 Drain solution ...
...connector until the tab (J) locks it from electrical outlet. 1. I G. Using your thumb, push forward and up for several minutes. Unplug deep cleaner from deep cleaner. 3-15 3-16 The tool caddy can be necessary to rotate the scrub module (M) slightly so it will align properly to remove tool. After ...some spots may need for removal. For some models, the brushes can be used to scrub stubborn areas such as scuff marks, dried spills, and in brush to the scrub module. How to the hose in sink and raising nozzle above your cleaner. 1. Continued § 13 Drain solution ...
User Guide
Page 17
... 4A8, 1-800-263-6376. 17 Service To obtain approved HOOVER service and genuine HOOVER parts, locate the nearest Hoover Factory Service Center or Authorized Hoover Warranty Service Dealer (Depot) by the complete model number when requesting information or ordering parts. (The model number appears on the bottom of the cleaner.) Full One Year Warranty (Domestic Use) Your...
... 4A8, 1-800-263-6376. 17 Service To obtain approved HOOVER service and genuine HOOVER parts, locate the nearest Hoover Factory Service Center or Authorized Hoover Warranty Service Dealer (Depot) by the complete model number when requesting information or ordering parts. (The model number appears on the bottom of the cleaner.) Full One Year Warranty (Domestic Use) Your...


