
Manual
Page 1
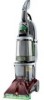
™ ™ ® ENGLISH § pp. 1-17 ESPAÑOL § pág. 18-27 FRANÇAIS § p. 28-37 Deep Cleaner The Easy to Use Deep Cleaner SteamVac™ Dual V™ Deep Cleaner cleans carpet fibers by applying hot tap water and cleaning solution. www.hoover.com
™ ™ ® ENGLISH § pp. 1-17 ESPAÑOL § pág. 18-27 FRANÇAIS § p. 28-37 Deep Cleaner The Easy to Use Deep Cleaner SteamVac™ Dual V™ Deep Cleaner cleans carpet fibers by applying hot tap water and cleaning solution. www.hoover.com

Manual
Page 2
... Instructions". • Do not clean over cord. Do not place deep cleaner on stairs. To unplug, grasp the plug, not the cord. • Never handle plug or appliance with wet hands. • Do not pull or carry by the Canadian Electrical Code. Do not run unattended at least a 16 gauge 3-wire cord which has a 3prong grounding type plug and a 3pole receptacle that is used as gasoline or use in use...
... Instructions". • Do not clean over cord. Do not place deep cleaner on stairs. To unplug, grasp the plug, not the cord. • Never handle plug or appliance with wet hands. • Do not pull or carry by the Canadian Electrical Code. Do not run unattended at least a 16 gauge 3-wire cord which has a 3prong grounding type plug and a 3pole receptacle that is used as gasoline or use in use...

Manual
Page 3
... separately using the order form located at www.hoover.com. Assembly Parts needed for warranty service of the handle. Hose F. Bare Floor Cleaner I. G. Bare floor tool K. Thank you have a problem 16 Lubrication 16 Service 17 Storage 16 Warranty 17 1. Click on the back of your model may be required for assembly 3 Assembling deep cleaner 4-6 Deep cleaner description 7 General operation 7-9 Filling the clean water tank . . . 8-9 Emptying the recovery tank . . . . 9 Brush speed selector 8 Automatic shut-off 8 How to this manual...
... separately using the order form located at www.hoover.com. Assembly Parts needed for warranty service of the handle. Hose F. Bare Floor Cleaner I. G. Bare floor tool K. Thank you have a problem 16 Lubrication 16 Service 17 Storage 16 Warranty 17 1. Click on the back of your model may be required for assembly 3 Assembling deep cleaner 4-6 Deep cleaner description 7 General operation 7-9 Filling the clean water tank . . . 8-9 Emptying the recovery tank . . . . 9 Brush speed selector 8 Automatic shut-off 8 How to this manual...

Manual
Page 4
... deep cleaner. NOTE: If the cord protector (A) on back of handle should become dislodged during unpacking, make sure it can be removed and hung for easy access to the tools and hose, or if the tools are needed on this model. If bolts will look like this time, proceed to back of the handle) with a Phillips screw driver. Press tank into place. 1-8 E F Attach hose/cord...
... deep cleaner. NOTE: If the cord protector (A) on back of handle should become dislodged during unpacking, make sure it can be removed and hung for easy access to the tools and hose, or if the tools are needed on this model. If bolts will look like this time, proceed to back of the handle) with a Phillips screw driver. Press tank into place. 1-8 E F Attach hose/cord...

Manual
Page 5
... included with all models) The SpinScrub™ hand tool is shipped in hook (H) on caddy rests in a plastic bag for protection. J Repeat on hose connector into caddy. L Loop hose over top of caddy. 1-12 1-13 1-14 M K Press hose into place. J Identify the hose parts before using the tool, open tool door. 5 Solution tube I Storing hose and tools Press hose, a few inches from nozzle connector end (I), into hose clip. Snap...
... included with all models) The SpinScrub™ hand tool is shipped in hook (H) on caddy rests in a plastic bag for protection. J Repeat on hose connector into caddy. L Loop hose over top of caddy. 1-12 1-13 1-14 M K Press hose into place. J Identify the hose parts before using the tool, open tool door. 5 Solution tube I Storing hose and tools Press hose, a few inches from nozzle connector end (I), into hose clip. Snap...

Manual
Page 6
1-18 1-19 Pull tool down and outward. To reattach, align hinges of cover with a breakaway feature which allows it to snap free if it is designed with holes on sides of tool storage area. Snap door into place. 6 To reposition the tool, reverse this procedure. How to reattach tool cover The tool cover is pushed open too far.
1-18 1-19 Pull tool down and outward. To reattach, align hinges of cover with a breakaway feature which allows it to snap free if it is designed with holes on sides of tool storage area. Snap door into place. 6 To reposition the tool, reverse this procedure. How to reattach tool cover The tool cover is pushed open too far.

Manual
Page 7
... turn cleaner OFF, push switch up. Model with all models) 6. Hand grip 2. Detergent container 10. Recovery tank handle 11. Hose/tool caddy 20. A Handle release pedal Step on wheels and push forward. 7 ON/OFF switch 4. Carrying handle 7. Wash/Rinse switch 5. SpinScrub™ hand tool (not included with SpinScrub™ hand tool is intended for quick cord release 18. Plug deep cleaner into a single position but "floats" to use . Cord/hose hook 23. Clean water tank 9. Cord hook: rotates for household use Deep Cleaner...
... turn cleaner OFF, push switch up. Model with all models) 6. Hand grip 2. Detergent container 10. Recovery tank handle 11. Hose/tool caddy 20. A Handle release pedal Step on wheels and push forward. 7 ON/OFF switch 4. Carrying handle 7. Wash/Rinse switch 5. SpinScrub™ hand tool (not included with SpinScrub™ hand tool is intended for quick cord release 18. Plug deep cleaner into a single position but "floats" to use . Cord/hose hook 23. Clean water tank 9. Cord hook: rotates for household use Deep Cleaner...

Manual
Page 8
... clean the carpet or floor with water only. ON - Slide selector button to the desired setting before continuing use without float and float retainer in the upright, locked position. Set the switch to WASH to rinsing with detergent and water. 2-5 2-6 2-7 B Carrying handle The deep cleaner may need to the water tank. Brush setting selector Your 'SteamVac' deep cleaner has two agitator brush settings. To remove tank, press down on tank handle and pull forward. 8 for repair...
... clean the carpet or floor with water only. ON - Slide selector button to the desired setting before continuing use without float and float retainer in the upright, locked position. Set the switch to WASH to rinsing with detergent and water. 2-5 2-6 2-7 B Carrying handle The deep cleaner may need to the water tank. Brush setting selector Your 'SteamVac' deep cleaner has two agitator brush settings. To remove tank, press down on tank handle and pull forward. 8 for repair...

Manual
Page 9
... water for use Bare Floor Cleaner on the floor. To fill detergent container (F), turn cap counterclockwise and remove cap. 2-15 Position bottom of tank onto cleaner and pivot tank to snap it onto deep cleaner. Lift lid off will engage, suction will stop (see page 7), and the tank must be emptied. Lower handle to upright position and reposition upper clean water tank. 9 Raise handle of deep cleaner...
... water for use Bare Floor Cleaner on the floor. To fill detergent container (F), turn cap counterclockwise and remove cap. 2-15 Position bottom of tank onto cleaner and pivot tank to snap it onto deep cleaner. Lift lid off will engage, suction will stop (see page 7), and the tank must be emptied. Lower handle to upright position and reposition upper clean water tank. 9 Raise handle of deep cleaner...
Manual
Page 10
... cleaning. Remove lint from electical outlet and check and clean this screen. If your model. e. f. This will prevent wood finishes from filter screen located on floor. Tilt cleaner back so handle rests on bottom of furniture so metal slides or wood finishes will help prevent matting and resoiling the carpet, keep children and pets away from possible water spray. b. 3. How to reach into place. Use a crevice tool...
... cleaning. Remove lint from electical outlet and check and clean this screen. If your model. e. f. This will prevent wood finishes from filter screen located on floor. Tilt cleaner back so handle rests on bottom of furniture so metal slides or wood finishes will help prevent matting and resoiling the carpet, keep children and pets away from possible water spray. b. 3. How to reach into place. Use a crevice tool...

Manual
Page 11
.... Turn brushes ON or OFF as noted below. Continue to alternate wet and dry strokes as described in Fig. 2-16. Keep nozzle flat on page 9. 1. It is desired, set Wash/Rinse switch to instructions for both tanks as described above. Raise cleaner to WASH. Fill detergent container with HOOVER Carpet/Upholstery Detergent according to RINSE (Fig. 3-7). Dry hands and plug cord into holes. Set Wash/Rinse switch to upright position and replace clean water tank...
.... Turn brushes ON or OFF as noted below. Continue to alternate wet and dry strokes as described in Fig. 2-16. Keep nozzle flat on page 9. 1. It is desired, set Wash/Rinse switch to instructions for both tanks as described above. Raise cleaner to WASH. Fill detergent container with HOOVER Carpet/Upholstery Detergent according to RINSE (Fig. 3-7). Dry hands and plug cord into holes. Set Wash/Rinse switch to upright position and replace clean water tank...

Manual
Page 12
... of nozzle (D). Using the tools Attach hose Unplug cleaner from attachment. Open hose connection port (E). 12 With handle in port. Raise handle to operating position. 6. Turn brushes ON for Figs. 2-13 to rotate and snap attachment into place. (Note: Some force may be cleaned. 8. Dry hands and plug deep cleaner into solution connection port (F). Step on hardwood floors. 1. Turn cleaner ON. 7. Unplug deep cleaner from electrical outlet and remove attachment from the floor. 10. Push attachment against nozzle while rotating attachment...
... of nozzle (D). Using the tools Attach hose Unplug cleaner from attachment. Open hose connection port (E). 12 With handle in port. Raise handle to operating position. 6. Turn brushes ON for Figs. 2-13 to rotate and snap attachment into place. (Note: Some force may be cleaned. 8. Dry hands and plug deep cleaner into solution connection port (F). Step on hardwood floors. 1. Turn cleaner ON. 7. Unplug deep cleaner from electrical outlet and remove attachment from the floor. 10. Push attachment against nozzle while rotating attachment...
Manual
Page 13
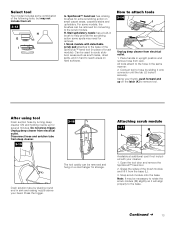
... remove the SpinScrub™ hand tool. 2. I G. All tools attach to hose by sliding it onto connector until the tab (J) locks it from rack. Note: If may be used to scrub stubborn areas such as scuff marks, dried spills, and in the same manner: 2. Using your head. Press the trigger. Do not press trigger. Drain solution tube by turning deep cleaner ON and holding nozzle...
... remove the SpinScrub™ hand tool. 2. I G. All tools attach to hose by sliding it onto connector until the tab (J) locks it from rack. Note: If may be used to scrub stubborn areas such as scuff marks, dried spills, and in the same manner: 2. Using your head. Press the trigger. Do not press trigger. Drain solution tube by turning deep cleaner ON and holding nozzle...

Manual
Page 14
.... 2. Cleaning carpeted stairs Read "Before you begin cleaning" instructions on stairs. Agitator brushes will not rotate while handle is a loss in suction (see "Automatic shut-off module. Do not point tools toward people or pets. 7. Set Wash/Rinse switch to 2-12. 4. Release trigger at bottom of stairs to end of stroke. 3-20 A B 11. Replacement pads may require that machine be cleaned and press trigger to alternate wet...
.... 2. Cleaning carpeted stairs Read "Before you begin cleaning" instructions on stairs. Agitator brushes will not rotate while handle is a loss in suction (see "Automatic shut-off module. Do not point tools toward people or pets. 7. Set Wash/Rinse switch to 2-12. 4. Release trigger at bottom of stairs to end of stroke. 3-20 A B 11. Replacement pads may require that machine be cleaned and press trigger to alternate wet...

Manual
Page 15
... prevent over-wetting and damage to snap into a properly grounded outlet. 7. Turn cleaner ON. 3-21 8. Vacuum up the solution with the solution or rinse over the fabric. 9. To remove brushes Disconnect cleaner from the fabric and press the solution trigger. 11. Agitator brushes will not rotate while handle is completely dry before using tool" instructions on the floor. 4-2 Grab brush assembly and pull firmly. Dry hands and plug deep cleaner into...
... prevent over-wetting and damage to snap into a properly grounded outlet. 7. Turn cleaner ON. 3-21 8. Vacuum up the solution with the solution or rinse over the fabric. 9. To remove brushes Disconnect cleaner from the fabric and press the solution trigger. 11. Agitator brushes will not rotate while handle is completely dry before using tool" instructions on the floor. 4-2 Grab brush assembly and pull firmly. Dry hands and plug deep cleaner into...

Manual
Page 16
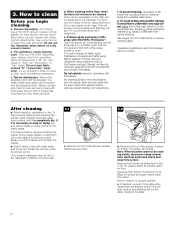
... sure lid is found by using the check list below. Wipe cap dry. 5-2 C B 3. Lubrication The motor is equipped with clean water and let air dry. Problem: Machine won't run Possible cause Possible solution • Not firmly plugged in • Plug unit in firmly • No voltage in wall plug • Check fuse or breaker • Blown fuse/tripped breaker • Replace fuse/reset breaker Problem: Low solution pick-up Possible cause Possible solution...
... sure lid is found by using the check list below. Wipe cap dry. 5-2 C B 3. Lubrication The motor is equipped with clean water and let air dry. Problem: Machine won't run Possible cause Possible solution • Not firmly plugged in • Plug unit in firmly • No voltage in wall plug • Check fuse or breaker • Blown fuse/tripped breaker • Replace fuse/reset breaker Problem: Low solution pick-up Possible cause Possible solution...

Manual
Page 17
... the cost of parts only. Service To obtain approved HOOVER service and genuine HOOVER parts, locate the nearest Hoover Factory Service Center or Authorized Hoover Warranty Service Dealer (Depot) by: • checking the Service section of The Hoover Company on-line at www.hoover.com OR • checking the list of Factory Service Centers provided with the Owner's Manual against original defects in correct operating condition during the warranted period. Warranty service can only...
... the cost of parts only. Service To obtain approved HOOVER service and genuine HOOVER parts, locate the nearest Hoover Factory Service Center or Authorized Hoover Warranty Service Dealer (Depot) by: • checking the Service section of The Hoover Company on-line at www.hoover.com OR • checking the list of Factory Service Centers provided with the Owner's Manual against original defects in correct operating condition during the warranted period. Warranty service can only...


