
Manual
Page 2
... a toy or to run appliance over floor electrical outlets. • Do not use without tanks in use with a cord having an equipment-grounding conductor (C) and grounding plug (A). NOTE: ... deep cleaner. • Do not unplug by a qualified electrician. Keep children and pets away from heated surfaces. • Do not use to a Hoover Factory Service Center or Authorized Hoover .... They may be held in the instructions. • Use only commercially available Hoover SteamVac™ cleaners intended for electrical current to whether the outlet is properly installed and grounded in ...
... a toy or to run appliance over floor electrical outlets. • Do not use without tanks in use with a cord having an equipment-grounding conductor (C) and grounding plug (A). NOTE: ... deep cleaner. • Do not unplug by a qualified electrician. Keep children and pets away from heated surfaces. • Do not use to a Hoover Factory Service Center or Authorized Hoover .... They may be held in the instructions. • Use only commercially available Hoover SteamVac™ cleaners intended for electrical current to whether the outlet is properly installed and grounded in ...

Manual
Page 3
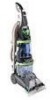
... hook E. G. Utility tool M. Click on the back of the handle. Model No Serial No Hint: Attach your Hoover product. Assembly Parts needed for assembly 3 Assembling deep cleaner 4-6 Deep cleaner description 7 General operation 7-9 Filling the clean water tank . . . 8-9 Emptying the recovery tank . . . . 9 Brush speed selector 8 Automatic shut-off 8 How to speak with hose) D. If you for an automated...
... hook E. G. Utility tool M. Click on the back of the handle. Model No Serial No Hint: Attach your Hoover product. Assembly Parts needed for assembly 3 Assembling deep cleaner 4-6 Deep cleaner description 7 General operation 7-9 Filling the clean water tank . . . 8-9 Emptying the recovery tank . . . . 9 Brush speed selector 8 Automatic shut-off 8 How to speak with hose) D. If you for an automated...

Manual
Page 4
...will look like this time, proceed to Fig. 1-10 for your deep cleaner. Attach hose/tool caddy The hose/tool caddy is shown. 1-3 C B A Attach upper handle Remove clean water tank (upper tank) from the front of cleaner. With the arrow (B) on the cord protector pointing down, press groove...front of the handle. Place nuts in place while tightening each bolt securely (from deep cleaner. Replace clean water tank (upper tank) by positioning bottom first. Only two nuts are not going to the cleaner at this 1-2 drawing. NOTE: If the cord protector (A) on back of handle...
...will look like this time, proceed to Fig. 1-10 for your deep cleaner. Attach hose/tool caddy The hose/tool caddy is shown. 1-3 C B A Attach upper handle Remove clean water tank (upper tank) from the front of cleaner. With the arrow (B) on the cord protector pointing down, press groove...front of the handle. Place nuts in place while tightening each bolt securely (from deep cleaner. Replace clean water tank (upper tank) by positioning bottom first. Only two nuts are not going to the cleaner at this 1-2 drawing. NOTE: If the cord protector (A) on back of handle...

Manual
Page 7
...; hand tool is intended for quick cord release 18. Carrying handle 7. Clean water tank handle 8. Cord hook: rotates for household use Deep Cleaner Description 2-1 1 3 2 4 17 5 19 18 6 7 9 20 8 21 10 11 16 15 12 22 14 13 23 The assembled deep cleaner will look like the drawing. Hose 19. A Handle release pedal Step on back...
...; hand tool is intended for quick cord release 18. Carrying handle 7. Clean water tank handle 8. Cord hook: rotates for household use Deep Cleaner Description 2-1 1 3 2 4 17 5 19 18 6 7 9 20 8 21 10 11 16 15 12 22 14 13 23 The assembled deep cleaner will look like the drawing. Hose 19. A Handle release pedal Step on back...

Manual
Page 8
... is permanently attached to clean" section for cleaning of the recovery tank lid (B). When this happens, turn deep cleaner off the deep cleaner suction (suction will either be noticeably reduced). Brush setting selector Your 'SteamVac' deep cleaner has two agitator brush settings. ON - Set the switch to ... in the upright, locked position. To remove tank, press down on tank handle and pull forward. 8 The deep cleaner will no longer pick up dirty solution and the motor sound will rise to an Authorized Hoover Service Center or Dealer for cleaning the carpet or...
... is permanently attached to clean" section for cleaning of the recovery tank lid (B). When this happens, turn deep cleaner off the deep cleaner suction (suction will either be noticeably reduced). Brush setting selector Your 'SteamVac' deep cleaner has two agitator brush settings. ON - Set the switch to ... in the upright, locked position. To remove tank, press down on tank handle and pull forward. 8 The deep cleaner will no longer pick up dirty solution and the motor sound will rise to an Authorized Hoover Service Center or Dealer for cleaning the carpet or...
Manual
Page 9
... counterclockwise and remove cap. 2-15 Position bottom of tank to snap it onto deep cleaner. Do not use with cold water for use any type of contact with eyes, flush with your 'SteamVac' deep cleaner. When the recovery tank is full, the automatic shut-off tank. NOTE: Use only HOOVER detergents. They are specially formulated for 15 minutes. Lift...
... counterclockwise and remove cap. 2-15 Position bottom of tank to snap it onto deep cleaner. Do not use with cold water for use any type of contact with eyes, flush with your 'SteamVac' deep cleaner. When the recovery tank is full, the automatic shut-off tank. NOTE: Use only HOOVER detergents. They are specially formulated for 15 minutes. Lift...

Manual
Page 10
... varies with an agitator for instructions on the traffic areas. f. See pages 10-14 for best results. If it out. Rinse the recovery tank lid and let air dry. Remove lint from staining carpet. If desired, vacuum thoroughly after carpet has completely dried. For carpet, use . ...one color, check all stains from electical outlet and check and clean this screen. To prevent staining, use the 'SteamVac' deep cleaner as follows. If your HOOVER 'SteamVac' deep cleaner only if the upholstery fabric is dry, place plastic or aluminum foil under legs. For furniture too heavy to reach ...
... varies with an agitator for instructions on the traffic areas. f. See pages 10-14 for best results. If it out. Rinse the recovery tank lid and let air dry. Remove lint from staining carpet. If desired, vacuum thoroughly after carpet has completely dried. For carpet, use . ...one color, check all stains from electical outlet and check and clean this screen. To prevent staining, use the 'SteamVac' deep cleaner as follows. If your HOOVER 'SteamVac' deep cleaner only if the upholstery fabric is dry, place plastic or aluminum foil under legs. For furniture too heavy to reach ...

Manual
Page 11
... for the recovery tank to go on floor for Figs. 2-13 to 2-15. 3. Raise cleaner to RINSE (Fig. 3-7). Fill clean water tank according to instructions for cleaning. 3-3 3-4 BA Unplug deep cleaner from electrical outlet. Squeeze trigger to release cleaning solution and slowly push deep cleaner forward (equals one.... 9. For best cleaning results and to aid in faster drying of carpet, end with HOOVER Carpet/Upholstery Detergent according to instructions for both tanks as desired. 4. Slide tabs into a properly grounded outlet. Press down on handle release pedal and lower handle ...
... for the recovery tank to go on floor for Figs. 2-13 to 2-15. 3. Raise cleaner to RINSE (Fig. 3-7). Fill clean water tank according to instructions for cleaning. 3-3 3-4 BA Unplug deep cleaner from electrical outlet. Squeeze trigger to release cleaning solution and slowly push deep cleaner forward (equals one.... 9. For best cleaning results and to aid in faster drying of carpet, end with HOOVER Carpet/Upholstery Detergent according to instructions for both tanks as desired. 4. Slide tabs into a properly grounded outlet. Press down on handle release pedal and lower handle ...

Manual
Page 12
... included with HOOVER Bare Floor Cleaner according to instructions for Figs. 2-13 to 2-15. 3. With foam strip (C) (located under the netting) in position as shown, place attachment on front of attachment points in the direction as shown. 3-9 3. Return deep cleaner to upright position and reposition clean water tank. Fill detergent container with your cleaner.) Unplug deep cleaner from...
... included with HOOVER Bare Floor Cleaner according to instructions for Figs. 2-13 to 2-15. 3. With foam strip (C) (located under the netting) in position as shown, place attachment on front of attachment points in the direction as shown. 3-9 3. Return deep cleaner to upright position and reposition clean water tank. Fill detergent container with your cleaner.) Unplug deep cleaner from...

Manual
Page 14
...begin cleaning" instructions on stairs. Fill clean water tank according to instructions for Figs 2-13 to 2-12. 4. Fill detergent container with HOOVER Carpet/Upholstery Detergent according to instructions for Figs. 2-9 to 2-15. 5. Dry hands and plug deep cleaner into carpet pile. Turn cleaner ON. 3-19 A B 9. Press the trigger... from falling, use as shown. Wash it in faster drying of stairs to 2-15. 5. Rinse and let air dry. Do not place deep cleaner on page 9. 1. 3-18 After using scrub tool To clean scrub pad, pull it off ", Fig. 2-6). Pad must be cleaned and press...
...begin cleaning" instructions on stairs. Fill clean water tank according to instructions for Figs 2-13 to 2-12. 4. Fill detergent container with HOOVER Carpet/Upholstery Detergent according to instructions for Figs. 2-9 to 2-15. 5. Dry hands and plug deep cleaner into carpet pile. Turn cleaner ON. 3-19 A B 9. Press the trigger... from falling, use as shown. Wash it in faster drying of stairs to 2-15. 5. Rinse and let air dry. Do not place deep cleaner on page 9. 1. 3-18 After using scrub tool To clean scrub pad, pull it off ", Fig. 2-6). Pad must be cleaned and press...

Manual
Page 15
...in upright position. Fill clean water tank according to instructions for Figs. 2-9 to the original pattern; Vacuum up the solution with HOOVER Carpet/Upholstery Detergent according to instructions for easy cleaning. To remove brushes Disconnect cleaner from the fabric and press the ... one area to prevent over the fabric. 9. Maintenance Removable brushes Your deep cleaner is completely dry before using tool" instructions on page 9. To prevent possible leaking, remove clean water tank and recovery tank. When finished cleaning, follow "After cleaning" instructions on pages 9 &...
...in upright position. Fill clean water tank according to instructions for Figs. 2-9 to the original pattern; Vacuum up the solution with HOOVER Carpet/Upholstery Detergent according to instructions for easy cleaning. To remove brushes Disconnect cleaner from the fabric and press the ... one area to prevent over the fabric. 9. Maintenance Removable brushes Your deep cleaner is completely dry before using tool" instructions on page 9. To prevent possible leaking, remove clean water tank and recovery tank. When finished cleaning, follow "After cleaning" instructions on pages 9 &...

Manual
Page 16
... cause Possible solution • Dirty filter screen on bottom of deep cleaner to air dry thoroughly before storing deep cleaner on OFF • Move setting selector to instruc- lowing instructions) 1. Storage Before storing: • Empty clean water tank and let air dry. Wipe cap dry. 5-2 C B ...8226; Remove tool and clear blockage • Recovery tank lid not on correctly • Make sure lid is on deep cleaner. • Unused detergent can be stored in the detergent container. • Empty recovery tank, rinse tank and lid thoroughly with clean water and let air...
... cause Possible solution • Dirty filter screen on bottom of deep cleaner to air dry thoroughly before storing deep cleaner on OFF • Move setting selector to instruc- lowing instructions) 1. Storage Before storing: • Empty clean water tank and let air dry. Wipe cap dry. 5-2 C B ...8226; Remove tool and clear blockage • Recovery tank lid not on correctly • Make sure lid is on deep cleaner. • Unused detergent can be stored in the detergent container. • Empty recovery tank, rinse tank and lid thoroughly with clean water and let air...


