Get support for Hoover FH52000

Hoover FH52000 Support Question

Hoover FH52000 Support Question

Find answers below for this question about Hoover FH52000.
Need a Hoover FH52000 manual? We have 1 online manual for this item!
Question posted by Kyrlia on September 16th, 2023

Solution Tank Leaking

Hoover smarteash +: the solution tank lid and outlet parts came apart. I thought I put them back correctly, but now it leaks all the solution out. How to put it back together correctly?

Current Answers

Answer #1: Posted by SonuKumar on September 16th, 2023 10:14 PM
This answer was accepted by the poster of the original question.
SonuKumar

Member since:
May 9th, 2021

Points: 16,621,300
1,100
points
To put the solution tank lid and outlet parts back together correctly on your Hoover FH52000 Hoover SmartWash+ carpet shampooer, follow these steps:

Make sure that the solution tank is empty.

Remove the solution tank lid from the tank.

Clean the lid and the outlet parts with a damp cloth.

Inspect the lid and the outlet parts for any damage. If there is any damage, you will need to replace the damaged parts before you can put the tank back together.

Apply a thin layer of silicone grease to the gasket on the lid.

Align the outlet parts with the holes in the lid.

Press the lid down firmly to snap it into place.

Fill the solution tank with water and cleaning solution.

Screw the solution tank lid onto the tank.

Once the solution tank is back together, test it to make sure that it does not leak. To do this, simply hold the tank upside down and look for any leaks. If you see any leaks, tighten the lid or apply more silicone grease to the gasket.

Here are some additional tips for putting the solution tank lid and outlet parts back together correctly:

Make sure that the gasket on the lid is clean and free of any debris.

Apply a thin layer of silicone grease to the gasket on the lid. This will help to create a watertight seal.

Align the outlet parts with the holes in the lid carefully before you press the lid into place.

Do not overtighten the solution tank lid. Overtightening the lid can damage the gasket and cause it to leak.

If you are still having problems with the solution tank leaking, you may need to contact Hoover customer support for further assistance.


Please respond to my effort to provide you with the best possible solution by using the "Acceptable Solution" and/or the "Helpful" buttons when the answer has proven to be helpful.

Regards,
Sonu
Your search handyman for all e-support needs!!

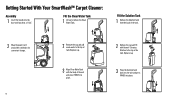
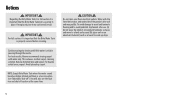
Related Hoover FH52000 Manual Pages

Product Manual - Page 2

Welcome to 5 years with the Hoover® limited warranty. See warranty for up to Hoover® ownership. Register your carpet cleaner by: Visiting Hoover.com or Hoover.ca Calling 1-800-944-9200 IT'S GUARANTEED. Make it official. Get cleaning confidence for complete details. 2
Product Manual - Page 3

Table of Contents Safety Instructions...4 Carton Contents...6 Product Guide...7 Tools and Accessories...8 Before You Begin Cleaning...9 Getting Started...10 How to Assemble Your SmartWash™ Carpet Cleaner 10 Using your SmartWash™ Carpet Cleaner 11 Maintenance...13 Hoover® Professional Series Solution Guide 20 Troubleshooting...21 Warranty ...23 French...25 Spanish...49 3
Product Manual - Page 4

... Not intended for use without filters and tanks in . To avoid personal injury or damage...allow to internal component damage, use only HOOVER cleaning fluid intended for use cord as ...children away from openings and moving parts. • Turn off all parts of vacuum canister. • Do not ...with damaged cord or plug. Keep cord away from outlet when not in areas where they may reduce air...
Product Manual - Page 5

... product, as they may scratch or damage your floor. • Water will not fit the outlet, have a proper outlet installed by the Canadian Electrical Code. 2 D D G E F CAUTION: TO REDUCE THE... sharp objects with carpets until they are completely dry. • Do not store extractor with solution in tanks. • With brushes and brush roll on a nominal 120-volt circuit and has a ...
Product Manual - Page 6

What's in -1 Antimicrobial Tool* Mesh Tool Storage Bag Sample Bottle of Cleaning Solution Accessories not included with your model may be purchased separately by visiting Hoover.com 6 FlexForce™ PowerBrushes 2-in the Box? Carpet Cleaner Solution Tank Water Tank Upper Handle Accessory Hose *Tools and Accessories vary per model.
Product Manual - Page 7

...Getting to Know Your Hoover® SmartWash™ 1. Filter 4. Removable Recovery Nozzle 2 7. Removable FlexDuo™ PowerBrushes 3 9. Solution Tank 4 10. Carry Handle 11. Handle release Pedal 5 13. Cord Wrap 12. Dirty Water/Recovery Tank 5. On/Off Pedal 6 7 8 9 10 11 12 13 7 Triggerless Handle Design 1 2. Clean Water Tank 3. Hose Connection 6. Automatic Wash...
Product Manual - Page 8

... bristle insert is for tough scrubbing power *Tools and Accessories vary per model. Accessories not included with your model may be purchased separately by visiting Hoover.com 8 The rubber nub insert is for unpleasant stain removal and hygienic clean ups B. Tools & Accessories: Stair Tool* Crevice Tool* Upholstery Tool* 2-in-1 Antimicrobial Tool...
Product Manual - Page 9

... Vacuum carpet and upholstery thoroughly with a Hoover vacuum before cleaning. ! Do not clean over floor electrical outlets. For full suction, it is important that the Dirty Water Tank is visible passing through the nozzle. Continue using dry strokes until little water is properly secured before cleaning. This removes residual carpet cleaning solution. NOTE: Empty Dirty Water Tank...
Product Manual - Page 10

...™ Carpet Cleaner: Assembly 1 Insert the handle into place. Fill the Solution Tank 1 Remove the Solution Tank from the back of the unit. 2 Wrap the power cord around the ...tank. Fill the Clean Water Tank 1 Lift up to the top of tank. Replace cap. 3 Align Clean Water Tank with the body of the unit and press FIRMLY into place. 2 Remove the cap and fill with Hoover® Cleaning Solution...
Product Manual - Page 12

... with clean water only. This will automatically dispense the optimal amount of water and cleaning solution. 6 When your carpets by extracting the water. 7 For best results, Hoover recommends rinsing the carpet with clean water only, remove the Solution Tank and then repeat steps 4 through the nozzle. 5 Slowly pull backward. The unit will remove residual...
Product Manual - Page 13

... through the nozzle. Dirty Water Tank: Your carpet cleaner is activated, empty the dirty water tank. 13 Maintenance How to Empty 1 Turn the cleaner off and unplug from carpet cleaner base at an angle. 3 Place on a flat surface and unlatch Dirty Water Tank lid to remove top of tank. 4 Empty tank, rinse, wipe filter clean and...
Product Manual - Page 14

...Tank Lid is properly secured before cleaning. For heavily soiled areas, repeat. CAUTION ! If misplaced, poor to soak up drips. 14 Avoid saturating carpet. You will result. ! This removes residual carpet cleaning solution. Remove Solution Tank...electrical outlets. Water will drip from the brushes and underside of the product after use and may puddle. For best results, Hoover ...
Product Manual - Page 15

... of injury from carpet cleaner. Maintenance How to Remove and Clean Nozzle 1 To prevent possible leaking, remove and empty Clean Water Tank, Dirty Water Tank and Solution Tank. 2 With handle in the proper position for the unit to remove from moving parts, unplug before servicing. ! CAUTION ! BE CAREFUL not to instantly pull nozzle straight up on...
Product Manual - Page 16

...The addition of injury from moving parts, unplug before storing carpet cleaner on...Tank, rinse tank and lid thoroughly with clean water and let air dry. HOW TO REPLACE 1 At an angle, align side B on a carpeted or wood surface. Repeat on cleaner. Maintenance How to Change and Clean Brushes HOW TO REMOVE 1 To prevent possible leaking, remove Clean Water Tank, Dirty Water Tank and Solution Tank...
Product Manual - Page 17

... from unit. 2 Close the Hose Port Door back into Hose Solution Port Read "Before You Begin Cleaning" instructions. Unit may lose suction if not closed properly. ! Be sure to ensure all fluid has discharged from moving parts, unplug before servicing. 17 Insert hose end by inserting FIRMLY into place. HOW TO REMOVE...
Product Manual - Page 19

...of stroke. 4 Fill Clean Water Tank according to instructions. 11 Lift tool, and position it into a properly grounded outlet. 13 It is in upright ...suction. Pull tool slowly over carpet 11 without pressing trigger. 5 Fill Solution Tank with dry strokes. When finished cleanin, follow "after Cleaning" and "After... Hoover® solution according to prevent the cleaner from falling, always place cleaner ...
Product Manual - Page 20

... your carpet. For best results, use your Carpet Cleaner + Spot Treatment + Solutions. To prevent project interruption, keep your warranty. EXPERT PET™ SPOT TREATMENT SPRAY...allergens for a truly deep clean. Hoover® Cleaning Solution Guide Use only Hoover cleaning solutions to prevent potential harm to complement your Hoover carpet cleaner and the specific condition ...
Product Manual - Page 21

... PRO PLUS™ CARPET WASHER DETERGENT Professional strength carpet & upholstery solution removes stubborn stains and odors. MULTI-FLOOR PLUS™ HARD FLOOR SOLUTION Powerful hard floor cleaning solution removes everyday dirt and grime. TILE & GROUT PLUS™ HARD FLOOR SOLUTION Powerful hard floor cleaning solution cleans and revitalizes tile and grout surfaces. STEAM PLUS™...
Product Manual - Page 22

...WARNING To reduce risk of fire and electric shock due to internal component damage, use only Hoover cleaning products intended for use . Mon-Fri 7am-6pm EST. QUESTIONS OR CONCERNS? WARNING ...Any other servicing should be done by the complete model number when requesting information or ordering parts. (The model number of product for further instruction before cleaning or servicing. See back...
Product Manual - Page 23

...See "How to Clean" page 13. 5. Dirty Water Lid not on correctly 7. Dirty Water Tank Debris Filter clogged 4. See "How to Empty" page 13. 2. See "How to start cleaning. 1. Recovery Tank not properly secured 6. Turn on handle release to Clean" page 15. 6. Clean Water Tank or Solution Tank empty 2. Brushroll stall protection activated 1. Step on the Cleaner...

Similar Questions

Leaking
Solutions is leaking from bottom, while running
(Posted by tomtrzeciak 1 year ago)
Not Spraying Water Or Solution
(Posted by Tann0919tp 2 years ago)
Solution Leaking From Back Of Fh52000g.
We have a Hoover Smart Wash FH52000G. I noticed liquid coming out of the back at the bottom of the m...
(Posted by shash28340 2 years ago)
Ask a New Question
Use the box below to post a new question about this Hoover product .
Points & Prizes
  • You can earn points for nearly everything you do on HelpOwl.com
  • You can trade in those points for gift cards at leading retailers such as Amazon.com and Walmart
  • It's that simple!
See How it Works
Create a Free Account

Hoover Manuals

Find free Hoover FH52000 manuals and user guides available at ManualOwl.com. Try out our unique manual viewer allowing you to interact with manuals from directly within your browser!

Hoover Reviews

View thousands of Hoover user reviews and customer ratings available at ReviewOwl.com.

Contact Information

Complete Hoover customer service contact information including steps to reach representatives, hours of operation, customer support links and more from ContactHelp.com.

Scoreboard Ratings

See detailed Hoover customer service rankings, employee comments and much more from our sister site.

Hoover Recalls

Find comprehensive Hoover recall information updated hourly on RecallOwl.com.