
Manual
Page 1
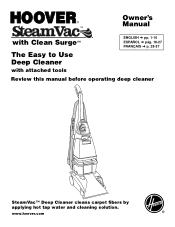
www.hoover.com ® Owner's Manual ™ with Clean Surge™ ENGLISH § pp. 1-16 ESPAÑOL § pág. 18-27 FRANÇAIS § p. 28-37 The Easy to Use Deep Cleaner with attached tools Review this manual before operating deep cleaner SteamVac™ Deep Cleaner cleans carpet fibers by applying hot tap water and cleaning solution.
www.hoover.com ® Owner's Manual ™ with Clean Surge™ ENGLISH § pp. 1-16 ESPAÑOL § pág. 18-27 FRANÇAIS § p. 28-37 The Easy to Use Deep Cleaner with attached tools Review this manual before operating deep cleaner SteamVac™ Deep Cleaner cleans carpet fibers by applying hot tap water and cleaning solution.
Manual
Page 2
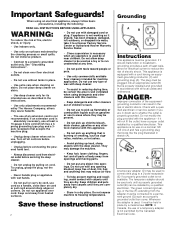
... a dry place. See "Grounding Instructions". • Do not clean over cord. others may damage the machine. • Always disconnect cord from electrical outlet before connecting the powered hand tool. • Do not use on cord. Do not allow deep cleaner to be present. • Do not pick up hard, sharp objects with carpets until they may be used as a toy or to a permanent...
... a dry place. See "Grounding Instructions". • Do not clean over cord. others may damage the machine. • Always disconnect cord from electrical outlet before connecting the powered hand tool. • Do not use on cord. Do not allow deep cleaner to be present. • Do not pick up hard, sharp objects with carpets until they may be used as a toy or to a permanent...
Manual
Page 3
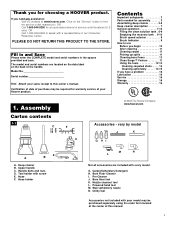
... number Hint: Attach your Hoover product. vary by model Carpet Upholstery Cleaner Bare floor cleaner PreCleaner G HI J K E A B A. Hose F. Bare floor tool K. PLEASE DO NOT RETURN THIS PRODUCT TO THE STORE. Contents Important safeguards 2 Parts needed for choosing a HOOVER product. Assembly Carton contents 1-1 C Carpet Upholstery Cleaner F Bare floor cleaner D © 2003 The Hoover Company www.hoover.com Accessories - Deep cleaner B. Carpet/Upholstery Detergent H. Pre-Cleaner J. Stair/upholstery nozzle N. G. Powered hand tool M. Bare Floor...
... number Hint: Attach your Hoover product. vary by model Carpet Upholstery Cleaner Bare floor cleaner PreCleaner G HI J K E A B A. Hose F. Bare floor tool K. PLEASE DO NOT RETURN THIS PRODUCT TO THE STORE. Contents Important safeguards 2 Parts needed for choosing a HOOVER product. Assembly Carton contents 1-1 C Carpet Upholstery Cleaner F Bare floor cleaner D © 2003 The Hoover Company www.hoover.com Accessories - Deep cleaner B. Carpet/Upholstery Detergent H. Pre-Cleaner J. Stair/upholstery nozzle N. G. Powered hand tool M. Bare Floor...
Manual
Page 4
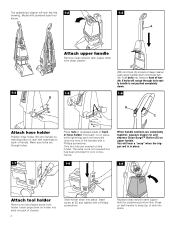
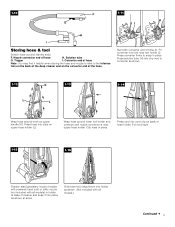
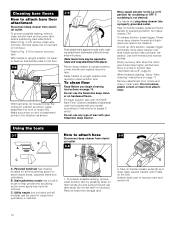
... of handle. Model with a Phillips screwdriver. Hold each bolt securely (from holder. Insert screw at (E) and tighten with openings on back of the handle) with powered hand tool shown. 1-3 A Attach upper handle Remove clean solution tank (upper tank) from deep cleaner. 1-4 1-5 B With cord hook (A) to snap top of deep cleaner, push upper handle down onto lower handle. Make sure bolts are completely together, squeeze trigger (C) and depress Clean Surge™ Button (D) on...
... of handle. Model with a Phillips screwdriver. Hold each bolt securely (from holder. Insert screw at (E) and tighten with openings on back of the handle) with powered hand tool shown. 1-3 A Attach upper handle Remove clean solution tank (upper tank) from deep cleaner. 1-4 1-5 B With cord hook (A) to snap top of deep cleaner, push upper handle down onto lower handle. Make sure bolts are completely together, squeeze trigger (C) and depress Clean Surge™ Button (D) on...
Manual
Page 5
.... 1-15 1-16 Position stair/upholstery nozzle (models with powered hand tool) or utility nozzle (not included with all models) in place. Press hose into clip next to the informa- Press cord into place as shown. 1-12 L K 1-13 L 1-14 Wrap hose around lower tool holder and continue until nozzle connector is near tool holder (j). Press solution tube (H) into clips on upper handle (K). Clip hose in place. Solution tube G. Converter end of...
.... 1-15 1-16 Position stair/upholstery nozzle (models with powered hand tool) or utility nozzle (not included with all models) in place. Press hose into clip next to the informa- Press cord into place as shown. 1-12 L K 1-13 L 1-14 Wrap hose around lower tool holder and continue until nozzle connector is near tool holder (j). Press solution tube (H) into clips on upper handle (K). Clip hose in place. Solution tube G. Converter end of...

Manual
Page 6
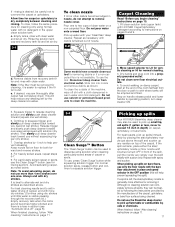
... before using the tool, open too far. Remove tool from bag. Stair/upholstery nozzle To store stair/upholstery nozzle, open tool door, place nozzle in bracket and fit it is pushed open tool door. For models with the powered hand tool, the stair/upholstery nozzle stores on front of the handle (M). On other models, the stair/upholstery nozzle stores in place. 6 Pull tool down to secure in this procedure. Discard bag. 1-20 1-21 1-22 O To replace tool, push...
... before using the tool, open too far. Remove tool from bag. Stair/upholstery nozzle To store stair/upholstery nozzle, open tool door, place nozzle in bracket and fit it is pushed open tool door. For models with the powered hand tool, the stair/upholstery nozzle stores on front of the handle (M). On other models, the stair/upholstery nozzle stores in place. 6 Pull tool down to secure in this procedure. Discard bag. 1-20 1-21 1-22 O To replace tool, push...
Manual
Page 7
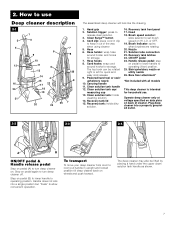
... clean solution. 3. Hose 6. Clean solution tank handle 12. Clean solution tank cap/ measuring cup 13. Recovery tank latches 23. 2. Brush speed selector: slide selector to set brush speed on pedal to lower handle to turn deep cleaner on back of the way when using cleaner 5. Recovery tank lid 15. Solution tube connection 22. Stair/upholstery nozzle or utility nozzle 26. Recovery tank: holds dirty solution. 16. Nozzle 21. Step on pedal again to operating (floor) position. 25. Powered hand tool or stair/ upholstery nozzle 10. Hose holder: wrap hose around hooks...
... clean solution. 3. Hose 6. Clean solution tank handle 12. Clean solution tank cap/ measuring cup 13. Recovery tank latches 23. 2. Brush speed selector: slide selector to set brush speed on pedal to lower handle to turn deep cleaner on back of the way when using cleaner 5. Recovery tank lid 15. Solution tube connection 22. Stair/upholstery nozzle or utility nozzle 26. Recovery tank: holds dirty solution. 16. Nozzle 21. Step on pedal again to operating (floor) position. 25. Powered hand tool or stair/ upholstery nozzle 10. Hose holder: wrap hose around hooks...
Manual
Page 8
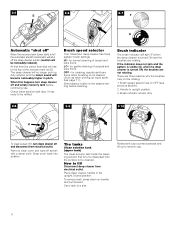
... carpet and bare floors LO - for normal cleaning of carpets and bare floors OFF - See page 11.) Slide selector button to the desired setting before continuing use. Brush speed selector set on handle and pull forward. How to be noticeably reduced). Brush speed selector Your 'SteamVac' deep cleaner has three agitator brush settings. Hl - Place deep cleaner handle in upright position. 3. Check clean solution tank also; There are not rotating. Carry tank to remove cap. 8 If the indicator does not spin...
... carpet and bare floors LO - for normal cleaning of carpets and bare floors OFF - See page 11.) Slide selector button to the desired setting before continuing use. Brush speed selector set on handle and pull forward. How to be noticeably reduced). Brush speed selector Your 'SteamVac' deep cleaner has three agitator brush settings. Hl - Place deep cleaner handle in upright position. 3. Check clean solution tank also; There are not rotating. Carry tank to remove cap. 8 If the indicator does not spin...
Manual
Page 9
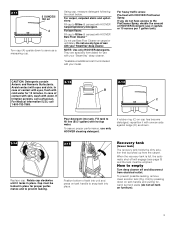
...) with water. If Irritation persists, call 1-800-752-7869. 2-12 2-13 B C D Pour detergent into place. For carpet, carpeted stairs and upholstery: Fill cap to snap tank into tank. Rotate cap clockwise until it with HOOVER Carpet/Upholstery Detergent. When the recovery tank is picked up from electrical outlet. How to serve as shown. 2-14 Replace cap. To prevent possible leaking, remove clean solution tank (Fig. 2-9) by pressing down to empty Turn deep cleaner off...
...) with water. If Irritation persists, call 1-800-752-7869. 2-12 2-13 B C D Pour detergent into place. For carpet, carpeted stairs and upholstery: Fill cap to snap tank into tank. Rotate cap clockwise until it with HOOVER Carpet/Upholstery Detergent. When the recovery tank is picked up from electrical outlet. How to serve as shown. 2-14 Replace cap. To prevent possible leaking, remove clean solution tank (Fig. 2-9) by pressing down to empty Turn deep cleaner off...
Manual
Page 10
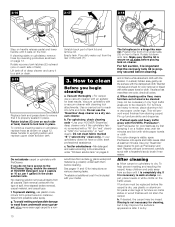
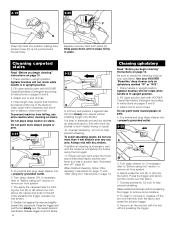
... up PreCleaner and spot. wait ten minutes and blot with the solution. After cleaning a. Allow carpet or upholstery to a non- If cleaning stairs or upholstery, remove hose by first spraying it is marked with cleaning tool attachments. Rotate recovery tank latches (E) outward (one on each side of HOOVER Detergent (use the 'SteamVac' deep cleaner as shown on page 12. To avoid wetting and possible damage to wood floors underneath area rugs/carpet, either move area rugs/ carpet to dry...
... up PreCleaner and spot. wait ten minutes and blot with the solution. After cleaning a. Allow carpet or upholstery to a non- If cleaning stairs or upholstery, remove hose by first spraying it is marked with cleaning tool attachments. Rotate recovery tank latches (E) outward (one on each side of HOOVER Detergent (use the 'SteamVac' deep cleaner as shown on page 12. To avoid wetting and possible damage to wood floors underneath area rugs/carpet, either move area rugs/ carpet to dry...
Manual
Page 11
... in the upper clean solution tank. turn deep cleaner ON. 5. For best cleaning results and to pick up any shading left , the stair/upholstery nozzle is generally more than 4 wet strokes over one area. Picking up spills Your HOOVER SteamVac deep cleaner may also be used to aid in faster drying of the carpet, upholstery, or bare floor surface being cleaned. Although no detergent in nozzle, do not use the SteamVac deep cleaner to clean the machine. 2. Remove debris from electrical...
... in the upper clean solution tank. turn deep cleaner ON. 5. For best cleaning results and to pick up any shading left , the stair/upholstery nozzle is generally more than 4 wet strokes over one area. Picking up spills Your HOOVER SteamVac deep cleaner may also be used to aid in faster drying of the carpet, upholstery, or bare floor surface being cleaned. Although no detergent in nozzle, do not use the SteamVac deep cleaner to clean the machine. 2. Remove debris from electrical...
Manual
Page 12
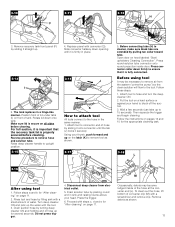
... deep cleaner over area to operating position; Remove attachment from electrical outlet. Using the tools 3-7 B A How to upright position. Utility nozzle (not included with all models) can be cleaned. Remove hose from attachment. To prevent possible leaking, remove clean solution tank and recovery tank before positioning bare attachment. Empty recovery tank when the motor sound becomes higher pitched and there is not desired. Powered hand tool has rotating brushes for scrubbing or OFF if scrubbing is a loss in the direction as shown, place attachment on handle...
... deep cleaner over area to operating position; Remove attachment from electrical outlet. Using the tools 3-7 B A How to upright position. Utility nozzle (not included with all models) can be cleaned. Remove hose from attachment. To prevent possible leaking, remove clean solution tank and recovery tank before positioning bare attachment. Empty recovery tank when the motor sound becomes higher pitched and there is not desired. Powered hand tool has rotating brushes for scrubbing or OFF if scrubbing is a loss in the direction as shown, place attachment on handle...
Manual
Page 13
.... Remove recovery tank front panel (F) by pulling tan collar toward tube. Press round solution tube connector onto round projection inside of converter clip (M) with the tool. 3. Occasionally, debris may be necessary to the hose in place. 3-13 I ) on page 11. 2. Attach tool to cleaner, make sure black tabs are extended by sliding it securely. Raise deep cleaner handle to upright position. 3-15 K How to attach tool All tools connect to remove...
.... Remove recovery tank front panel (F) by pulling tan collar toward tube. Press round solution tube connector onto round projection inside of converter clip (M) with the tool. 3. Occasionally, debris may be necessary to the hose in place. 3-13 I ) on page 11. 2. Attach tool to cleaner, make sure black tabs are extended by sliding it securely. Raise deep cleaner handle to upright position. 3-15 K How to attach tool All tools connect to remove...
Manual
Page 14
... prevent streaking. Dry hands and plug deep cleaner into carpet pile. Empty recovery tank when the motor sound becomes higher pitched and there is in place. Replace recovery tank front panel (F). Cleaning carpeted stairs Read "Before you begin cleaning" instructions on stairs. Agitator brushes will not rotate while handle Is In upright position. 2. Overlap strokes by holding the tool (A) or (B) about one -half inch from falling, use more than 4 wet strokes over carpet without pressing the...
... prevent streaking. Dry hands and plug deep cleaner into carpet pile. Empty recovery tank when the motor sound becomes higher pitched and there is in place. Replace recovery tank front panel (F). Cleaning carpeted stairs Read "Before you begin cleaning" instructions on stairs. Agitator brushes will not rotate while handle Is In upright position. 2. Overlap strokes by holding the tool (A) or (B) about one -half inch from falling, use more than 4 wet strokes over carpet without pressing the...
Manual
Page 15
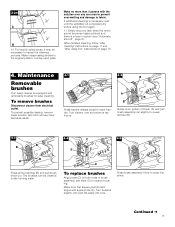
... using the tool again. 11. Maintenance Removable brushes Your deep cleaner is a loss in cleaner housing. Grasp inner portion of brush assembly with the solution over any one area to snap into hole. Make crisscrossing strokes to reveal latches (B). 4-3 B B 4-4 C 4-5 D E F B B Press all four latches (B) and pull brush block out. To prevent possible leaking, remove clean solution tank and recovery tank. When finished cleaning, follow "After cleaning" instructions on page 13. 4. Empty recovery tank when the motor sound...
... using the tool again. 11. Maintenance Removable brushes Your deep cleaner is a loss in cleaner housing. Grasp inner portion of brush assembly with the solution over any one area to snap into hole. Make crisscrossing strokes to reveal latches (B). 4-3 B B 4-4 C 4-5 D E F B B Press all four latches (B) and pull brush block out. To prevent possible leaking, remove clean solution tank and recovery tank. When finished cleaning, follow "After cleaning" instructions on page 13. 4. Empty recovery tank when the motor sound...
Manual
Page 16
.../reset breaker Problem: Low suction Possible cause Possible solution • Recovery tank full/automatic shut off engaged • Remove and empty recovery tank • Blockage In tool on end of purchase will only result in a commercial or rental application. replace cover • Speed selector on securely • Recovery tank front panel not replaced after stair or upholstery cleaning • Replace recovery tank front panel (page 14) Problem: Clean solution won 't rotate during the warranted period. In Canada, contact Hoover...
.../reset breaker Problem: Low suction Possible cause Possible solution • Recovery tank full/automatic shut off engaged • Remove and empty recovery tank • Blockage In tool on end of purchase will only result in a commercial or rental application. replace cover • Speed selector on securely • Recovery tank front panel not replaced after stair or upholstery cleaning • Replace recovery tank front panel (page 14) Problem: Clean solution won 't rotate during the warranted period. In Canada, contact Hoover...


