Owner's Manual
Page 1
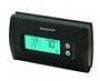
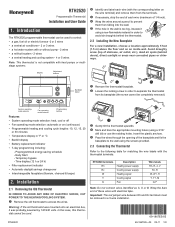
.... Display Adjustment buttons Backlight button Remove the thermostat faceplate. Loosen the locking screw in °F or °C • Backlit display • Battery replacement indicator • 7-day programming including: - Temporary bypass - Insert the plastic anchors.... Note: Do not connect wires identified as C, X or B. Wrap the bare end of staircase, air outlet, etc.), dead air spots (behind the thermostat. 2.2 Installing the New Baseplate For a new installation, choose a location approximately 5 feet (1.5 m) above the floor and on an inside wall. System ...
.... Display Adjustment buttons Backlight button Remove the thermostat faceplate. Loosen the locking screw in °F or °C • Backlit display • Battery replacement indicator • 7-day programming including: - Temporary bypass - Insert the plastic anchors.... Note: Do not connect wires identified as C, X or B. Wrap the bare end of staircase, air outlet, etc.), dead air spots (behind the thermostat. 2.2 Installing the New Baseplate For a new installation, choose a location approximately 5 feet (1.5 m) above the floor and on an inside wall. System ...
Owner's Manual
Page 2
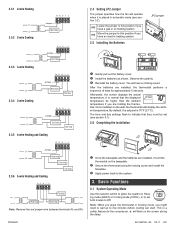
... Batteries JP2 jumper Gently pull out the battery cover. Install the batteries as shown. Once installed on the wall, the thermostat will hear a clicking sound. will operate when it is a safety feature for approximately 5 seconds. Observe the polarity. Reinstall the ... Functions 3.1 System Operating Mode Use this position if you are holding the thermostat. HE Move the jumper to this selector switch to five minutes before cooling can start. The time and day settings flash to indicate that the displayed temperature be set both modes to the...
... Batteries JP2 jumper Gently pull out the battery cover. Install the batteries as shown. Once installed on the wall, the thermostat will hear a clicking sound. will operate when it is a safety feature for approximately 5 seconds. Observe the polarity. Reinstall the ... Functions 3.1 System Operating Mode Use this position if you are holding the thermostat. HE Move the jumper to this selector switch to five minutes before cooling can start. The time and day settings flash to indicate that the displayed temperature be set both modes to the...
Owner's Manual
Page 3
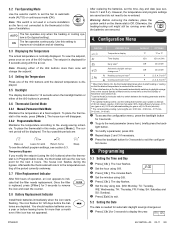
...; Press the backlight button for 3 seconds to display the year. Programming 5.1 Setting the Time and Day Press [ Clk ]. buttons until the desired temperature is replaced, press [ Filter ] for 3 seconds to exit the configura- To place the thermostat in Programmable mode, the thermostat will be displayed. You should replace batteries once a year or before...
...; Press the backlight button for 3 seconds to display the year. Programming 5.1 Setting the Time and Day Press [ Clk ]. buttons until the desired temperature is replaced, press [ Filter ] for 3 seconds to exit the configura- To place the thermostat in Programmable mode, the thermostat will be displayed. You should replace batteries once a year or before...

Owner's Manual
Page 4
... Cooling 78°F (25.5°C) Heating 62°F (16.5°C) Cooling 82°F (28°C) 10.00 p.m. 5.4 Modifying the Schedule You can program up to dis- Note: If you wish to skip a period, press [ CLR ] while the period is displayed. Period start time, the heating setpoint... OF THIS WARRANTY. The schedule automatically controls your thermostat, please go to the next period. Repeat steps 2 to 8 for a period of one setpoint to the next according to state. For each day of a consumer. Warranty Honeywell warrants this product, excluding battery, to be free...
... Cooling 78°F (25.5°C) Heating 62°F (16.5°C) Cooling 82°F (28°C) 10.00 p.m. 5.4 Modifying the Schedule You can program up to dis- Note: If you wish to skip a period, press [ CLR ] while the period is displayed. Period start time, the heating setpoint... OF THIS WARRANTY. The schedule automatically controls your thermostat, please go to the next period. Repeat steps 2 to 8 for a period of one setpoint to the next according to state. For each day of a consumer. Warranty Honeywell warrants this product, excluding battery, to be free...


