

Owner's Manual
Page 3
This thermostat is compatible with the following systems: • Gas, oil or electric furnace • Central air conditioner • a hot water system with heat pumps or multi-stage systems. 2 RTH2310 Programmable Thermostat 1 Identify System Type 1. This thermostat is not compatible with or without pump • a millivolt system • a central heating and cooling system If you are not sure of your system type or if you have any other questions, call us toll-free at 1-800-468-1502.
This thermostat is compatible with the following systems: • Gas, oil or electric furnace • Central air conditioner • a hot water system with heat pumps or multi-stage systems. 2 RTH2310 Programmable Thermostat 1 Identify System Type 1. This thermostat is not compatible with or without pump • a millivolt system • a central heating and cooling system If you are not sure of your system type or if you have any other questions, call us toll-free at 1-800-468-1502.
Owner's Manual
Page 4
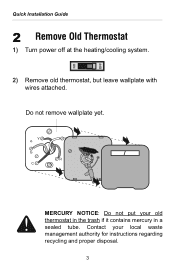
Contact your old thermostat in the trash if it contains mercury in a sealed tube. MERCURY NOTICE: Do not put your local waste management authority for instructions regarding recycling and proper disposal. 3 Quick Installation Guide 2 Remove Old Thermostat 2. 1) Turn power off at the heating/cooling system. 2) Remove old thermostat, but leave wallplate with wires attached. Do not remove wallplate yet.
Contact your old thermostat in the trash if it contains mercury in a sealed tube. MERCURY NOTICE: Do not put your local waste management authority for instructions regarding recycling and proper disposal. 3 Quick Installation Guide 2 Remove Old Thermostat 2. 1) Turn power off at the heating/cooling system. 2) Remove old thermostat, but leave wallplate with wires attached. Do not remove wallplate yet.
Owner's Manual
Page 11
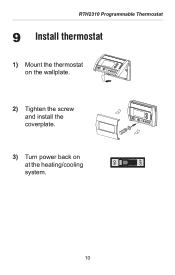
RTH2310 Programmable Thermostat 9 Install thermostat 8. 1) Mount the thermostat on the wallplate. 2) Tighten the screw and install the coverplate. 3) Turn power back on at the heating/cooling system. 10
RTH2310 Programmable Thermostat 9 Install thermostat 8. 1) Mount the thermostat on the wallplate. 2) Tighten the screw and install the coverplate. 3) Turn power back on at the heating/cooling system. 10
Owner's Manual
Page 12
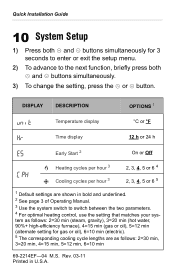
... OPTIONS 1 Temperature display °C or °F Time display 12 h or 24 h Early Start 2 On or Off Heating cycles per hour 3 2, 3, 4, 5 or 6 4 Cooling cycles per hour 3 2, 3, 4, 5 or 6 5 1 Default settings are as follows: 2=30 min (steam, gravity), 3=20 min (hot water, 90%+ high-efficiency furnace), ...4=15 min (gas or oil), 5=12 min (alternate setting for gas or oil), 6=10 min (electric). 5 The corresponding cooling cycle lengths are shown in U.S.A. Rev. 03-11 Printed in bold and underlined. 2 See page 3 of Operating Manual. 3 Use the system ...
... OPTIONS 1 Temperature display °C or °F Time display 12 h or 24 h Early Start 2 On or Off Heating cycles per hour 3 2, 3, 4, 5 or 6 4 Cooling cycles per hour 3 2, 3, 4, 5 or 6 5 1 Default settings are as follows: 2=30 min (steam, gravity), 3=20 min (hot water, 90%+ high-efficiency furnace), ...4=15 min (gas or oil), 5=12 min (alternate setting for gas or oil), 6=10 min (electric). 5 The corresponding cooling cycle lengths are shown in U.S.A. Rev. 03-11 Printed in bold and underlined. 2 See page 3 of Operating Manual. 3 Use the system ...


