

Owner's Manual
Page 1
Quick Installation Guide RTH2310 Programmable Thermostat 69-2214EF-02
Quick Installation Guide RTH2310 Programmable Thermostat 69-2214EF-02
Owner's Manual
Page 2
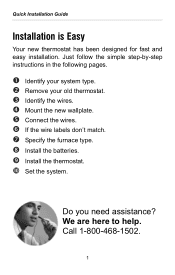
Call 1-800-468-1502. 1 We are here to help. Do you need assistance? Quick Installation Guide Installation is Easy Your new thermostat has been designed for fast and easy installation. Just follow the simple step-by-step instructions in the following pages. Identify your system type. Remove your old thermostat. Identify the wires. Mount the new wallplate. Connect the wires. If the wire labels don't match. Specify the furnace type. Install the batteries. Install the thermostat. Set the system.
Call 1-800-468-1502. 1 We are here to help. Do you need assistance? Quick Installation Guide Installation is Easy Your new thermostat has been designed for fast and easy installation. Just follow the simple step-by-step instructions in the following pages. Identify your system type. Remove your old thermostat. Identify the wires. Mount the new wallplate. Connect the wires. If the wire labels don't match. Specify the furnace type. Install the batteries. Install the thermostat. Set the system.
Owner's Manual
Page 4
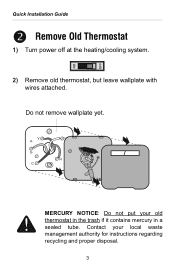
MERCURY NOTICE: Do not put your local waste management authority for instructions regarding recycling and proper disposal. 3 Quick Installation Guide Remove Old Thermostat 2. 1) Turn power off at the heating/cooling system. 2) Remove old thermostat, but leave wallplate with wires attached. Contact your old thermostat in the trash if it contains mercury in a sealed tube. Do not remove wallplate yet.
MERCURY NOTICE: Do not put your local waste management authority for instructions regarding recycling and proper disposal. 3 Quick Installation Guide Remove Old Thermostat 2. 1) Turn power off at the heating/cooling system. 2) Remove old thermostat, but leave wallplate with wires attached. Contact your old thermostat in the trash if it contains mercury in a sealed tube. Do not remove wallplate yet.
Owner's Manual
Page 6
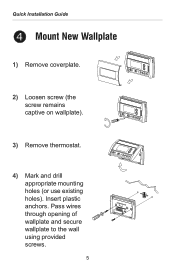
Insert plastic anchors. Pass wires through opening of wallplate and secure wallplate to the wall using provided screws. 5 Quick Installation Guide Mount New Wallplate 4. 1) Remove coverplate. 2) Loosen screw (the screw remains captive on wallplate). 3) Remove thermostat. 4) Mark and drill appropriate mounting holes (or use existing holes).
Insert plastic anchors. Pass wires through opening of wallplate and secure wallplate to the wall using provided screws. 5 Quick Installation Guide Mount New Wallplate 4. 1) Remove coverplate. 2) Loosen screw (the screw remains captive on wallplate). 3) Remove thermostat. 4) Mark and drill appropriate mounting holes (or use existing holes).

Owner's Manual
Page 8
Do not use C, X or B. If wires are connected to both Rh and Rc terminals, remove jumper (see diagram below. Wrap bare end of wire with electrical tape. Quick Installation Guide Connect Wires (less common wiring) If a labeled wire does not match any terminal designation, see previous page). 7
Do not use C, X or B. If wires are connected to both Rh and Rc terminals, remove jumper (see diagram below. Wrap bare end of wire with electrical tape. Quick Installation Guide Connect Wires (less common wiring) If a labeled wire does not match any terminal designation, see previous page). 7

Owner's Manual
Page 10
... the ambient temperature once it is 70 °F (21 °C). 9 By default, the setpoint is installed on the wall. After the batteries are holding the thermostat. Quick Installation Guide Install Batteries 7. 1) Pull out the battery cover. 2) Install the batteries as shown. Afterwards, the screen displays the actual temperature. It is normal that the...
... the ambient temperature once it is 70 °F (21 °C). 9 By default, the setpoint is installed on the wall. After the batteries are holding the thermostat. Quick Installation Guide Install Batteries 7. 1) Pull out the battery cover. 2) Install the batteries as shown. Afterwards, the screen displays the actual temperature. It is normal that the...
Owner's Manual
Page 11
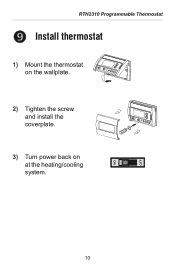
RTH2310 Programmable Thermostat Install thermostat 8. 1) Mount the thermostat on the wallplate. 2) Tighten the screw and install the coverplate. 3) Turn power back on at the heating/cooling system. 10
RTH2310 Programmable Thermostat Install thermostat 8. 1) Mount the thermostat on the wallplate. 2) Tighten the screw and install the coverplate. 3) Turn power back on at the heating/cooling system. 10

Owner's Manual
Page 12
...), 4=15 min (gas or oil), 5=12 min (alternate setting for gas or oil), 6=10 min (electric). 5 The corresponding cooling cycle lengths are shown in U.S.A. Quick Installation Guide System Setup 9. 1) Press both and buttons simultaneously for 3 seconds to enter or exit the setup menu. 2) To advance to switch between the two...
...), 4=15 min (gas or oil), 5=12 min (alternate setting for gas or oil), 6=10 min (electric). 5 The corresponding cooling cycle lengths are shown in U.S.A. Quick Installation Guide System Setup 9. 1) Press both and buttons simultaneously for 3 seconds to enter or exit the setup menu. 2) To advance to switch between the two...
Owner's Manual
Page 13
Guide d'installation rapide RTH2310 Thermostat programmable 69-2214EF-02
Guide d'installation rapide RTH2310 Thermostat programmable 69-2214EF-02


