

User Guide
Page 7
... to the Network Port 30 Connecting the Audio In/Out 31 Connecting the Power Cord 31 3 Configuration 33 Front Panel Controls 33 Connecting the USB Port 36 Connecting the Infrared Remote Control 37 Turning On the Power 38 Initial Unit Setup 38 Resetting to Default Settings 39 Logging On 39 Opening the...
... to the Network Port 30 Connecting the Audio In/Out 31 Connecting the Power Cord 31 3 Configuration 33 Front Panel Controls 33 Connecting the USB Port 36 Connecting the Infrared Remote Control 37 Turning On the Power 38 Initial Unit Setup 38 Resetting to Default Settings 39 Logging On 39 Opening the...

User Guide
Page 8
...66 Configuring Cameras 66 Configuring Audio Recording 69 Configuring the Alarm Outputs 70 Configuring the HSRD40 Displays 71 Configuring for Remote Control 74 Configuring Recording Settings 74 Setting the Record Mode 75 Setting the Recording Schedule 76 Setting the DVR for Pre-Event... 109 Recording 113 Recording Video 113 Panic Recording 113 Recording Audio 114 Playing Recorded Video 114 Front Panel and Remote Control Playback Arrow Buttons . 116 Mouse Playback Controls 116 Searching Recorded Video 117 Go To Search 118 Record Table 119 Event Log Search 121 Text-In Search 124 ...
...66 Configuring Cameras 66 Configuring Audio Recording 69 Configuring the Alarm Outputs 70 Configuring the HSRD40 Displays 71 Configuring for Remote Control 74 Configuring Recording Settings 74 Setting the Record Mode 75 Setting the Recording Schedule 76 Setting the DVR for Pre-Event... 109 Recording 113 Recording Video 113 Panic Recording 113 Recording Audio 114 Playing Recorded Video 114 Front Panel and Remote Control Playback Arrow Buttons . 116 Mouse Playback Controls 116 Searching Recorded Video 117 Go To Search 118 Record Table 119 Event Log Search 121 Text-In Search 124 ...

User Guide
Page 11
... Factory Reset Switch 30 Network Connector 30 Audio In/Out Connectors 31 Power Cord Connector 32 DVR Front Panel 33 USB Port 36 Infrared Remote Control 37 Login Screen 39 Setup Screen 40 Virtual Keyboard 40 Information Screen 41 Upgrade Screen 42 Setup Import Window 44 Setup Export Window 44 System...
... Factory Reset Switch 30 Network Connector 30 Audio In/Out Connectors 31 Power Cord Connector 32 DVR Front Panel 33 USB Port 36 Infrared Remote Control 37 Login Screen 39 Setup Screen 40 Virtual Keyboard 40 Information Screen 41 Upgrade Screen 42 Setup Import Window 44 Setup Export Window 44 System...

User Guide
Page 12
... Screen 69 Audio Setup Screen 69 Alarm-Out Setup Screen 70 OSD Setup Screen 72 OSD Margin Screen 73 Main Monitor Setup Screen 73 Remote Control Setup Screen 74 Record Menu 75 Record Setup Screen 75 Recording Schedule Setup Screen 77 Default Screen 78 Pre-Event Setup Screen 79 Event Menu...
... Screen 69 Audio Setup Screen 69 Alarm-Out Setup Screen 70 OSD Setup Screen 72 OSD Margin Screen 73 Main Monitor Setup Screen 73 Remote Control Setup Screen 74 Record Menu 75 Record Setup Screen 75 Recording Schedule Setup Screen 77 Default Screen 78 Pre-Event Setup Screen 79 Event Menu...

User Guide
Page 13
... 98 Check Recording Screen 99 Storage Screen 100 System Events Action Screen 101 Event Status Screen 102 HRSD 4 Front Panel Controls 105 Mouse Menu 107 PTZ Select Camera Menu 109 Mouse PTZ Control Toolbar 110 PTZ Feature Menu 111 PTZ Preset Screen 112 Preset View Screen 112 Playback (Text-In) Screen 115... Mouse Playback Controls Toolbar 116 Search Menu 117 Go To Search Menu 118 Go to the Date/Time Window 118 Record Table Search (Standard View) Window 119 Record ...
... 98 Check Recording Screen 99 Storage Screen 100 System Events Action Screen 101 Event Status Screen 102 HRSD 4 Front Panel Controls 105 Mouse Menu 107 PTZ Select Camera Menu 109 Mouse PTZ Control Toolbar 110 PTZ Feature Menu 111 PTZ Preset Screen 112 Preset View Screen 112 Playback (Text-In) Screen 115... Mouse Playback Controls Toolbar 116 Search Menu 117 Go To Search Menu 118 Go to the Date/Time Window 118 Record Table Search (Standard View) Window 119 Record ...

User Guide
Page 15
... 3-7 Table 3-8 Table 3-9 Table 3-10 Table 3-11 Table 3-12 Table 3-13 Table 4-1 Table 4-2 Table 4-3 Table 4-4 Table 4-5 Table 4-6 Table 4-7 Table D-1 Table D-2 Table D-3 DVR Front Panel Controls 34 Infrared Remote Control Buttons 37 Setup Screen Options 41 Storage Screen Setup Fields 50 Group Authority Levels 52 Camera Setup Screen Settings 67 Setting Alarm-Out Schedules...
... 3-7 Table 3-8 Table 3-9 Table 3-10 Table 3-11 Table 3-12 Table 3-13 Table 4-1 Table 4-2 Table 4-3 Table 4-4 Table 4-5 Table 4-6 Table 4-7 Table D-1 Table D-2 Table D-3 DVR Front Panel Controls 34 Infrared Remote Control Buttons 37 Setup Screen Options 41 Storage Screen Setup Fields 50 Group Authority Levels 52 Camera Setup Screen Settings 67 Setting Alarm-Out Schedules...

User Guide
Page 17
... lists common terms and the pages where they appear. Document 800-03097 Rev C 17 03/09 It also describes how to configure the infrared remote control. • Chapter 4, Operation, describes live monitoring, recording video and audio, playing recorded video, and searching for recorded video. • Appendix A, USB Hard Disk Drive ...screens. • Appendix H, System Log Notices provides a helpful list of system log notices. • Appendix I, Error Code Notices provides a helpful list of the front panel controls and LCD displays, and provides instructions for configuring the DVR.
... lists common terms and the pages where they appear. Document 800-03097 Rev C 17 03/09 It also describes how to configure the infrared remote control. • Chapter 4, Operation, describes live monitoring, recording video and audio, playing recorded video, and searching for recorded video. • Appendix A, USB Hard Disk Drive ...screens. • Appendix H, System Log Notices provides a helpful list of system log notices. • Appendix I, Error Code Notices provides a helpful list of the front panel controls and LCD displays, and provides instructions for configuring the DVR.

User Guide
Page 20
...-supply cord or the plug has been damaged • If liquid is replaced by following the operating instructions, adjust only those controls that the customer and installer may be given to the instructions. 19. Reduced Air Flow Installation of the equipment in a closed...a suitable operating environment for safe operation of other hazards. 16. Unauthorized substitutions may result in fire, electric shock, or other controls may result in an environment compatible with the specified operating temperature range. 21. Correct Batteries WARNING! Risk of used replacement parts ...
...-supply cord or the plug has been damaged • If liquid is replaced by following the operating instructions, adjust only those controls that the customer and installer may be given to the instructions. 19. Reduced Air Flow Installation of the equipment in a closed...a suitable operating environment for safe operation of other hazards. 16. Unauthorized substitutions may result in fire, electric shock, or other controls may result in an environment compatible with the specified operating temperature range. 21. Correct Batteries WARNING! Risk of used replacement parts ...

User Guide
Page 23
protocol • Infrared Remote Control • Remote access via Ethernet • Time Synchronization using industry standard protocol • Self-diagnostics with Color (NTSC or PAL) and B&W (CCIR and EIA-170) ...
protocol • Infrared Remote Control • Remote access via Ethernet • Time Synchronization using industry standard protocol • Self-diagnostics with Color (NTSC or PAL) and B&W (CCIR and EIA-170) ...

User Guide
Page 24
... video can use to upgrade the system or copy video clips to use than even the most advanced VCR. You can view video and control your DVR has many features that make it much more powerful and easier to external hard disk, CD-RW drives, or flash drives. 24... DVR installation VGA Monitor Main Monitor (BNC) Sensors x4 Audio Input x4 Audio Output ATM/POS Digital Video Recorder Alarm Output Flash Drive IR Remote Control RASPlus Network Web Guard Siren Technical Overview In addition to replacing both a time-lapse VCR and a multiplexer in a security installation, your DVR remotely...
... video can use to upgrade the system or copy video clips to use than even the most advanced VCR. You can view video and control your DVR has many features that make it much more powerful and easier to external hard disk, CD-RW drives, or flash drives. 24... DVR installation VGA Monitor Main Monitor (BNC) Sensors x4 Audio Input x4 Audio Output ATM/POS Digital Video Recorder Alarm Output Flash Drive IR Remote Control RASPlus Network Web Guard Siren Technical Overview In addition to replacing both a time-lapse VCR and a multiplexer in a security installation, your DVR remotely...
User Guide
Page 25
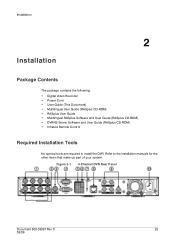
... User Guide • Mulitlingual RASplus Software and User Guide (RASplus CD-ROM) • DVRNS Server Software and User Guide (RASplus CD-ROM) • Infrared Remote Control Required Installation Tools No special tools are required to the installation manuals for the other items that make up part of your system. Refer to...
... User Guide • Mulitlingual RASplus Software and User Guide (RASplus CD-ROM) • DVRNS Server Software and User Guide (RASplus CD-ROM) • Infrared Remote Control Required Installation Tools No special tools are required to the installation manuals for the other items that make up part of your system. Refer to...

User Guide
Page 27
... to connect it to VGA out. Installation Note The Loop BNC connectors are auto terminated. Connecting Video Out Connect the main monitor to connect a remote control keyboard. In this case, press and hold for five seconds or longer to switch the video output to the DVR. Connecting to the RS232 Port...
... to connect it to VGA out. Installation Note The Loop BNC connectors are auto terminated. Connecting Video Out Connect the main monitor to connect a remote control keyboard. In this case, press and hold for five seconds or longer to switch the video output to the DVR. Connecting to the RS232 Port...

User Guide
Page 29
... be used to reset both the Alarm Out signal and the internal buzzer of 2A@125VAC and 1A@30VDC. and + (respectively) of the control system to control PTZ (pan, tilt, zoom) cameras. Document 800-03097 Rev C 29 03/09 Connect the device to the ARI (Alarm Reset In)... of the DVR. Installation Note All the connectors marked G are common. NC/NO (Relay Alarm Output) The DVR can be controlled remotely by an external device or control system, such as buzzers or lights. See Chapter 3, Configuration for configuring the RS485 connection. Figure 2-7 RS485 Port Connections R S485 ...
... be used to reset both the Alarm Out signal and the internal buzzer of 2A@125VAC and 1A@30VDC. and + (respectively) of the control system to control PTZ (pan, tilt, zoom) cameras. Document 800-03097 Rev C 29 03/09 Connect the device to the ARI (Alarm Reset In)... of the DVR. Installation Note All the connectors marked G are common. NC/NO (Relay Alarm Output) The DVR can be controlled remotely by an external device or control system, such as buzzers or lights. See Chapter 3, Configuration for configuring the RS485 connection. Figure 2-7 RS485 Port Connections R S485 ...

User Guide
Page 33
... laid out differently, perform the same functions as those on page 34 describes each button and control. Front Panel Controls The front panel looks and operates much like a VCR combined with a multiplexer. Many of the buttons on the front panel have multiple functions. Configuration 3 Configuration ...
... laid out differently, perform the same functions as those on page 34 describes each button and control. Front Panel Controls The front panel looks and operates much like a VCR combined with a multiplexer. Many of the buttons on the front panel have multiple functions. Configuration 3 Configuration ...

User Guide
Page 34
...34 When the DVR is to enter passwords (which contain only numbers). Ensure that nothing blocks the sensor, or the remote control will not function properly. # Control Table 3-1 DVR Front Panel Controls Function 1 Camera Buttons (1 to 4) Press an individual camera button to the quad (2x2) mode. HRSD40F DVR User Guide... • Camera 1 zooms in the menu or PTZ mode, you are in • Camera 2 zooms out • Camera 3 controls near focus • Camera 4 controls far focus 2 POWER LED The POWER LED lights when the unit is On. 3 ALARM LED The ALARM LED lights when alarm output or...
...34 When the DVR is to enter passwords (which contain only numbers). Ensure that nothing blocks the sensor, or the remote control will not function properly. # Control Table 3-1 DVR Front Panel Controls Function 1 Camera Buttons (1 to 4) Press an individual camera button to the quad (2x2) mode. HRSD40F DVR User Guide... • Camera 1 zooms in the menu or PTZ mode, you are in • Camera 2 zooms out • Camera 3 controls near focus • Camera 4 controls far focus 2 POWER LED The POWER LED lights when the unit is On. 3 ALARM LED The ALARM LED lights when alarm output or...

User Guide
Page 35
... zoom mode and return to play video forward at high speed. You can move the rectangle around using the Up and Down arrow buttons to control Pan and Tilt in Camera setup, you can press to select a highlighted item or complete an entry that will be enlarged. In playback mode, ... output to VGA out manually. 8 PTZ/ZOOM Button In Live Monitoring mode, press (PTZ/Zoom) to open the Pan/Tilt/Zoom screen, where you can control properly configured cameras. to freeze the current live 7 PANIC Button Press (Panic) to exit PTZ mode and enter Zoom mode. Pressing enlarges the area in...
... zoom mode and return to play video forward at high speed. You can move the rectangle around using the Up and Down arrow buttons to control Pan and Tilt in Camera setup, you can press to select a highlighted item or complete an entry that will be enlarged. In playback mode, ... output to VGA out manually. 8 PTZ/ZOOM Button In Live Monitoring mode, press (PTZ/Zoom) to open the Pan/Tilt/Zoom screen, where you can control properly configured cameras. to freeze the current live 7 PANIC Button Press (Panic) to exit PTZ mode and enter Zoom mode. Pressing enlarges the area in...

User Guide
Page 36
... mode. Figure 3-2 USB Port 36 Playback/ClipCopy is provided to display live channels sequentially. 11 USB Port See below. HRSD40F DVR User Guide # Control Table 3-1 DVR Front Panel Controls Function 9 PLAYBACK/ CLIPCOPY Button Press (Playback/ClipCopy) to access the Setup menu. Press and hold for three seconds or longer to connect external...
... mode. Figure 3-2 USB Port 36 Playback/ClipCopy is provided to display live channels sequentially. 11 USB Port See below. HRSD40F DVR User Guide # Control Table 3-1 DVR Front Panel Controls Function 9 PLAYBACK/ CLIPCOPY Button Press (Playback/ClipCopy) to access the Setup menu. Press and hold for three seconds or longer to connect external...

User Guide
Page 37
Configuration Connecting the Infrared Remote Control Figure 3-3 Infrared Remote Control Table 3-2 Infrared Remote Control Buttons Number 1 2 3 4 5 6 7 8 Function ID Camera ENTER/PAUSE MENU PANIC PLAYBACK/CLIP COPY PTZ/ZOOM Arrows If the System ID for the DVR is set to 0, you can control that DVR with the infrared remote control without any additional changes. (See Figure 3-7, the Information setup screen, in this chapter for further information on setting the System ID.) Document 800-03097 Rev C 37 03/09
Configuration Connecting the Infrared Remote Control Figure 3-3 Infrared Remote Control Table 3-2 Infrared Remote Control Buttons Number 1 2 3 4 5 6 7 8 Function ID Camera ENTER/PAUSE MENU PANIC PLAYBACK/CLIP COPY PTZ/ZOOM Arrows If the System ID for the DVR is set to 0, you can control that DVR with the infrared remote control without any additional changes. (See Figure 3-7, the Information setup screen, in this chapter for further information on setting the System ID.) Document 800-03097 Rev C 37 03/09
User Guide
Page 38
...42) • Camera (see Configuring Devices on page 66) • Audio (see Configuring Audio Recording on page 69) • Remote control (see Connecting the Infrared Remote Control on page 37) • Record mode (see Configuring Recording Settings on page 74) • Network (see Setting Up the DVR Network ...first time, you can set the Unit ID of the front panel buttons. If you set up Notifications on the remote control and number button (1 to 4) to control that DVR. Initial Unit Setup Before using various screens and dialog boxes. 38 Turning On the Power Connecting the power ...
...42) • Camera (see Configuring Devices on page 66) • Audio (see Configuring Audio Recording on page 69) • Remote control (see Connecting the Infrared Remote Control on page 37) • Record mode (see Configuring Recording Settings on page 74) • Network (see Setting Up the DVR Network ...first time, you can set the Unit ID of the front panel buttons. If you set up Notifications on the remote control and number button (1 to 4) to control that DVR. Initial Unit Setup Before using various screens and dialog boxes. 38 Turning On the Power Connecting the power ...

User Guide
Page 39
Figure 3-4 Login Screen 2. There is no default password when logging on the front panel or remote control. Note To assure the secure management of camera number buttons and then . button, and the virtual keyboard displays. Configuration Resetting to display the...Select a User and enter the password by pressing the appropriate combination of the system, Honeywell strongly recommends that screen to its default settings. (ENTER) to using the front panel buttons or the infrared remote control. Opening the Setup Screen Press Press to move through the options. Highlight and press that...
Figure 3-4 Login Screen 2. There is no default password when logging on the front panel or remote control. Note To assure the secure management of camera number buttons and then . button, and the virtual keyboard displays. Configuration Resetting to display the...Select a User and enter the password by pressing the appropriate combination of the system, Honeywell strongly recommends that screen to its default settings. (ENTER) to using the front panel buttons or the infrared remote control. Opening the Setup Screen Press Press to move through the options. Highlight and press that...