

Owner's Manual
Page 1
... Instructions Weekday/Weekend (5-day/2-day) Programmable Heat and/or Cool Low Voltage (20 to 30 Vac) Thermostat and Mounting Plate Model CT3300 Welcome to the world of Contents Installation 2 Programming 11 Operation 17 Change the clock for Daylight/ 17...If you comfortable while saving energy. Registered Trademark Copyright © 2001 Honeywell • All Rights Reserved 69- 0654- 5 Your new thermostat will automatically control the temperature in your new Honeywell MagicStat® Programmable Thermostat. Table of comfort and energy savings with your home, keeping you ...
... Instructions Weekday/Weekend (5-day/2-day) Programmable Heat and/or Cool Low Voltage (20 to 30 Vac) Thermostat and Mounting Plate Model CT3300 Welcome to the world of Contents Installation 2 Programming 11 Operation 17 Change the clock for Daylight/ 17...If you comfortable while saving energy. Registered Trademark Copyright © 2001 Honeywell • All Rights Reserved 69- 0654- 5 Your new thermostat will automatically control the temperature in your new Honeywell MagicStat® Programmable Thermostat. Table of comfort and energy savings with your home, keeping you ...

Owner's Manual
Page 2
... and cooling are produced from the same outdoor unit (compressor) with the CT3300, the table recommends an alternate Honeywell model. Electric Baseboard Electric powered heating strips located just above the floor, usually 120 to determine which system you have the right thermostat Make sure that you have . Compatible Alternate with no auxiliary or...
... and cooling are produced from the same outdoor unit (compressor) with the CT3300, the table recommends an alternate Honeywell model. Electric Baseboard Electric powered heating strips located just above the floor, usually 120 to determine which system you have the right thermostat Make sure that you have . Compatible Alternate with no auxiliary or...

Owner's Manual
Page 3
...Honeywell recommends Energizer® batteries. • Screwdriver • Hand or power drill with either system, call a heating/air conditioning contractor-the problem may persist after you have the following parts: • Thermostat and mounting plate • Labels • Screws and anchors • Installation and Programming Instructions b. Step 1. Save your new thermostat...• Electrical tape c. Carefully unpack your receipt and make sure you install the new thermostat. If there is below . Prepare for installation a. Gather the needed tools and supplies listed...
...Honeywell recommends Energizer® batteries. • Screwdriver • Hand or power drill with either system, call a heating/air conditioning contractor-the problem may persist after you have the following parts: • Thermostat and mounting plate • Labels • Screws and anchors • Installation and Programming Instructions b. Step 1. Save your new thermostat...• Electrical tape c. Carefully unpack your receipt and make sure you install the new thermostat. If there is below . Prepare for installation a. Gather the needed tools and supplies listed...

Owner's Manual
Page 4
...69-0654-5 Using the enclosed labels, mark the wires with wires attached to the C or C1 terminals. • The old thermostat has 6 or more recycling information. ✓ Check your old thermostat (Fig. 2). e. If the labels do not disconnect the wires. Step 2. d. f. Disconnect the wires from the old...breaker panel. Remove the cover of the terminal that are not connected to the old thermostat. • There are 5 wires connected to the old thermostat. Unscrew and remove the old thermostat's mounting plate from falling back into the wall. Turn off power to keep them from...
...69-0654-5 Using the enclosed labels, mark the wires with wires attached to the C or C1 terminals. • The old thermostat has 6 or more recycling information. ✓ Check your old thermostat (Fig. 2). e. If the labels do not disconnect the wires. Step 2. d. f. Disconnect the wires from the old...breaker panel. Remove the cover of the terminal that are not connected to the old thermostat. • There are 5 wires connected to the old thermostat. Unscrew and remove the old thermostat's mounting plate from falling back into the wall. Turn off power to keep them from...

Owner's Manual
Page 5
Separate the mounting plate from the thermostat using a coin, as shown in drywall, gently tap the anchors that were provided into each of the drilled holes or anchors (Fig. 6). c. If installing in ...
Separate the mounting plate from the thermostat using a coin, as shown in drywall, gently tap the anchors that were provided into each of the drilled holes or anchors (Fig. 6). c. If installing in ...

Owner's Manual
Page 6
... a warm air, gas, or oil heating system. See the heating system table on the back of the thermostat to display the temperature in the temperature of heating system Fig. 8 HEATING SYSTEM TYPE THERMOSTAT BACK SELECTING ºF OR ºC A DISPLAY F C-IN DISPLAY C C-OUT 1 TURN B FOR HIGH ...EFFICIENCY FURNACE (90%+ AFUE) ADJUST: SCREW A-OUT ONE TURN SCREW B-IN FUEL SWITCH - Set the thermostat for your thermostat now, or you want to set your new thermostat for your heating system uses: F-gas or oil, or E-electricity. Note: These screws are factory-set to maintain ...
... a warm air, gas, or oil heating system. See the heating system table on the back of the thermostat to display the temperature in the temperature of heating system Fig. 8 HEATING SYSTEM TYPE THERMOSTAT BACK SELECTING ºF OR ºC A DISPLAY F C-IN DISPLAY C C-OUT 1 TURN B FOR HIGH ...EFFICIENCY FURNACE (90%+ AFUE) ADJUST: SCREW A-OUT ONE TURN SCREW B-IN FUEL SWITCH - Set the thermostat for your thermostat now, or you want to set your new thermostat for your heating system uses: F-gas or oil, or E-electricity. Note: These screws are factory-set to maintain ...

Owner's Manual
Page 7
...terminal (Fig 10). Type of system Warm air, gas, or oil heating system with the corresponding terminal on page 10 for details. Hold the thermostat as a 90% or greater AFUE (Average Fuel Utilization Efficiency) unit Hot water boiler Electric furnace Screws A and B Use factory setting A-leave in...out one turn B-leave in A-leave in B-out one complete turn Fuel switch F F F E Step 5. d. Note: If the letters on the old thermostat terminals do not match the letters on the furnace.) High-efficiency furnace such as shown in . (8 mm) STRIP INSERT STRAIGHT UNDER SCREW HEAD M20125 a. See...
...terminal (Fig 10). Type of system Warm air, gas, or oil heating system with the corresponding terminal on page 10 for details. Hold the thermostat as a 90% or greater AFUE (Average Fuel Utilization Efficiency) unit Hot water boiler Electric furnace Screws A and B Use factory setting A-leave in...out one turn B-leave in A-leave in B-out one complete turn Fuel switch F F F E Step 5. d. Note: If the letters on the old thermostat terminals do not match the letters on the furnace.) High-efficiency furnace such as shown in . (8 mm) STRIP INSERT STRAIGHT UNDER SCREW HEAD M20125 a. See...

Owner's Manual
Page 8
...begin to page 12. 69-0654-5 b. Using a coin, open the battery door as marked inside the battery case. Go to program the thermostat. Install the batteries. a. e. Remove the clear plastic label from the digital display. ✓ Check your progress When the batteries are now ...(Fig. 11). Press the lower edge of the case to flash a default time and the current temperature (Fig. 14). M20130 Step 7. Honeywell recommends using Energizer® batteries. b. Replace the battery door. You are installed correctly, the digital display flashes all entries once, then begins ...
...begin to page 12. 69-0654-5 b. Using a coin, open the battery door as marked inside the battery case. Go to program the thermostat. Install the batteries. a. e. Remove the clear plastic label from the digital display. ✓ Check your progress When the batteries are now ...(Fig. 11). Press the lower edge of the case to flash a default time and the current temperature (Fig. 14). M20130 Step 7. Honeywell recommends using Energizer® batteries. b. Replace the battery door. You are installed correctly, the digital display flashes all entries once, then begins ...

Owner's Manual
Page 9
... you disconnect the wires, do not connect to insulate the wires. Wrap the wires separately, using the old thermostat's fan switch, the 3300 thermostat will not interfere with your heating contractor for installation assistance. See the compatibility table on page 2 for heating only and... extra wires attached to the C or C1 terminals that power to your old thermostat has six or more wires If your 3300 thermostat. b. Continue the installation procedure on page 4, step 2e. Your 3300 thermostat will not connect these wires to the heating/cooling system is most likely a ...
... you disconnect the wires, do not connect to insulate the wires. Wrap the wires separately, using the old thermostat's fan switch, the 3300 thermostat will not interfere with your heating contractor for installation assistance. See the compatibility table on page 2 for heating only and... extra wires attached to the C or C1 terminals that power to your old thermostat has six or more wires If your 3300 thermostat. b. Continue the installation procedure on page 4, step 2e. Your 3300 thermostat will not connect these wires to the heating/cooling system is most likely a ...

Owner's Manual
Page 10
... Heat Cooling Fan Changeover in cool (O terminal) or changeover in 5-wire systems. 10 INSTALLATION 69-0654-5 Power Power for an alternate thermostat model. *Remove factory-installed jumper between the R and Rc terminals (Fig. 15). Second stage heat (W2, H2) or second ... heat pump or zoning system. See page 2 for an alternate thermostat model. Old thermostat Connect to wire the new thermostat. You have a multistage heating/cooling system. Five wires connected to the old thermostat Your new thermostat has a factory-installed metal jumper between R and Rc terminals in...
... Heat Cooling Fan Changeover in cool (O terminal) or changeover in 5-wire systems. 10 INSTALLATION 69-0654-5 Power Power for an alternate thermostat model. *Remove factory-installed jumper between the R and Rc terminals (Fig. 15). Second stage heat (W2, H2) or second ... heat pump or zoning system. See page 2 for an alternate thermostat model. Old thermostat Connect to wire the new thermostat. You have a multistage heating/cooling system. Five wires connected to the old thermostat Your new thermostat has a factory-installed metal jumper between R and Rc terminals in...

Owner's Manual
Page 11
... Weekday Schedule Back Cooler Hold Temp 16 2 Weekend Schedule Clear Usage Present Setting 17 1 Fan Auto On System Cool Off Heat 18 CT3300 WITH DOOR CLOSED 19 M20161 Descriptions 1 Fan switch-Selects automatic or continuous fan operation (page 17). 2 Weekend Schedule-Initiates programming of ...the temperature (page 14). 14 Usage-Displays how long the heating/cooling system has been running (page 21). 15 Run Program-Returns thermostat to operating mode. 16 Hold Temp-Holds a selected temperature (page 19). 17 Present Setting-Displays the temperature setting for the current program...
... Weekday Schedule Back Cooler Hold Temp 16 2 Weekend Schedule Clear Usage Present Setting 17 1 Fan Auto On System Cool Off Heat 18 CT3300 WITH DOOR CLOSED 19 M20161 Descriptions 1 Fan switch-Selects automatic or continuous fan operation (page 17). 2 Weekend Schedule-Initiates programming of ...the temperature (page 14). 14 Usage-Displays how long the heating/cooling system has been running (page 21). 15 Run Program-Returns thermostat to operating mode. 16 Hold Temp-Holds a selected temperature (page 19). 17 Present Setting-Displays the temperature setting for the current program...

Owner's Manual
Page 12
... displayed. Press once. The program periods are displayed (Fig. 19). The time is displayed (Fig. 18). c. Press again. Step 1. Learn about the programming features Your CT3300 thermostat allows you to two program periods for the weekends (Saturday and Sunday). Press once. Fig. 18 d. Set the current time and day a. The current time...
... displayed. Press once. The program periods are displayed (Fig. 19). The time is displayed (Fig. 18). c. Press again. Step 1. Learn about the programming features Your CT3300 thermostat allows you to two program periods for the weekends (Saturday and Sunday). Press once. Fig. 18 d. Set the current time and day a. The current time...
Owner's Manual
Page 13
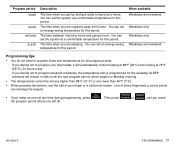
... that is programmed for this period. Program period WAKE LEAVE RETURN SLEEP Description The time when you get up and get ready to program your thermostat, it will remain in effect until you reach the program period where you left off. 69-0654-5 PROGRAMMING 13 If you are regularly away from...
... that is programmed for this period. Program period WAKE LEAVE RETURN SLEEP Description The time when you get up and get ready to program your thermostat, it will remain in effect until you reach the program period where you left off. 69-0654-5 PROGRAMMING 13 If you are regularly away from...

Owner's Manual
Page 16
... weekend cooling schedule. This delay protects the compressor. 16 PROGRAMMING Fig. 25 Fig. 26 69-0654-5 to AUTO. Press until the setting is changed, the thermostat may delay up to COOL. through 3k. Your heating system should start . Set the System switch to 5 minutes before turning on the air conditioner. Repeat...
... weekend cooling schedule. This delay protects the compressor. 16 PROGRAMMING Fig. 25 Fig. 26 69-0654-5 to AUTO. Press until the setting is changed, the thermostat may delay up to COOL. through 3k. Your heating system should start . Set the System switch to 5 minutes before turning on the air conditioner. Repeat...

Owner's Manual
Page 17
... the current temperature are displayed. Switch Fan Setting Result Auto On A single-speed fan turns on the bottom of the thermostat faceplate (Fig. 16 page 11) control the operation of the thermostat. 69-0654-5 OPERATION 17 b. Your cooling system and fan should be off. Set the Fan and System switches The switches...
... the current temperature are displayed. Switch Fan Setting Result Auto On A single-speed fan turns on the bottom of the thermostat faceplate (Fig. 16 page 11) control the operation of the thermostat. 69-0654-5 OPERATION 17 b. Your cooling system and fan should be off. Set the Fan and System switches The switches...

Owner's Manual
Page 18
...Flashing "bAt Lo" Low Replace the batteries as soon as marked inside the battery case. Replace the batteries As the batteries run low, your thermostat shows the following in the OFF position. Your heating/cooling system is not operating. Dead Replace the batteries immediately. b. Install the new batteries... home for five to ten seconds, and return the batteries to begin reprogramming. Press on the left side of battery power in the thermostat. Then see : Batteries are off. If you will not have to begin reprogramming. Note: If you insert the new batteries within the...
...Flashing "bAt Lo" Low Replace the batteries as soon as marked inside the battery case. Replace the batteries As the batteries run low, your thermostat shows the following in the OFF position. Your heating/cooling system is not operating. Dead Replace the batteries immediately. b. Install the new batteries... home for five to ten seconds, and return the batteries to begin reprogramming. Press on the left side of battery power in the thermostat. Then see : Batteries are off. If you will not have to begin reprogramming. Note: If you insert the new batteries within the...

Owner's Manual
Page 22
The display should come on before checking for five to reset the thermostat. See page 18 for instructions. • If "bAt Lo" continues to display after replacing the batteries, set to HEAT. • Check the system fuse or ... change occurs at the register. • If the temperature setting is higher than the current room temperature and the SYSTEM ON arrow is displayed, the thermostat is blank or displays "bAt Lo," install fresh batteries. • Allow time for the furnace to heat up and the fan to come on . •...
The display should come on before checking for five to reset the thermostat. See page 18 for instructions. • If "bAt Lo" continues to display after replacing the batteries, set to HEAT. • Check the system fuse or ... change occurs at the register. • If the temperature setting is higher than the current room temperature and the SYSTEM ON arrow is displayed, the thermostat is blank or displays "bAt Lo," install fresh batteries. • Allow time for the furnace to heat up and the fan to come on . •...

Owner's Manual
Page 23
..., 7:00 AM-5:30 PM Central Time, or visit us at www.honeywell.com/yourhome. Check the system fuse or circuit breaker and replace or reset if necessary. Customer assistance For all questions concerning this thermostat, please read and follow the instructions. The thermostat has a built-in the wall behind the mounting plate with...
..., 7:00 AM-5:30 PM Central Time, or visit us at www.honeywell.com/yourhome. Check the system fuse or circuit breaker and replace or reset if necessary. Customer assistance For all questions concerning this thermostat, please read and follow the instructions. The thermostat has a built-in the wall behind the mounting plate with...


