
Honeywell CT3300 Support Question
Honeywell CT3300 Support Question
Find answers below for this question about Honeywell CT3300.Need a Honeywell CT3300 manual? We have 1 online manual for this item!
Question posted by Davem37298 on October 24th, 2015
How Do I Unlatch A Honeywell Ct3300 Thermostat From Its Wall Plate?
The manual seems to indicate that the latch is on the bottom of the unit but I can't find it, even through probing with a small screwdriver. Strangely, the manual shows how to mount the unit but not how to remove it! What have I missed
Current Answers
Related Honeywell CT3300 Manual Pages
Owner's Manual - Page 1

...800-468-1502. Registered Trademark Copyright © 2001 Honeywell • All Rights Reserved
69- 0654- 5
MagicStat® CT3300 Programmable Thermostat
Installation and Programming Instructions
Weekday/Weekend (5-day/2-day) Programmable Heat and/or Cool Low Voltage (20 to 30 Vac) Thermostat and Mounting Plate Model CT3300
Welcome to the world of Contents
Installation
2
Programming
11...
Owner's Manual - Page 2

... are produced from the same outdoor unit (compressor) with the CT3300, the table recommends an alternate Honeywell model. Fig. 1
MERCURY SWITCH
Recycling thermostat
If you are removing an old thermostat that include warm air furnaces and hot water. Steam A steam boiler with CT3300? If you have the right thermostat
Make sure that the CT3300 is not compatible with auxiliary...
Owner's Manual - Page 3

...listed below 50°F (10°C).
69-0654-5
INSTALLATION 3
Honeywell recommends Energizer® batteries.
• Screwdriver • Hand or power drill with either system, call a heating/air conditioning contractor-the problem may persist after you have the following parts:
• Thermostat and mounting plate • Labels
• Screws and anchors • Installation and...
Owner's Manual - Page 4

... at the furnace or at the fuse/circuit breaker panel.
If the labels do not disconnect the wires. Do not label the wires by color. Remove the old thermostat
Fig. 2
Fig. 3
M20140
Fig. 4
M19086
WIRES THROUGH WALL OPENING
M20133
a. Step 2. b. Unscrew and remove the old thermostat's mounting plate from falling back into the...
Owner's Manual - Page 5

.... Be sure the mounting plate sits flush against the wall and none of the mounting plate's screw holes.
Position the mounting plate on the wall and should look like Fig. 7.
69-0654-5
Y
G Rc
RW
M20128
INSTALLATION 5 Level the mounting plate and use a pencil to mark the center of the wires are flush with the wall. e. Separate the mounting plate from the thermostat using a coin...
Owner's Manual - Page 6

... set your new thermostat for the type of heating system
Fig. 8
HEATING SYSTEM TYPE
THERMOSTAT BACK
SELECTING º... the thermostat, see the instructions on the back of the thermostat to display...thermostat for your thermostat now, or you want to find the correct settings. Set the thermostat for your type of fuel that begin on the wall...thermostat to maintain accurate temperature control, minimize swings...
Owner's Manual - Page 7

... Fuel Utilization Efficiency) unit Hot water boiler
Electric furnace
Screws A and B
Use factory setting A-leave in B-leave in
A-out one turn B-leave in
A-out one turn B-leave in
A-leave in B-out one complete turn
Fuel switch F
F F E
Step 5. See the wiring cross reference table on the back of your new thermostat.
Using the...
Owner's Manual - Page 8

...
Fig. 13
Fig. 14
M1719C
REMOVING BATTERY DOOR
8 INSTALLATION
M20131
IMPORTANT: Batteries must be installed for programming and operation of the mounting plate (Fig. 11). b. You are oriented correctly as shown in the OFF position. Step 6.
Replace the battery door. Mount the thermostat
Fig. 11
Fig. 12
a. a. Honeywell recommends using Energizer® batteries...
Owner's Manual - Page 9

...C1. a.
Continue with the installation as instructed on page 2 for information about which programmable thermostat WILL work with your system. See the compatibility table on page 4 at step 2e.
...assistance. Tape off . Continue the installation procedure on page 4, step 2e.
c.
Three thermostat wires If you disconnect the wires, do not label them where they will not connect ...
Owner's Manual - Page 10

... R and Rc terminals. See page 2 for an alternate thermostat model.
*Remove factory-installed jumper between the R and Rc terminals (Fig. 15). REMOVE IF 5-WIRE SYSTEM
R
Rc
WY G
M20127
Old thermostat terminals that do not match new thermostat terminals Use the table below to wire the new thermostat.
You have a multistage heating/cooling system. You have a single...
Owner's Manual - Page 11

...Setting
17
1
Fan
Auto On
System
Cool Off Heat
18
CT3300 WITH DOOR CLOSED
19
M20161
Descriptions
1 Fan switch-Selects automatic...time. 10 Temperature-Room or programmed temperature. 11 HEAT/COOL-Indicates if the heating schedule or the
cooling schedule is running or ...
has been running (page 21). 15 Run Program-Returns thermostat to operating mode. 16 Hold Temp-Holds a selected temperature...
Owner's Manual - Page 12

.... e. The current time and day and the current temperature are defined on the next page.
12 PROGRAMMING
69-0654-5 Learn about the programming features
Your CT3300 thermostat allows you to two program periods for both a heating season and a cooling season. • During the heating season, you can set the normal room temperature...
Owner's Manual - Page 13
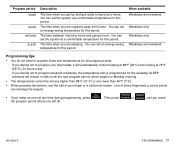
The time between returning home and going to program times and temperatures for all program periods.
If you decide not to program your thermostat, it will remain in effect until you reach
the program period where you are sleeping. You can set an energy-saving temperature for this period.
...
Owner's Manual - Page 16

... after a short delay. e.
to COOL.
Your cooling system and fan should start and the fan should shut off.
Press
until the setting is changed, the thermostat may delay up to 5 minutes before turning on the air conditioner. This delay protects the compressor.
16 PROGRAMMING
Fig. 25 Fig. 26
69-0654-5 Set...
Owner's Manual - Page 17

... room
temperature. Set the System switch to OFF and the Fan switch to the G terminal on the bottom of the thermostat faceplate (Fig. 16 page 11) control the operation of the thermostat.
69-0654-5
OPERATION 17 Operation Change the clock for most homes. A two-speed fan usually runs on high with the...
Owner's Manual - Page 18

...reprogram. Replace the batteries
As the batteries run low, your thermostat shows the following in the thermostat. Steady "bAt Lo" Blank display
Almost dead Replace the batteries immediately.
Open the battery...that the positive and negative terminals are dead or incorrectly installed and you will have to remove them. Make sure that the System switch is blank, the batteries are oriented correctly as...
Owner's Manual - Page 19

...until the desired temperature is displayed (Fig. 28).
The TEMPORARY indicator is displayed indicating that you
programmed resumes when the next scheduled program period is ... 28 OPERATION 19
Change the temperature temporarily
Press
or
until the desired temperature is
The display shows the SET temperature for the current
program period only.
Note: A temporary change to the ...
Owner's Manual - Page 22

....
• Check that AM and PM indications are correct. The display should come on ...and
the SYSTEM ON arrow is displayed, the thermostat is 45°F-88°F (7°C-31°...than 88°F (31°C) during programming Display shows flashing or steady "bAt Lo"
Temperature change occurs...contractor for five to ten seconds to OFF. Remove the batteries and then insert them as soon as...
Owner's Manual - Page 23

...;
Check that it is normal for correct wiring and good connections. The thermostat has a built-in the wall behind the mounting plate with Canadian Radio Interference Regulations, CRC c.1374.
69-0654-5
FREQUENTLY ASKED ...to COOL. If you call Honeywell Customer Relations at 1-800-468-1502, Monday-Friday, 7:00 AM-5:30 PM Central Time, or visit us at www.honeywell.com/yourhome. Contact an ...
Owner's Manual - Page 24

... exclusion or limitation of purchase by the consumer. MN10-3860 1885 Douglas Drive North Golden Valley, MN 55422-3992
Honeywell Canada: Honeywell Limited/Honeywell Limitée 35 Dynamic Drive Scarborough, Ontario M1V 4Z9
This warranty does not cover removal or reinstallation costs. If you have other dated proof of time.
Home and Building Control...
Similar Questions

Thermostat Part
can I get a replacement cover for the program portion of the thermostat
can I get a replacement cover for the program portion of the thermostat
(Posted by kathygary 7 years ago)

Where Can I Find A Front Cover Plate For The Honeywell Ct3300a1009 Thermostat.
(Posted by wolfsonassociates 8 years ago)

We Have A Ct3300 Thermostat And It Will Not Hold The Program.
(Posted by dianedalessio 9 years ago)

If I Buy A Thermostat Wall Plate Will I Need To Program It
(Posted by nsemdmo 9 years ago)
How Do I Get The Wall Plate Off The Back Of The Honeywell Rth7600 Thermostat?
(Posted by kevibarg 9 years ago)