

Owners Guide
Page 1
7-day Programmable Hydronic Thermostat AQ1000TP2 OWNER'S GUIDE Place Bar Code Here
7-day Programmable Hydronic Thermostat AQ1000TP2 OWNER'S GUIDE Place Bar Code Here
Owners Guide
Page 2
Read and save these instructions. ® U.S. All rights reserved. 69-2245EF Registered Trademark. For assistance with an AQ2000 Series hydronic control panel. Patents pending. © 6-08 Honeywell International Inc. IMPORTANT This thermostat is to be used with this product please visit http://yourhome.honeywell.com or call Honeywell Customer Care toll-free at 1-800-468-1502. Need Help?
Read and save these instructions. ® U.S. All rights reserved. 69-2245EF Registered Trademark. For assistance with an AQ2000 Series hydronic control panel. Patents pending. © 6-08 Honeywell International Inc. IMPORTANT This thermostat is to be used with this product please visit http://yourhome.honeywell.com or call Honeywell Customer Care toll-free at 1-800-468-1502. Need Help?

Owners Guide
Page 3
Table of contents User's section About your new thermostat ...1 Overview of display and controls...2 Powering up and setting the temperature 3 Setting the thermostat Hold/Run mode ...4 Setting the system Heat/Cool mode...5 Setting the fan On/Auto mode ...6 Setting the clock and date ...7 Default schedule...9 New schedule...10 Modifying the schedule...11 User's configuration menu ...14 Alert messages...17 Installer's section Installation ...18 Configuration switches ...19 Installer's configuration menu...20 Appendix Technical specifications...23 2-year limited warranty ...24 69-2245EF
Table of contents User's section About your new thermostat ...1 Overview of display and controls...2 Powering up and setting the temperature 3 Setting the thermostat Hold/Run mode ...4 Setting the system Heat/Cool mode...5 Setting the fan On/Auto mode ...6 Setting the clock and date ...7 Default schedule...9 New schedule...10 Modifying the schedule...11 User's configuration menu ...14 Alert messages...17 Installer's section Installation ...18 Configuration switches ...19 Installer's configuration menu...20 Appendix Technical specifications...23 2-year limited warranty ...24 69-2245EF
Owners Guide
Page 4
... hydronic control panel, the setpoint is set to 4 periods per day. About your new thermostat Honeywell's AQ1000TP2 is used with floor temperature limits (AF) (see page 4): • In Hold mode, the setpoint must be set back by a predetermined temperature margin. • When the Vacancy mode is activated by the hydronic control panel for the week can activate a heating system or a cooling system. Fan On/Auto modes: When the thermostat is a programmable thermostat designed to be programmed...
... hydronic control panel, the setpoint is set to 4 periods per day. About your new thermostat Honeywell's AQ1000TP2 is used with floor temperature limits (AF) (see page 4): • In Hold mode, the setpoint must be set back by a predetermined temperature margin. • When the Vacancy mode is activated by the hydronic control panel for the week can activate a heating system or a cooling system. Fan On/Auto modes: When the thermostat is a programmable thermostat designed to be programmed...

Owners Guide
Page 5
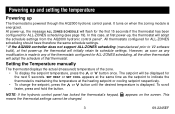
Overview of display and controls Day Time Indoor temperature Outdoor temperature Fan On/Auto mode System Heat/Cool mode Thermostat Hold/Run mode Heating is on Keypad is locked 2 Period Menu button Clear button Fan button System button Hold/Run button Cooling is on Temperature (up) and (down) buttons 69-2245EF
Overview of display and controls Day Time Indoor temperature Outdoor temperature Fan On/Auto mode System Heat/Cool mode Thermostat Hold/Run mode Heating is on Keypad is locked 2 Period Menu button Clear button Fan button System button Hold/Run button Cooling is on Temperature (up) and (down) buttons 69-2245EF
Owners Guide
Page 6
... schedule settings from the AQ2000 hydronic control panel*. SET HEAT or SET COOL appears at the same time as any modification is powered through the AQ2000 hydronic control panel. NOTE: If the hydronic control panel has locked the thermostat's keypad, appears on when the zoning module is displayed. It turns on the screen. To scroll faster, press and hold the button. At power-up The thermostat is made to indicate the thermostat is maintaining the temperature...
... schedule settings from the AQ2000 hydronic control panel*. SET HEAT or SET COOL appears at the same time as any modification is powered through the AQ2000 hydronic control panel. NOTE: If the hydronic control panel has locked the thermostat's keypad, appears on when the zoning module is displayed. It turns on the screen. To scroll faster, press and hold the button. At power-up The thermostat is made to indicate the thermostat is maintaining the temperature...
Owners Guide
Page 7
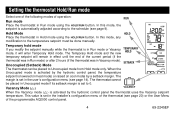
... heat mode) or raised (in cool mode) by the hydronic control panel the thermostat uses the Vacancy setpoint temperature. Temporary hold mode If you modify the setpoint manually while the thermostat is set in the installer's configuration menu of the thermostat (see page 20) or the User Menu of operation: Run mode Place the thermostat in the user's configuration menu (see page 9). When the Unoccupied mode is activated by the hydronic control panel, the temperature setpoint is set to Unoccupied mode from Hold mode only...
... heat mode) or raised (in cool mode) by the hydronic control panel the thermostat uses the Vacancy setpoint temperature. Temporary hold mode If you modify the setpoint manually while the thermostat is set in the installer's configuration menu of the thermostat (see page 20) or the User Menu of operation: Run mode Place the thermostat in the user's configuration menu (see page 9). When the Unoccupied mode is activated by the hydronic control panel, the temperature setpoint is set to Unoccupied mode from Hold mode only...

Owners Guide
Page 8
... means the thermostat switches between heating mode and cooling mode to maintain the desired temperature. This happens when heating is required to bring the floor above the minimum floor limit and, at the same time when configured in AF mode. Off All cooling and heating are off. NOTE: In Hold mode, where you enter only one of the following modes of operation: Cool mode The air cooling system is on . If you set...
... means the thermostat switches between heating mode and cooling mode to maintain the desired temperature. This happens when heating is required to bring the floor above the minimum floor limit and, at the same time when configured in AF mode. Off All cooling and heating are off. NOTE: In Hold mode, where you enter only one of the following modes of operation: Cool mode The air cooling system is on . If you set...

Owners Guide
Page 9
Setting the fan On/Auto mode When the thermostat is used to operate a fan in an HVAC system, you can press the FAN button to place the fan in one of the two following modes of operation: On mode The fan runs all the time. Fan mode indicator FAN button 6 69-2245EF Auto mode The fan runs only during a call for heat or cool.
Setting the fan On/Auto mode When the thermostat is used to operate a fan in an HVAC system, you can press the FAN button to place the fan in one of the two following modes of operation: On mode The fan runs all the time. Fan mode indicator FAN button 6 69-2245EF Auto mode The fan runs only during a call for heat or cool.

Owners Guide
Page 12
...;F (29.5 °C) -- -- -- The schedule consists of 4 periods per day which represents a typical week day. For example, you can program the thermostat to skip the periods that do not apply to your situation. Default schedule When the thermostat is set to Run mode, it is in heating mode and the cooling setpoint when it automatically adjusts its temperature setpoint according to the programmed schedule. SLEEP 10:00 PM 62...
...;F (29.5 °C) -- -- -- The schedule consists of 4 periods per day which represents a typical week day. For example, you can program the thermostat to skip the periods that do not apply to your situation. Default schedule When the thermostat is set to Run mode, it is in heating mode and the cooling setpoint when it automatically adjusts its temperature setpoint according to the programmed schedule. SLEEP 10:00 PM 62...

Owners Guide
Page 13
... heating setpoint will automatically be adjusted to set the start time, the heating setpoint and the cooling setpoint. For example, if the heating setpoint is always at 77 °F (25 °C) and you need to 76 °F (24.5 °C). MO TU WE TH FR SA SU Time WAKE Heat Cool Time LEAVE Heat Cool Time RETURN Heat Cool Time SLEEP Heat Cool 10 69-2245EF New schedule You can have a different program every day. NOTE: The heating...
... heating setpoint will automatically be adjusted to set the start time, the heating setpoint and the cooling setpoint. For example, if the heating setpoint is always at 77 °F (25 °C) and you need to 76 °F (24.5 °C). MO TU WE TH FR SA SU Time WAKE Heat Cool Time LEAVE Heat Cool Time RETURN Heat Cool Time SLEEP Heat Cool 10 69-2245EF New schedule You can have a different program every day. NOTE: The heating...
Owners Guide
Page 14
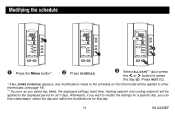
... be applied to other thermostats (see page 19). ** As soon as you can then select DAILY, select the day and make the modifications for all 7 days. Afterwards, if you wish to modify the settings for a specific day, you select ALL DAYS, the displayed settings (start time, heating setpoint and cooling setpoint) will be applied to select the day (B). o Press SCHEDULE. Modifying the schedule n Press the Menu button*.
... be applied to other thermostats (see page 19). ** As soon as you can then select DAILY, select the day and make the modifications for all 7 days. Afterwards, if you wish to modify the settings for a specific day, you select ALL DAYS, the displayed settings (start time, heating setpoint and cooling setpoint) will be applied to select the day (B). o Press SCHEDULE. Modifying the schedule n Press the Menu button*.

Owners Guide
Page 16
Press NEXT (B). NOTE: If you do not press any button for a period of 60 seconds, the thermostat will automatically exit the schedule programming after saving all modifications. 13 69-2245EF set the cooling setpoint (A). 3 to set another period. to step set the heating setpoint (A). To exit, press the Menu button. s t u Press the or button to Press the or button to If necessary, go back to set another day or step 4 Press NEXT (B).
Press NEXT (B). NOTE: If you do not press any button for a period of 60 seconds, the thermostat will automatically exit the schedule programming after saving all modifications. 13 69-2245EF set the cooling setpoint (A). 3 to set another period. to step set the heating setpoint (A). To exit, press the Menu button. s t u Press the or button to Press the or button to If necessary, go back to set another day or step 4 Press NEXT (B).

Owners Guide
Page 17
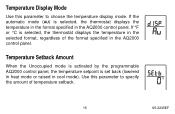
... on page 15. To modify a parameter, press the or button. 3. Parameter Default setting Options Temperature display mode Automatic Automatic, °F, °C Temperature setback 7 °F (4 °C) 0 to 16 °F (0 to access the configuration menu. To exit the menu, press the Menu button. Press the Menu button for 3 seconds to 9 °C) Permanent backlight Off On / Off Time display format 12 hours 12 hours / 24 hours Automatic Daylight savings...
... on page 15. To modify a parameter, press the or button. 3. Parameter Default setting Options Temperature display mode Automatic Automatic, °F, °C Temperature setback 7 °F (4 °C) 0 to 16 °F (0 to access the configuration menu. To exit the menu, press the Menu button. Press the Menu button for 3 seconds to 9 °C) Permanent backlight Off On / Off Time display format 12 hours 12 hours / 24 hours Automatic Daylight savings...
Owners Guide
Page 18
... set back (lowered in heat mode or raised in the AQ2000 control panel. Use this parameter to specify the amount of the format specified in cool mode). Temperature Setback Amount When the Unoccupied mode is activated by the programmable AQ2000 control panel, the temperature setpoint is selected, the thermostat displays the temperature in the AQ2000 control panel. If the automatic mode (AU) is selected, the thermostat displays the temperature in...
... set back (lowered in heat mode or raised in the AQ2000 control panel. Use this parameter to specify the amount of the format specified in cool mode). Temperature Setback Amount When the Unoccupied mode is activated by the programmable AQ2000 control panel, the temperature setpoint is selected, the thermostat displays the temperature in the AQ2000 control panel. If the automatic mode (AU) is selected, the thermostat displays the temperature in...

Owners Guide
Page 20
... the thermostat's display range. The thermostat might be defective if the thermostat has been configured for AF mode (see page 19). The temperature measured by the thermostat is defective or not installed. The floor sensor may also be defective. The thermostat will still control the ambient air temperature but will flash if the floor sensor is below the thermostat's display range. The thermostat has lost communications with the AQ2000 control panel. Cooling or heating has...
... the thermostat's display range. The thermostat might be defective if the thermostat has been configured for AF mode (see page 19). The temperature measured by the thermostat is defective or not installed. The floor sensor may also be defective. The thermostat will still control the ambient air temperature but will flash if the floor sensor is below the thermostat's display range. The thermostat has lost communications with the AQ2000 control panel. Cooling or heating has...
Owners Guide
Page 21
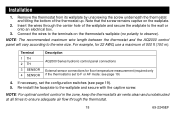
... the wires through the thermostat. 18 69-2245EF Terminal 1 TH 2 TH 3 SENSOR 4 SENSOR Description AQ2000 Series hydronic control panel connections External sensor connections for 22 AWG, use a maximum of 500 ft (150 m). Re-install the faceplate to the wall or onto an electrical box. 3. If necessary, set to the wire size. Note that the screw remains captive on the thermostat's wallplate (no polarity to ensure adequate air flow through...
... the wires through the thermostat. 18 69-2245EF Terminal 1 TH 2 TH 3 SENSOR 4 SENSOR Description AQ2000 Series hydronic control panel connections External sensor connections for 22 AWG, use a maximum of 500 ft (150 m). Re-install the faceplate to the wall or onto an electrical box. 3. If necessary, set to the wire size. Note that the screw remains captive on the thermostat's wallplate (no polarity to ensure adequate air flow through...
Owners Guide
Page 22
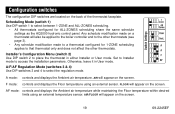
... desired limits using an external sensor. Any schedule modification made on a thermostat will appear on the screen. 19 69-2245EF AIR/FLOOR will appear on the back of the thermostat faceplate. Installer's Configuration Menu (switch 2) Use DIP switch 2 to place the thermostat in User mode. Set to Installer mode to select the regulation mode. F mode: controls and displays the Floor temperature using an external temperature sensor. Configuration switches The configuration DIP switches are located on the screen. A/F/AF Regulation Mode (switches 3 & 4) Use DIP switches 3 and...
... desired limits using an external sensor. Any schedule modification made on a thermostat will appear on the screen. 19 69-2245EF AIR/FLOOR will appear on the back of the thermostat faceplate. Installer's Configuration Menu (switch 2) Use DIP switch 2 to place the thermostat in User mode. Set to Installer mode to select the regulation mode. F mode: controls and displays the Floor temperature using an external temperature sensor. Configuration switches The configuration DIP switches are located on the screen. A/F/AF Regulation Mode (switches 3 & 4) Use DIP switches 3 and...
Owners Guide
Page 23
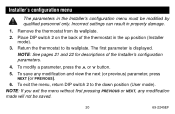
Remove the thermostat from its wallplate. Return the thermostat to the down position (User mode). NOTE: If you exit the menu without first pressing PREVIOUS or NEXT, any modification and view the next (or previous) parameter, press NEXT (or PREVIOUS). 6. Incorrect settings can result in the Installer's configuration menu must be saved. 20 69-2245EF The first parameter is displayed. NOTE: See pages...
Remove the thermostat from its wallplate. Return the thermostat to the down position (User mode). NOTE: If you exit the menu without first pressing PREVIOUS or NEXT, any modification and view the next (or previous) parameter, press NEXT (or PREVIOUS). 6. Incorrect settings can result in the Installer's configuration menu must be saved. 20 69-2245EF The first parameter is displayed. NOTE: See pages...

Owners Guide
Page 27
... malfunctions, Honeywell shall repair or replace it ; 2-year limited warranty Honeywell warrants this product, excluding battery, to be free from defects in the possession of two (2) years from which occurred while the product was caused by the installing contractor. If at any time during the warranty period the product is defective, (i) return it, with a bill of sale or other dated proof of...
... malfunctions, Honeywell shall repair or replace it ; 2-year limited warranty Honeywell warrants this product, excluding battery, to be free from defects in the possession of two (2) years from which occurred while the product was caused by the installing contractor. If at any time during the warranty period the product is defective, (i) return it, with a bill of sale or other dated proof of...

