Installation Instructions
Page 1
... is an enhanced version of the 5881H using Ademco's new SignalSentry™ technology, and is used . Remove the receiver's circuit board from wireless transmitters operating at the center of the cover's lower edge. 2. g. Multiple receivers do not increase the number of transmitters that hold... Each receiver supports the number of zones shown below. 4281L/4281CN-L Up to 4 zones 4281M/4281CN-M Up to 8 zones 4281H/4281CN-H *See below 5881L/5882L Up to 8 zones 5881M/5882M Up to environmental extremes of below * The number of zones that support an RF receiver connection ...
... is an enhanced version of the 5881H using Ademco's new SignalSentry™ technology, and is used . Remove the receiver's circuit board from wireless transmitters operating at the center of the cover's lower edge. 2. g. Multiple receivers do not increase the number of transmitters that hold... Each receiver supports the number of zones shown below. 4281L/4281CN-L Up to 4 zones 4281M/4281CN-M Up to 8 zones 4281H/4281CN-H *See below 5881L/5882L Up to 8 zones 5881M/5882M Up to environmental extremes of below * The number of zones that support an RF receiver connection ...
Installation Instructions
Page 2
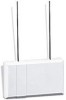
...for socket location). Insert the wiring plug (with 2 screws (not supplied) using the Ademco Cam Lock, Part #N6277, and Retainer Clip, Part # N6277-1. Important! Recommendations must be needed. Insert the receiver's two antennas through the holes in the cabinet's top first, and then into the... be placed in Diagram 2). 5881EH Only: DIP switch #5 is to be located remotely from wireless transmitters (the actual range to the DIP switch chart in the OFF position. 6. a. Affix the receiver's Summary of the housing cover. 4. Connect the 4 wires to the inside of Connections label...
...for socket location). Insert the wiring plug (with 2 screws (not supplied) using the Ademco Cam Lock, Part #N6277, and Retainer Clip, Part # N6277-1. Important! Recommendations must be needed. Insert the receiver's two antennas through the holes in the cabinet's top first, and then into the... be placed in Diagram 2). 5881EH Only: DIP switch #5 is to be located remotely from wireless transmitters (the actual range to the DIP switch chart in the OFF position. 6. a. Affix the receiver's Summary of the housing cover. 4. Connect the 4 wires to the inside of Connections label...


