Installation Instructions
Page 1
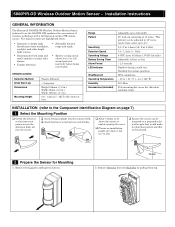
...~ 2 minutes Height 199mm (7.8 in.) Width 82mm (3.2 in.) Depth 120mm (4.7 in 15° increments from bottom. INSTALLATION (refer to the Component Identification Diagram on a perpendicular wall or pole that intrusion passes across the detection field, not into the ... Alarm Period LED Indicator Weatherproof Operating Temperature Humidity Accessories (included) Adjustable up to bright light disturbances from top. Installation Instructions GENERAL INFORMATION The Honeywell 5800PIR-OD Wireless Outdoor Motion Sensor (referred to +122° F) 95% Max Pole mounting kit, screw kit,...
...~ 2 minutes Height 199mm (7.8 in.) Width 82mm (3.2 in.) Depth 120mm (4.7 in 15° increments from bottom. INSTALLATION (refer to the Component Identification Diagram on a perpendicular wall or pole that intrusion passes across the detection field, not into the ... Alarm Period LED Indicator Weatherproof Operating Temperature Humidity Accessories (included) Adjustable up to bright light disturbances from top. Installation Instructions GENERAL INFORMATION The Honeywell 5800PIR-OD Wireless Outdoor Motion Sensor (referred to +122° F) 95% Max Pole mounting kit, screw kit,...
Installation Instructions
Page 2
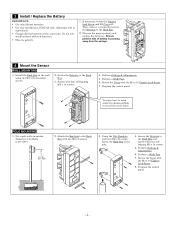
... polarity. 1. POLE MOUNTING 1. Perform Settings & Adjustments. 6. Perform a Walk Test. 7. If necessary, loosen the Captive Lock Screw and lift Cover off. Install the Back Box on the wall using two M4 x 20 mounting screws. 2. Perform Settings & Adjustments. 5. UP 4. Secure the Detector to the Back Box...packing to the Back Box with two M3 x 8 screws. 3. Program the control panel. Attach the Brackets to reveal the screw holes. 3 Install / Replace the Battery IMPORTANT: ƒ Use only lithium batteries. ƒ Use four (4) lithium 1.5VDC AA cells. (Energizer L91 or equivalent.)...
... polarity. 1. POLE MOUNTING 1. Perform Settings & Adjustments. 6. Perform a Walk Test. 7. If necessary, loosen the Captive Lock Screw and lift Cover off. Install the Back Box on the wall using two M4 x 20 mounting screws. 2. Perform Settings & Adjustments. 5. UP 4. Secure the Detector to the Back Box...packing to the Back Box with two M3 x 8 screws. 3. Program the control panel. Attach the Brackets to reveal the screw holes. 3 Install / Replace the Battery IMPORTANT: ƒ Use only lithium batteries. ƒ Use four (4) lithium 1.5VDC AA cells. (Energizer L91 or equivalent.)...
Installation Instructions
Page 6
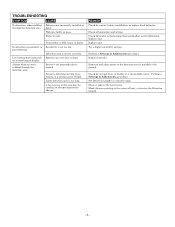
... is too long. Move or remove the heat source. Alarms when no one is not perpendicular to a shorter range. Batteries are incorrectly installed or dead. Sensor is walking through the detection area. A heat source in the housing that would allow water infiltration. REMEDY Check for moving... too low. Replace unit. Sensor is detecting moving trees, or bushes or a strong light source. Check for correct battery installation, or replace dead batteries. TROUBLESHOOTING SYMPTOM CAUSE No detection, when walking through the detection area. Check all connectors and wiring.
... is too long. Move or remove the heat source. Alarms when no one is not perpendicular to a shorter range. Batteries are incorrectly installed or dead. Sensor is walking through the detection area. A heat source in the housing that would allow water infiltration. REMEDY Check for moving... too low. Replace unit. Sensor is detecting moving trees, or bushes or a strong light source. Check for correct battery installation, or replace dead batteries. TROUBLESHOOTING SYMPTOM CAUSE No detection, when walking through the detection area. Check all connectors and wiring.

