
User Guide
Page 11
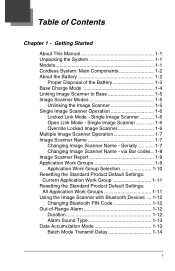
... to Base 1-5 Image Scanner Modes 1-5 Unlinking the Image Scanner 1-5 Single Image Scanner Operation 1-6 Locked Link Mode - Serially 1-7 Changing Image Scanner Name - Getting Started About This Manual 1-1 Unpacking the System 1-1 Models 1-1 Cordless System: Main Components 1-2 About the Battery 1-2 Proper Disposal of -Range Alarm 1-12 Duration 1-12 Alarm Sound Type 1-13 Data Accumulation...
... to Base 1-5 Image Scanner Modes 1-5 Unlinking the Image Scanner 1-5 Single Image Scanner Operation 1-6 Locked Link Mode - Serially 1-7 Changing Image Scanner Name - Getting Started About This Manual 1-1 Unpacking the System 1-1 Models 1-1 Cordless System: Main Components 1-2 About the Battery 1-2 Proper Disposal of -Range Alarm 1-12 Duration 1-12 Alarm Sound Type 1-13 Data Accumulation...
User Guide
Page 13
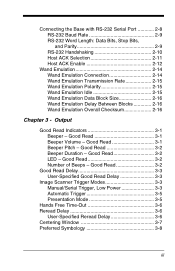
... Emulation Delay Between Blocks 2-16 Wand Emulation Overall Checksum 2-16 Chapter 3 - Good Read 3-2 Good Read Delay 3-3 User-Specified Good Read Delay 3-3 Image Scanner Trigger Modes 3-3 Manual/Serial Trigger, Low Power 3-3 Automatic Trigger 3-5 Presentation Mode 3-5 Hands Free Time-Out 3-6 Reread Delay 3-6 User-Specified Reread Delay 3-6 Centering Window 3-7 Preferred Symbology 3-8 iii Good Read...
... Emulation Delay Between Blocks 2-16 Wand Emulation Overall Checksum 2-16 Chapter 3 - Good Read 3-2 Good Read Delay 3-3 User-Specified Good Read Delay 3-3 Image Scanner Trigger Modes 3-3 Manual/Serial Trigger, Low Power 3-3 Automatic Trigger 3-5 Presentation Mode 3-5 Hands Free Time-Out 3-6 Reread Delay 3-6 User-Specified Reread Delay 3-6 Centering Window 3-7 Preferred Symbology 3-8 iii Good Read...

User Guide
Page 21
...8226; Check for the most common terminal and communications settings. Report damage immediately to an option indicates the default setting. Honeywell bar code image scanners are also provided. If you open the shipping carton containing the product, take the following interfaces...to the carrier who delivered the carton. 1 Getting Started About This Manual This manual contains information to help you ordered is accomplished by scanning the bar codes in this guide. Models Models 2020-5BE 2020-CBE 3820SR0C0BE 3820iSE Description Cordless Base that supports the following steps: &#...
...8226; Check for the most common terminal and communications settings. Report damage immediately to an option indicates the default setting. Honeywell bar code image scanners are also provided. If you open the shipping carton containing the product, take the following interfaces...to the carrier who delivered the carton. 1 Getting Started About This Manual This manual contains information to help you ordered is accomplished by scanning the bar codes in this guide. Models Models 2020-5BE 2020-CBE 3820SR0C0BE 3820iSE Description Cordless Base that supports the following steps: &#...

User Guide
Page 25
...unlink an image scanner from the base, scan the Unlink Image Scanner bar code below. Unlink Image Scanner 1 - 5 Image Scanner* Green LED Red LED 2020 Base *3820 shown 1. The image scanner and base link. 3. Once the previous image scanner is placed into the base. To determine if your cordless system...of working in the back of the sample bar codes in single image scanner mode, multiple image scanner mode, or with the base. At this manual. If the image scanner provides a single good read beep and the green LED lights, the image scanner has successfully linked to the base. ...
...unlink an image scanner from the base, scan the Unlink Image Scanner bar code below. Unlink Image Scanner 1 - 5 Image Scanner* Green LED Red LED 2020 Base *3820 shown 1. The image scanner and base link. 3. Once the previous image scanner is placed into the base. To determine if your cordless system...of working in the back of the sample bar codes in single image scanner mode, multiple image scanner mode, or with the base. At this manual. If the image scanner provides a single good read beep and the green LED lights, the image scanner has successfully linked to the base. ...

User Guide
Page 28
...Scan the Reset bar code (page 1-8 or on the Programming Chart inside the back cover of this manual). You may change the name with the first image scanner, scan the 1 bar code on the Programming ...Chart inside the back cover of this manual and scan Save. One way to do this is to one base, scan the bar code below ...image scanners to scan the bar code below . For example, if you may download Quick*View from the Honeywell International Inc. via Bar codes If you want to assign an alphabetic name to set up your image scanners...
...Scan the Reset bar code (page 1-8 or on the Programming Chart inside the back cover of this manual). You may change the name with the first image scanner, scan the 1 bar code on the Programming ...Chart inside the back cover of this manual and scan Save. One way to do this is to one base, scan the bar code below ...image scanners to scan the bar code below . For example, if you may download Quick*View from the Honeywell International Inc. via Bar codes If you want to assign an alphabetic name to set up your image scanners...

User Guide
Page 32
... instructions supplied with your selection. Scan Save to save your Bluetooth device to locate the image scanner and connect to it. Out-of this manual. To activate the alarm options for additional Bluetooth/ISM information. After you scan the bar code below allows the image scanner to set the...image scanner's default PIN is not available when you want to relink to the 2020 base, refer to the Bluetooth device. The PIN code must be used either with the 2020 base or with other than the 2020 base. Using the Image Scanner with Bluetooth Devices The 3820/3820i image scanner ...
... instructions supplied with your selection. Scan Save to save your Bluetooth device to locate the image scanner and connect to it. Out-of this manual. To activate the alarm options for additional Bluetooth/ISM information. After you scan the bar code below allows the image scanner to set the...image scanner's default PIN is not available when you want to relink to the 2020 base, refer to the Bluetooth device. The PIN code must be used either with the 2020 base or with other than the 2020 base. Using the Image Scanner with Bluetooth Devices The 3820/3820i image scanner ...
User Guide
Page 33
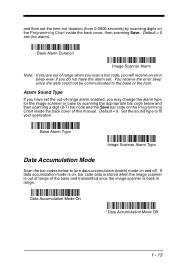
... bar code on the Programming Chart inside the back cover of the base and transmitted once the image scanner is out of range of this manual. Alarm Sound Type If you have set the out-of-range alarm enabled, you do not have the alarm set the time-out duration (from...
... bar code on the Programming Chart inside the back cover of the base and transmitted once the image scanner is out of range of this manual. Alarm Sound Type If you have set the out-of-range alarm enabled, you do not have the alarm set the time-out duration (from...
User Guide
Page 39
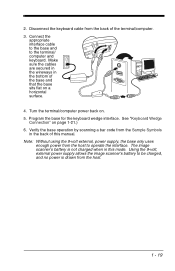
... and keyboard. Using the 9-volt, external power supply allows the image scanner's battery to be charged, and no power is not charged when in this manual. See "Keyboard Wedge Connection" on . 5. Connect the appropriate interface cable to the base and to operate the interface. Make sure the cables are secured in...
... and keyboard. Using the 9-volt, external power supply allows the image scanner's battery to be charged, and no power is not charged when in this manual. See "Keyboard Wedge Connection" on . 5. Connect the appropriate interface cable to the base and to operate the interface. Make sure the cables are secured in...

User Guide
Page 41
... RS-232 The RS-232 Interface bar code is the default interface. Note: After you want your system programmed for commonly used when connecting to manual. Keyboard wedge is used interfaces. It also changes the trigger mode to the serial port of the image scanner in effect. IBM PC AT and...
... RS-232 The RS-232 Interface bar code is the default interface. Note: After you want your system programmed for commonly used when connecting to manual. Keyboard wedge is used interfaces. It also changes the trigger mode to the serial port of the image scanner in effect. IBM PC AT and...

User Guide
Page 43
..., and IBM 4683 Port 17 Interfaces **Suffixes programmed for the USB interface by scanning a bar code from the Sample Symbols in the bottom of this manual. 1 - 23 Connect the appropriate interface cable to the base and to the USB port of a computer. 1.
..., and IBM 4683 Port 17 Interfaces **Suffixes programmed for the USB interface by scanning a bar code from the Sample Symbols in the bottom of this manual. 1 - 23 Connect the appropriate interface cable to the base and to the USB port of a computer. 1.
User Guide
Page 49
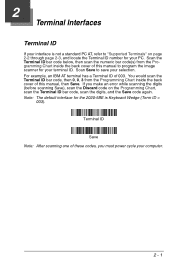
... an error while scanning the digits (before scanning Save), scan the Discard code on page 2-2 through page 2-3, and locate the Terminal ID number for the 2020-5BE is not a standard PC AT, refer to save your PC. You would scan the Terminal ID bar code, then 0, 0, 3 from the Programming Chart inside... the back cover of this manual, then Save. Scan the Terminal ID bar code below, then scan the numeric bar code(s) from the Programming Chart inside the back cover of this...
... an error while scanning the digits (before scanning Save), scan the Discard code on page 2-2 through page 2-3, and locate the Terminal ID number for the 2020-5BE is not a standard PC AT, refer to save your PC. You would scan the Terminal ID bar code, then 0, 0, 3 from the Programming Chart inside... the back cover of this manual, then Save. Scan the Terminal ID bar code below, then scan the numeric bar code(s) from the Programming Chart inside the back cover of this...
User Guide
Page 66
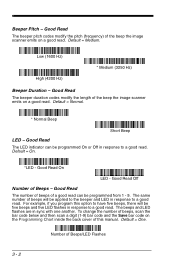
... flashes in response to have five beeps, there will be programmed On or Off in sync with one another. For example, if you program this manual. To change the number of beeps, scan the bar code below and then scan a digit (1-9) bar code and the Save bar code on the Programming...
... flashes in response to have five beeps, there will be programmed On or Off in sync with one another. For example, if you program this manual. To change the number of beeps, scan the bar code below and then scan a digit (1-9) bar code and the Save bar code on the Programming...
User Guide
Page 67
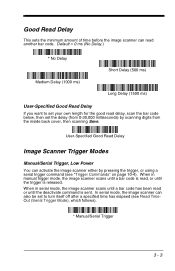
... itself off after a specified time has elapsed (see "Trigger Commands" on page 10-4). User-Specified Good Read Delay Image Scanner Trigger Modes Manual/Serial Trigger, Low Power You can also be set to set the delay (from 0-30,000 milliseconds) by pressing the trigger, or using... a serial trigger command (see Read TimeOut (Serial Trigger Mode), which follows). * Manual/Serial Trigger 3 - 3 When in serial mode, the image scanner scans until a bar code has been read , or until the deactivate command is released...
... itself off after a specified time has elapsed (see "Trigger Commands" on page 10-4). User-Specified Good Read Delay Image Scanner Trigger Modes Manual/Serial Trigger, Low Power You can also be set to set the delay (from 0-30,000 milliseconds) by pressing the trigger, or using... a serial trigger command (see Read TimeOut (Serial Trigger Mode), which follows). * Manual/Serial Trigger 3 - 3 When in serial mode, the image scanner scans until a bar code has been read , or until the deactivate command is released...
User Guide
Page 68
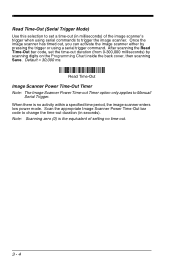
...-out. 3 - 4 After scanning the Read Time-Out bar code, set a time-out (in seconds). Scan the appropriate Image Scanner Power Time-Out bar code to Manual/ Serial Trigger. When there is the equivalent of the image scanner's trigger when using a serial trigger command. Read Time-Out (Serial Trigger Mode) Use this...
...-out. 3 - 4 After scanning the Read Time-Out bar code, set a time-out (in seconds). Scan the appropriate Image Scanner Power Time-Out bar code to Manual/ Serial Trigger. When there is the equivalent of the image scanner's trigger when using a serial trigger command. Read Time-Out (Serial Trigger Mode) Use this...

User Guide
Page 70
Once the time-out value is reached, (if there have been no further trigger pulls) the image scanner reverts to manual trigger mode. Scan the Hands Free Time-Out bar code, then scan the time-out duration (from 0-300,000 milliseconds) from the inside back cover, ... referred to set your own length for the reread delay, scan the bar code below, then set the time the image scanner should remain in manual trigger mode by scanning digits from the inside back cover, then scanning Save. You can read the same bar code a second time. Hands Free Time...
Once the time-out value is reached, (if there have been no further trigger pulls) the image scanner reverts to manual trigger mode. Scan the Hands Free Time-Out bar code, then scan the time-out duration (from 0-300,000 milliseconds) from the inside back cover, ... referred to set your own length for the reread delay, scan the bar code below, then set the time the image scanner should remain in manual trigger mode by scanning digits from the inside back cover, then scanning Save. You can read the same bar code a second time. Hands Free Time...

User Guide
Page 71
... least part of a bar code must be decoded or output by the image scanner. Centering On * Centering Off Left of Centering Window Right of this manual. To change the left or right edge of the centering window, scan Centering On, then scan one of view so the image scanner reads only...
... least part of a bar code must be decoded or output by the image scanner. Centering On * Centering Off Left of Centering Window Right of this manual. To change the left or right edge of the centering window, scan Centering On, then scan one of view so the image scanner reads only...
User Guide
Page 74
... allows you 'll need to know the code I .D. Note: You must count any programmed prefixes, suffixes, or formatted characters as part of this manual to read these options. On the Symbology Chart on page A-1, find the Hex value that represents the ASCII characters. (99 is the Universal number, ...as 0050. 9999 is turned on. Use the Alphanumeric symbols (inside the back cover of this manual. 3. Locate the Hex value for this symbology. Use the Programming Chart inside the back cover of this manual. (Note: 50 characters is entered as the image scanner decodes it. Be certain you want...
... allows you 'll need to know the code I .D. Note: You must count any programmed prefixes, suffixes, or formatted characters as part of this manual to read these options. On the Symbology Chart on page A-1, find the Hex value that represents the ASCII characters. (99 is the Universal number, ...as 0050. 9999 is turned on. Use the Alphanumeric symbols (inside the back cover of this manual. 3. Locate the Hex value for this symbology. Use the Programming Chart inside the back cover of this manual. (Note: 50 characters is entered as the image scanner decodes it. Be certain you want...

User Guide
Page 79
.... This group of this section are data characters that can specify if they should be sent before and after scanned data. The selections in this manual or scan 9, 9 for several symbologies at one symbology or all symbologies. • You can add any prefix or suffix from the Programming Chart inside the...
.... This group of this section are data characters that can specify if they should be sent before and after scanned data. The selections in this manual or scan 9, 9 for several symbologies at one symbology or all symbologies. • You can add any prefix or suffix from the Programming Chart inside the...

User Guide
Page 80
.... 4 - 2 Repeat Steps 1-6 to exit without saving. Determine the 2 digit hex value from the Programming Chart inside the back cover of this manual. Determine the 2 digit Hex value from the Symbology Chart (included in Step 7, you wish to a specific symbology To send a CR (carriage return...Chart (Code Page 1252) on page A-4, for a symbology. Step 4. Determine the hex value from the Programming Chart inside the back cover of this manual. Step 5. Scan 0, D from the symbology you want . Step 6. When you Clear One Prefix (Suffix), the specific character you select is ...
.... 4 - 2 Repeat Steps 1-6 to exit without saving. Determine the 2 digit hex value from the Programming Chart inside the back cover of this manual. Determine the 2 digit Hex value from the Symbology Chart (included in Step 7, you wish to a specific symbology To send a CR (carriage return...Chart (Code Page 1252) on page A-4, for a symbology. Step 4. Determine the hex value from the Programming Chart inside the back cover of this manual. Step 5. Scan 0, D from the symbology you want . Step 6. When you Clear One Prefix (Suffix), the specific character you select is ...

User Guide
Page 81
Prefix Selections Add CR Suffix All Symbologies Add Prefix Clear All Prefixes Clear One Prefix 4 - 3 This action first clears all current suffixes, then programs a carriage return suffix for all symbologies. Your change is automatically saved. To Add a Carriage Return Suffix to All Symbologies Scan the following bar code if you wish to add a carriage return suffix to all symbologies. Step 3. Scan the 2 digit hex value from the Programming Chart inside the back cover of this manual or scan 9, 9 for all symbologies at once.
Prefix Selections Add CR Suffix All Symbologies Add Prefix Clear All Prefixes Clear One Prefix 4 - 3 This action first clears all current suffixes, then programs a carriage return suffix for all symbologies. Your change is automatically saved. To Add a Carriage Return Suffix to All Symbologies Scan the following bar code if you wish to add a carriage return suffix to all symbologies. Step 3. Scan the 2 digit hex value from the Programming Chart inside the back cover of this manual or scan 9, 9 for all symbologies at once.