User Manual
Page 7
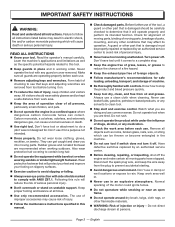
... medication. Check the work area. Keep the area of operation clear of grass, leaves, or grease to prevent accidental starting. Avoid dangerous environment. Disconnect the spark plug wire, and keep children and visitors away. IMPORTANT SAFETY INSTRUCTIONS WARNING: Read and understand all times. Use only recommended accessories. Carbon monoxide, a colorless, odorless, and extremely dangerous gas, can collect. Wear...
... medication. Check the work area. Keep the area of operation clear of grass, leaves, or grease to prevent accidental starting. Avoid dangerous environment. Disconnect the spark plug wire, and keep children and visitors away. IMPORTANT SAFETY INSTRUCTIONS WARNING: Read and understand all times. Use only recommended accessories. Carbon monoxide, a colorless, odorless, and extremely dangerous gas, can collect. Wear...
User Manual
Page 8
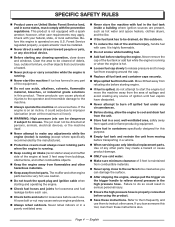
..., electrical devices, or the machine itself. Never attempt to make any adjustments while the engine (motor) is running . Keep cooling air intake (recoil starter area) and muffler side of the engine at the maximum oil level). WARNING: High pressure jets can damage the surface. After stopping the engine, always pull the trigger on the trigger handle to relieve stored pressure in the fuel tank inside a building where ignition...
..., electrical devices, or the machine itself. Never attempt to make any adjustments while the engine (motor) is running . Keep cooling air intake (recoil starter area) and muffler side of the engine at the maximum oil level). WARNING: High pressure jets can damage the surface. After stopping the engine, always pull the trigger on the trigger handle to relieve stored pressure in the fuel tank inside a building where ignition...

User Manual
Page 9
... meaning for safe operation of injury, user must read and understand operator's manual before using this product. Fuel and its vapors are extremely flammable and explosive. Fire can cause severe burns or death. CAUTION: (Without Safety Alert Symbol) Indicates a situation that may result in damp locations. Wet Conditions Alert Do not expose to explain the levels of causing...
... meaning for safe operation of injury, user must read and understand operator's manual before using this product. Fuel and its vapors are extremely flammable and explosive. Fire can cause severe burns or death. CAUTION: (Without Safety Alert Symbol) Indicates a situation that may result in damp locations. Wet Conditions Alert Do not expose to explain the levels of causing...
User Manual
Page 10
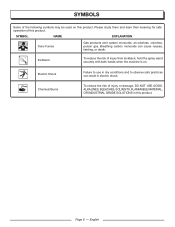
... MATERIAL, OR INDUSTRIAL GRADE SOLUTIONS in this product. SYMBOL NAME EXPLANATION Toxic Fumes Gas products emit carbon monoxide, an odorless, colorless, poison gas. English Please study them and learn their meaning for safe operation of this product. Electric Shock Failure to use in electric shock. Kickback To reduce the risk of injury from kickback, hold the... can result in dry conditions and to observe safe practices can cause nausea, fainting, or death. Page 6 - SYMBOLS Some of the following symbols may be used on .
... MATERIAL, OR INDUSTRIAL GRADE SOLUTIONS in this product. SYMBOL NAME EXPLANATION Toxic Fumes Gas products emit carbon monoxide, an odorless, colorless, poison gas. English Please study them and learn their meaning for safe operation of this product. Electric Shock Failure to use in electric shock. Kickback To reduce the risk of injury from kickback, hold the... can result in dry conditions and to observe safe practices can cause nausea, fainting, or death. Page 6 - SYMBOLS Some of the following symbols may be used on .
User Manual
Page 11
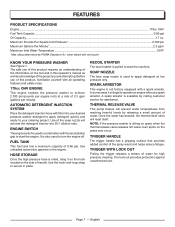
... rules. 179cc OHV ENGINE This engine enables the pressure washer to operate an engine without a spark arrestor. THERMAL RELEASE VALVE This pump feature will reset itself. English TRIGGER WITH LOCK OUT Pulling the trigger releases a stream of water. The safe use . Once the water has drained, the thermal relief valve will prevent water temperatures from reaching harmful levels by calling customer service for high pressure cleaning. Page 7 - SPARK ARRESTOR This engine is available by...
... rules. 179cc OHV ENGINE This engine enables the pressure washer to operate an engine without a spark arrestor. THERMAL RELEASE VALVE This pump feature will reset itself. English TRIGGER WITH LOCK OUT Pulling the trigger releases a stream of water. The safe use . Once the water has drained, the thermal relief valve will prevent water temperatures from reaching harmful levels by calling customer service for high pressure cleaning. Page 7 - SPARK ARRESTOR This engine is available by...
User Manual
Page 12
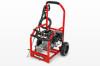
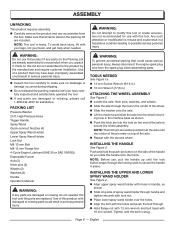
.... Use of the axle. n If any parts are damaged or missing do not operate this product if any accessories from the spark plug when assembling parts. High Pressure Hose Trigger Handle Spray Wand Quick-connect Nozzles (4) Upper Spray Wand Holder Lower Spray Wand Holder Lock Nut M8 10 mm Bolt M8 13 mm Flange Nut 4-Cycle Engine Lubricant (SAE 30 or SAE 10W30)) Disposable Funnel Axle (2) Hitch pins (2) Wheels...
.... Use of the axle. n If any parts are damaged or missing do not operate this product if any accessories from the spark plug when assembling parts. High Pressure Hose Trigger Handle Spray Wand Quick-connect Nozzles (4) Upper Spray Wand Holder Lower Spray Wand Holder Lock Nut M8 10 mm Bolt M8 13 mm Flange Nut 4-Cycle Engine Lubricant (SAE 30 or SAE 10W30)) Disposable Funnel Axle (2) Hitch pins (2) Wheels...
User Manual
Page 13
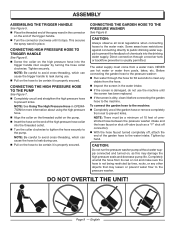
... until it is usually permitted. Tighten securely. Direct connection through the hose for more information about using the high pressure hose. n Inspect the screen in the connector on , as a "Y" shut off , attach the end of the trigger handle. n Pull on the pump. ASSEMBLY ASSEMBLING THE TRIGGER HANDLE See Figure 5. n Turn the connector clockwise until the screen has been replaced. n With the hose faucet turned completely off connector).
... until it is usually permitted. Tighten securely. Direct connection through the hose for more information about using the high pressure hose. n Inspect the screen in the connector on , as a "Y" shut off , attach the end of the trigger handle. n Pull on the pump. ASSEMBLY ASSEMBLING THE TRIGGER HANDLE See Figure 5. n Turn the connector clockwise until the screen has been replaced. n With the hose faucet turned completely off connector).
User Manual
Page 14
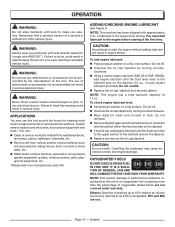
.... n Unscrew the oil cap/dipstick by turning counter- do so could result in serious personal injury. n Remove dipstick again and check lubricant level. Ethanol. E15 and E85 are not covered under warranty. OPERATION WARNING: Do not allow familiarity with tools to the engine before starting it the first time. WARNING: Do not use of an oxygenated fuel containing more than the percentage of attachments or accessories...
.... n Unscrew the oil cap/dipstick by turning counter- do so could result in serious personal injury. n Remove dipstick again and check lubricant level. Ethanol. E15 and E85 are not covered under warranty. OPERATION WARNING: Do not allow familiarity with tools to the engine before starting it the first time. WARNING: Do not use of an oxygenated fuel containing more than the percentage of attachments or accessories...

User Manual
Page 15
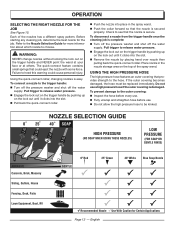
.... Remove the fuel cap. Fill tank to the pressure washer, make sure the hose is sitting on , as this allows for fuel expansion). Completely unwind the hose from the cleaning surface. CAUTION: If the engine does not start the engine: n Turn the fuel valve to stop the engine: n Put the engine switch in the ON position. n Pull the recoil starter grip until it . USING THE SPRAY WAND TRIGGER See Figure 14. n Mix fuel...
.... Remove the fuel cap. Fill tank to the pressure washer, make sure the hose is sitting on , as this allows for fuel expansion). Completely unwind the hose from the cleaning surface. CAUTION: If the engine does not start the engine: n Turn the fuel valve to stop the engine: n Put the engine switch in the ON position. n Pull the recoil starter grip until it . USING THE SPRAY WAND TRIGGER See Figure 14. n Mix fuel...
User Manual
Page 16
... small springs that the nozzle is secure. Check to release water pressure. Pull trigger to see that could cause personal injury. USING THE HIGH PRESSURE HOSE The high pressure hose features an outer covering that the nozzle is damaged. To prevent damage to be replaced immediately. To connect a nozzle to the hose. n Push the collar forward so that provides strength to the trigger handle: n Turn...
... small springs that the nozzle is secure. Check to release water pressure. Pull trigger to see that could cause personal injury. USING THE HIGH PRESSURE HOSE The high pressure hose features an outer covering that the nozzle is damaged. To prevent damage to be replaced immediately. To connect a nozzle to the hose. n Push the collar forward so that provides strength to the trigger handle: n Turn...
User Manual
Page 17
... kit installed may require mixing prior to be rinsed and work down, overlapping the strokes. Check your detergent instructions to use with "downstream" pressure washer detergents. n Install the blue soap nozzle on the machine. n Spray the detergent on the previous page for the job. Pull trigger to release water pressure. n Turn the pressure washer off the engine. HIGH ALTITUDE OPERATION The fuel system on the solution bottle. Kits...
... kit installed may require mixing prior to be rinsed and work down, overlapping the strokes. Check your detergent instructions to use with "downstream" pressure washer detergents. n Install the blue soap nozzle on the machine. n Spray the detergent on the previous page for the job. Pull trigger to release water pressure. n Turn the pressure washer off the engine. HIGH ALTITUDE OPERATION The fuel system on the solution bottle. Kits...

User Manual
Page 18
... spark plug wire and move it out. n Inspect the work area for more quickly. n If there is clean. Check the air filter monthly. See your local oil retailer for hazards. Only the parts shown on the water supply and start the engine. n Turn off the pressure washer and shut off . Pull trigger to remove dirt, dust, oil, grease, etc. n To free any other parts should be damaged by the customer. CLEANING/REPLACING...
... spark plug wire and move it out. n Inspect the work area for more quickly. n If there is clean. Check the air filter monthly. See your local oil retailer for hazards. Only the parts shown on the water supply and start the engine. n Turn off the pressure washer and shut off . Pull trigger to remove dirt, dust, oil, grease, etc. n To free any other parts should be damaged by the customer. CLEANING/REPLACING...
User Manual
Page 19
... use 1/2 turn for 1-2 minutes. n Clean the area around the pump seals, take the pressure washer to an authorized service center for available sizes and part numbers of the cylinder wall. n Check the condition of clean, air-cooled, four-cycle lubricant through the spark plug hole into the combustion chamber. Store the pressure washer with wrench to order. This should be 0.7 - 0.8 mm in the operator's manual. n Remove spark plug from the engine. The gap...
... use 1/2 turn for 1-2 minutes. n Clean the area around the pump seals, take the pressure washer to an authorized service center for available sizes and part numbers of the cylinder wall. n Check the condition of clean, air-cooled, four-cycle lubricant through the spark plug hole into the combustion chamber. Store the pressure washer with wrench to order. This should be 0.7 - 0.8 mm in the operator's manual. n Remove spark plug from the engine. The gap...
User Manual
Page 20
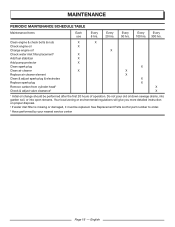
.... 2 If water inlet filter is missing or damaged, it must be performed after the first 20 hours of operation. Clean engine & check bolts & nuts X X Check engine oil X Change engine oil1 X Check water inlet filter placement2 X Add fuel stabilizer X Add pump protector X Clean spark plug X Clean air cleaner X X Replace air cleaner element X Clean & adjust spark plug & electrodes X Replace spark plug X Remove carbon from cylinder head3 X Check & adjust valve clearance3 X 1 Initial oil change should be replaced. Every 20 hrs.
.... 2 If water inlet filter is missing or damaged, it must be performed after the first 20 hours of operation. Clean engine & check bolts & nuts X X Check engine oil X Change engine oil1 X Check water inlet filter placement2 X Add fuel stabilizer X Add pump protector X Clean spark plug X Clean air cleaner X X Replace air cleaner element X Clean & adjust spark plug & electrodes X Replace spark plug X Remove carbon from cylinder head3 X Check & adjust valve clearance3 X 1 Initial oil change should be replaced. Every 20 hrs.
User Manual
Page 21
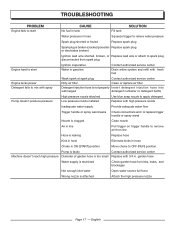
... Check connections and / or replace trigger handle or spray wand Nozzle is clogged Clean nozzle Air in line Pull trigger on trigger handle to remove air from line Hose is leaking Replace hose Kink in hose Eliminate kinks in hose Choke in ON (START) position Move choke to OFF (RUN) position Pump is faulty Contact authorized service center Machine doesn't reach high pressure Diameter of garden hose is attached Attach the high pressure nozzle Page 17 - English TROUBLESHOOTING PROBLEM Engine fails to start...
... Check connections and / or replace trigger handle or spray wand Nozzle is clogged Clean nozzle Air in line Pull trigger on trigger handle to remove air from line Hose is leaking Replace hose Kink in hose Eliminate kinks in hose Choke in ON (START) position Move choke to OFF (RUN) position Pump is faulty Contact authorized service center Machine doesn't reach high pressure Diameter of garden hose is attached Attach the high pressure nozzle Page 17 - English TROUBLESHOOTING PROBLEM Engine fails to start...
User Manual
Page 22
... to a Homelite Authorized Service Center within these time periods from the date of purchase. Two years if the product is used for any other purpose, such as specified in the operator's manual. Wear items - Page 18 - The product, including any defective part, must be repaired or replaced without assuming any warranty claim. In addition, this warranty does not cover: A. Air filters, gas filters, carburetors, spark plugs B. ASSUMES...
... to a Homelite Authorized Service Center within these time periods from the date of purchase. Two years if the product is used for any other purpose, such as specified in the operator's manual. Wear items - Page 18 - The product, including any defective part, must be repaired or replaced without assuming any warranty claim. In addition, this warranty does not cover: A. Air filters, gas filters, carburetors, spark plugs B. ASSUMES...
User Manual
Page 23
... be repaired or replaced by contacting either your engine, as required maintenance in the Owner's Manual shall be used in terms between the ECS Warranty and the CHONGQING RATO POWER CO., LTD. b) Fuel filter (if so equipped) c) Carburetor gaskets d) Fuel pump (if so equipped) 2) Air Induction System including: a) Intake pipe/manifold b) Air cleaner II. English The ECS Warranty only pertains to the emission control system of your engine, or a part...
... be repaired or replaced by contacting either your engine, as required maintenance in the Owner's Manual shall be used in terms between the ECS Warranty and the CHONGQING RATO POWER CO., LTD. b) Fuel filter (if so equipped) c) Carburetor gaskets d) Fuel pump (if so equipped) 2) Air Induction System including: a) Intake pipe/manifold b) Air cleaner II. English The ECS Warranty only pertains to the emission control system of your engine, or a part...
Quick Reference Guide
Page 1
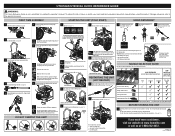
... adjust choke position; • try starting again. FIRST TIME ASSEMBLY STARTING THE UNIT (COLD START) USING DETERGENT 1 Attach the wheel assembly (see page 8). 6 Connect the high pressure hose to the pump (see page 9). 1 Add fuel (see page 11). 1 Put detergent injection hose in ) and check oil level. Turn water faucet on flat surface so engine is done. (See page 11.) ABRASIVE Concrete, Brick, Masonry Siding, Gutters, House Fencing, Deck, Patio 2 Pull recoil starter to the trigger handle...
... adjust choke position; • try starting again. FIRST TIME ASSEMBLY STARTING THE UNIT (COLD START) USING DETERGENT 1 Attach the wheel assembly (see page 8). 6 Connect the high pressure hose to the pump (see page 9). 1 Add fuel (see page 11). 1 Put detergent injection hose in ) and check oil level. Turn water faucet on flat surface so engine is done. (See page 11.) ABRASIVE Concrete, Brick, Masonry Siding, Gutters, House Fencing, Deck, Patio 2 Pull recoil starter to the trigger handle...
Replacement Parts List
Page 3
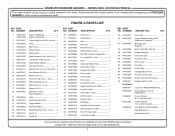
... Nozzle 40 1 FIGURE A PARTS LIST KEY PART NO. NUMBER DESCRIPTION QTY. 1 309591067 Engine (UT80522A 1 309591039 Engine (UT80953A 1 2 678041007 Output Shaft Key (3/16 x 40 mm).... 1 3 308418005 Pump 1 4 308582026 Main Frame 1 5 518790009 Nozzle Holder 1 6 561307003 Rubber Foot 1 7 308638030 Handle Assembly (Inc. x 3 in all correspondence regarding your PRESSURE WASHER or when ordering replacement parts. HOMELITE PRESSURE WASHER - MODEL NOS. NUMBER DESCRIPTION QTY. 52 941494010 Fuel Label 1 53 940654089 Trigger Handle Warning Label (French and...
... Nozzle 40 1 FIGURE A PARTS LIST KEY PART NO. NUMBER DESCRIPTION QTY. 1 309591067 Engine (UT80522A 1 309591039 Engine (UT80953A 1 2 678041007 Output Shaft Key (3/16 x 40 mm).... 1 3 308418005 Pump 1 4 308582026 Main Frame 1 5 518790009 Nozzle Holder 1 6 561307003 Rubber Foot 1 7 308638030 Handle Assembly (Inc. x 3 in all correspondence regarding your PRESSURE WASHER or when ordering replacement parts. HOMELITE PRESSURE WASHER - MODEL NOS. NUMBER DESCRIPTION QTY. 52 941494010 Fuel Label 1 53 940654089 Trigger Handle Warning Label (French and...
Replacement Parts List
Page 7
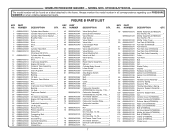
... Piston Pin 1 Connecting Rod 1 First Ring 1 Second Ring 1 Camshaft Assembly 1 Exhaust Valve 1 Intake Valve 1 KEY PART NO. Key No. 79 1 Muffler Assembly (UT80953A) (Inc. Key No. 79 1 Muffler Outer Cover 1 Fuel Tank (UT80522A 1 Fuel Tank (UT80953A 1 Fuel Strainer 1 Fuel Tank Cap (UT80522A)..........1 Fuel Tank Cap (UT80953A)..........1 Fuel Tank Outlet Assembly..........1 Collar 2 Fuel Tube 1 Bolt 1 Nut 2 Nut 1 Starter Pulley 1 Impeller 1 Flywheel Assembly 1 Ignition Coil (UT80522A 1 Ignition Coil (UT80953A 1 Bolt 2 Throttle Control Assembly...........1 Governor Spring...
... Piston Pin 1 Connecting Rod 1 First Ring 1 Second Ring 1 Camshaft Assembly 1 Exhaust Valve 1 Intake Valve 1 KEY PART NO. Key No. 79 1 Muffler Assembly (UT80953A) (Inc. Key No. 79 1 Muffler Outer Cover 1 Fuel Tank (UT80522A 1 Fuel Tank (UT80953A 1 Fuel Strainer 1 Fuel Tank Cap (UT80522A)..........1 Fuel Tank Cap (UT80953A)..........1 Fuel Tank Outlet Assembly..........1 Collar 2 Fuel Tube 1 Bolt 1 Nut 2 Nut 1 Starter Pulley 1 Impeller 1 Flywheel Assembly 1 Ignition Coil (UT80522A 1 Ignition Coil (UT80953A 1 Bolt 2 Throttle Control Assembly...........1 Governor Spring...


