
User Manual
Page 2
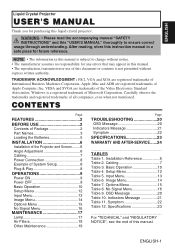
... Package 2 Part Names 3 Loading the Batteries 5 INSTALLATION 6 Installation of the Projector and Screen........6 Angle Adjustment 6 Cabling 7 Power Connection 8 Example of this liquid crystal projector. OSD Message 20 Table 10. Symptom 22 Table 12. Specifications 23 For "TECHNICAL" and "REGULATORY NOTICE", see the end of System Setup 8 Plug & Play 8 OPERATIONS 9 Power ON 9 Power OFF 9 Basic Operation 10 Setup Menu 12 Input Menu 13 Image Menu 14 Options Menu 15 No Signal Menu 16 MAINTENANCE 17 Lamp 17 Air Filters 19...
... Package 2 Part Names 3 Loading the Batteries 5 INSTALLATION 6 Installation of the Projector and Screen........6 Angle Adjustment 6 Cabling 7 Power Connection 8 Example of this liquid crystal projector. OSD Message 20 Table 10. Symptom 22 Table 12. Specifications 23 For "TECHNICAL" and "REGULATORY NOTICE", see the end of System Setup 8 Plug & Play 8 OPERATIONS 9 Power ON 9 Power OFF 9 Basic Operation 10 Setup Menu 12 Input Menu 13 Image Menu 14 Options Menu 15 No Signal Menu 16 MAINTENANCE 17 Lamp 17 Air Filters 19...

User Manual
Page 3
... project various computer signals as well as NTSC / PAL / SECAM video signals onto a screen. FEATURES This liquid crystal projector is used to ensure correct usage through understanding. BEFORE USE Contents of package Make sure all of the following items are quickly available. NOTE • Keep the original packing material for Remote Control Transmitter AUTO MENU KEYSTONE MENU SELECT POSITION RESET FREEZE PinP MAGNIFY MUTE OFF FOCUS ZOOM VOLUME Remote Control...
... project various computer signals as well as NTSC / PAL / SECAM video signals onto a screen. FEATURES This liquid crystal projector is used to ensure correct usage through understanding. BEFORE USE Contents of package Make sure all of the following items are quickly available. NOTE • Keep the original packing material for Remote Control Transmitter AUTO MENU KEYSTONE MENU SELECT POSITION RESET FREEZE PinP MAGNIFY MUTE OFF FOCUS ZOOM VOLUME Remote Control...
User Manual
Page 5
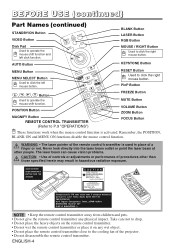
... LASER RADIATION DO NOT STARE INTO BEAM CLASS2 LASER PRODUCT MAX. ENGLISH-4 POSITION Button AUTO KEYSTONE MENU MENU SELECT RESET POSITION FREEZE PinP MUTE MAGNIFY OFF FOCUS ZOOM VOLUME MAGNIFY Button REMOTE CONTROL TRANSMITTER (Refer to P.9 "OPERATIONS") RESET Button Used to click the right mouse button. BEFORE USE (continued) Part Names (continued) STANDBY/ON Button VIDEO Button Disk Pad Used to operate the mouse shift function and left mouse button. , , , Button Used to operate the mouse shift function.
... LASER RADIATION DO NOT STARE INTO BEAM CLASS2 LASER PRODUCT MAX. ENGLISH-4 POSITION Button AUTO KEYSTONE MENU MENU SELECT RESET POSITION FREEZE PinP MUTE MAGNIFY OFF FOCUS ZOOM VOLUME MAGNIFY Button REMOTE CONTROL TRANSMITTER (Refer to P.9 "OPERATIONS") RESET Button Used to click the right mouse button. BEFORE USE (continued) Part Names (continued) STANDBY/ON Button VIDEO Button Disk Pad Used to operate the mouse shift function and left mouse button. , , , Button Used to operate the mouse shift function.
User Manual
Page 7
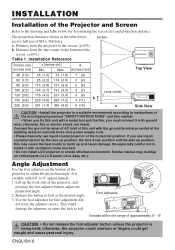
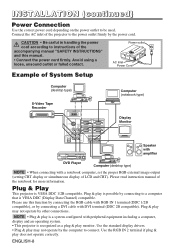
.... 3. Installation Reference Screen Screen size [inches (m)] 40 (1.0) 60 (1.5) 80 (2.0) 100 (2.5) 120 (3.0) 150 (3.8) 200 (5.0) a [inches (m)] Min. Connect the ground terminal of AC inlet of the projector to instructions of the accompanying manual "SAFETY INSTRUCTIONS" and this manual. • When you fix this may buildup on the bottom of this unit with the ground terminal provided at the building using an optional three-core power-supply cord...
.... 3. Installation Reference Screen Screen size [inches (m)] 40 (1.0) 60 (1.5) 80 (2.0) 100 (2.5) 120 (3.0) 150 (3.8) 200 (5.0) a [inches (m)] Min. Connect the ground terminal of AC inlet of the projector to instructions of the accompanying manual "SAFETY INSTRUCTIONS" and this manual. • When you fix this may buildup on the bottom of this unit with the ground terminal provided at the building using an optional three-core power-supply cord...
User Manual
Page 8
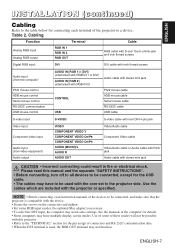
... Video cable Video/Audio cable or Audio cable with RCA jack Audio cable with the projector or specified. See the manuals of the devices to be connected, and make sure that the projector is compatible with the device. • Secure the screws on the connectors and tighten. • For some RGB input modes, the optional Mac adapter is used with the core set to the projector side. Use of some settings. Please read instruction manuals...
... Video cable Video/Audio cable or Audio cable with RCA jack Audio cable with the projector or specified. See the manuals of the devices to be connected, and make sure that the projector is compatible with the device. • Secure the screws on the connectors and tighten. • For some RGB input modes, the optional Mac adapter is used with the core set to the projector side. Use of some settings. Please read instruction manuals...
User Manual
Page 9
... cable with a notebook computer, set the proper RGB external image output (setting CRT display or simultaneous display of the notebook for more information. Please read instruction manual of LCD and CRT). Connect the AC inlet of the projector to instructions of the accompanying manual "SAFETY INSTRUCTIONS" and this function by connecting the RGB cable with RGB IN 1 terminal (DDC 1/2B compatible), or by the power cord. Use the standard display drivers...
... cable with a notebook computer, set the proper RGB external image output (setting CRT display or simultaneous display of the notebook for more information. Please read instruction manual of LCD and CRT). Connect the AC inlet of the projector to instructions of the accompanying manual "SAFETY INSTRUCTIONS" and this function by connecting the RGB cable with RGB IN 1 terminal (DDC 1/2B compatible), or by the power cord. Use the standard display drivers...
User Manual
Page 10
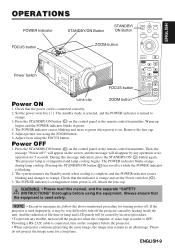
... orange and set the Power switch to green when power is on the control panel or the remote control transmitter. WARNING • Please read this message indication, press the STANDBY/ON button again. And the reduction of life time of lamp and LCD panels will be very difficult to [ | ]. Adjust picture size using the FOCUS button . Always ensure that the indicator is used improperly, it may remain as an afterimage. If the projector is blinking. 2. Check that the power cord is turned to orange. Adjust focus using the ZOOM button...
... orange and set the Power switch to green when power is on the control panel or the remote control transmitter. WARNING • Please read this message indication, press the STANDBY/ON button again. And the reduction of life time of lamp and LCD panels will be very difficult to [ | ]. Adjust picture size using the FOCUS button . Always ensure that the indicator is used improperly, it may remain as an afterimage. If the projector is blinking. 2. Check that the power cord is turned to orange. Adjust focus using the ZOOM button...

User Manual
Page 12
... BLANK button. Set / Clear KEYSTONE Mode : Press the KEYSTONE button. MUTE Set/Clear Mute Mode : Press the MUTE button. AUTO Automatic Adjustment at Video Input : Press the AUTO button. It may not function correctly with some input signals. • The adjustable range of distortion correction will be used . MENU SELECT Select Menu Type: Press the MENU SELECT button. Allows the user to page 4. Normal menu Single menu SETUP INPUT BRIGHT CONTRAST V POSIT H POSIT H PHASE H SIZE COLOR BAL R COLOR BAL B ASPECT IMAGE 100...
... BLANK button. Set / Clear KEYSTONE Mode : Press the KEYSTONE button. MUTE Set/Clear Mute Mode : Press the MUTE button. AUTO Automatic Adjustment at Video Input : Press the AUTO button. It may not function correctly with some input signals. • The adjustable range of distortion correction will be used . MENU SELECT Select Menu Type: Press the MENU SELECT button. Allows the user to page 4. Normal menu Single menu SETUP INPUT BRIGHT CONTRAST V POSIT H POSIT H PHASE H SIZE COLOR BAL R COLOR BAL B ASPECT IMAGE 100...

User Manual
Page 14
... image becomes irregular, or lacks color) at Video Input: Select the EXECUTE with the button. Menu for the input signal. The function indicated (**) are automatically adjusted. Use with the window at RGB Input: Select the EXECUTE with the button. When the TURN ON is selected, the NR mode is active and the noise on screen of AUTO enables and executes the function AUTO (Automatic Adjustment at Video Input), except for the input signal with...
... image becomes irregular, or lacks color) at Video Input: Select the EXECUTE with the button. Menu for the input signal. The function indicated (**) are automatically adjusted. Use with the window at RGB Input: Select the EXECUTE with the button. When the TURN ON is selected, the NR mode is active and the noise on screen of AUTO enables and executes the function AUTO (Automatic Adjustment at Video Input), except for the input signal with...

User Manual
Page 15
...; • P.IN P. Display : Press the / button. ENGLISH-14 Image Menu Item Description SETUP INPUT BLANK START UP MyScreen MIRROR P.IN P. INPUT GAMMA IMAGE OPT. This is default of P. The selected one colors) is displayed when the BLANK mode is going to the MyScreen Display Size mode. TURN OFF displays the blue screen. • When MyScreen or ORIGIAL is selected, the screen is ON. After adjusting the position, press the KEYSTONE button to go to...
...; • P.IN P. Display : Press the / button. ENGLISH-14 Image Menu Item Description SETUP INPUT BLANK START UP MyScreen MIRROR P.IN P. INPUT GAMMA IMAGE OPT. This is default of P. The selected one colors) is displayed when the BLANK mode is going to the MyScreen Display Size mode. TURN OFF displays the blue screen. • When MyScreen or ORIGIAL is selected, the screen is ON. After adjusting the position, press the KEYSTONE button to go to...

User Manual
Page 16
... the menu. is selected on screen is received, set time. Select an item with the and buttons. SYNC ON G Invalid: Select TURN OFF with the button. • May not be displayed correctly with some input signals when SYNC ON G is received. ENGLISH-15 The system automatically enters the standby mode when a signal is active. SYNC ON G Valid: Select TURN ON with the and buttons. AUTO OFF SYNC ON G WHISPER Operation Start/Stop...
... the menu. is selected on screen is received, set time. Select an item with the and buttons. SYNC ON G Invalid: Select TURN OFF with the button. • May not be displayed correctly with some input signals when SYNC ON G is received. ENGLISH-15 The system automatically enters the standby mode when a signal is active. SYNC ON G Valid: Select TURN ON with the and buttons. AUTO OFF SYNC ON G WHISPER Operation Start/Stop...
User Manual
Page 18
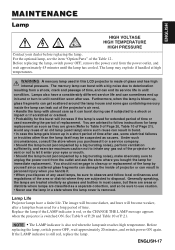
... lamp cover is used exceeding the period of the lamp by yourself since such reuse can burst with utmost care as glasses and bottles in a short period of time after a lamp has been used in unlit condition. If the LAMP indicator is switched ON. Replace the lamp if the LAMP indicator is red, or the CHANGE THE LAMP message appears when the projector is still red, replace the lamp. ENGLISH MAINTENANCE Lamp HIGH VOLTAGE HIGH TEMPERATURE HIGH...
... lamp cover is used exceeding the period of the lamp by yourself since such reuse can burst with utmost care as glasses and bottles in a short period of time after a lamp has been used in unlit condition. If the LAMP indicator is switched ON. Replace the lamp if the LAMP indicator is red, or the CHANGE THE LAMP message appears when the projector is still red, replace the lamp. ENGLISH MAINTENANCE Lamp HIGH VOLTAGE HIGH TEMPERATURE HIGH...
User Manual
Page 19
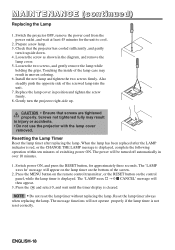
... screen. 2. Gently turn it upside down. 4. When the lamp has been replaced after replacing the lamp. Reset the lamp timer always when replacing the lamp. Check that screws are tightened properly. CAUTION • Ensure that the projector has cooled sufficiently, and gently turn the projector right-side up. The power will then appear. 3. Resetting the Lamp Timer Reset the lamp timer after the LAMP indicator is red, or the CHANGE THE LAMP message is displayed. Loosen the two screws, and gently remove the lamp...
... screen. 2. Gently turn it upside down. 4. When the lamp has been replaced after replacing the lamp. Reset the lamp timer always when replacing the lamp. Check that screws are tightened properly. CAUTION • Ensure that the projector has cooled sufficiently, and gently turn the projector right-side up. The power will then appear. 3. Resetting the Lamp Timer Reset the lamp timer after the LAMP indicator is red, or the CHANGE THE LAMP message is displayed. Loosen the two screws, and gently remove the lamp...
User Manual
Page 20
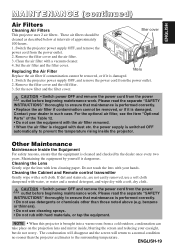
... filter. 3. the power supply is brought into a warm room from the power outlet before beginning maintenance work . Cleaning the Lens Gently wipe the lens with a soft, dry cloth. Cleaning the Cabinet and Remote control transmitter Gently wipe with a vacuum cleaner. 4. If dirt and stains etc. Set the new filter and the filter cover. Contact your hands. ENGLISH MAINTENANCE (continued) Air Filters Cleaning Air Filters filter cover This projector uses 2 air filters. Switch the projector power supply OFF, and remove the power cord from the power...
... filter. 3. the power supply is brought into a warm room from the power outlet before beginning maintenance work . Cleaning the Lens Gently wipe the lens with a soft, dry cloth. Cleaning the Cabinet and Remote control transmitter Gently wipe with a vacuum cleaner. 4. If dirt and stains etc. Set the new filter and the filter cover. Contact your hands. ENGLISH MAINTENANCE (continued) Air Filters Cleaning Air Filters filter cover This projector uses 2 air filters. Switch the projector power supply OFF, and remove the power cord from the power...

User Manual
Page 21
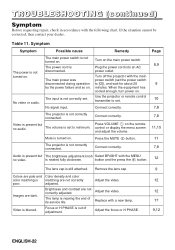
... LAMP TIME. TROUBLESHOOTING OSD Message The messages as shown in (*1) P.17~18 "Lamp". Power will be switched OFF AFTER ** hr. automatically in * * hours. Check signal input connections and signal sources. ENGLISH-20 THE POWER WILL TURN OFF AFTER 0 hr. Always reset the lamp timer after replacing the lamp. Switch power OFF, and wait 20 minutes until the equipment cools. NO INPUT IS DETECTED ON *** No input signal found. The internal temperature has risen. CHANGE THE LAMP AFTER REPLACING LAMP, RESET THE LAMP TIME. OSD Message Message Contents CHANGE...
... LAMP TIME. TROUBLESHOOTING OSD Message The messages as shown in (*1) P.17~18 "Lamp". Power will be switched OFF AFTER ** hr. automatically in * * hours. Check signal input connections and signal sources. ENGLISH-20 THE POWER WILL TURN OFF AFTER 0 hr. Always reset the lamp timer after replacing the lamp. Switch power OFF, and wait 20 minutes until the equipment cools. NO INPUT IS DETECTED ON *** No input signal found. The internal temperature has risen. CHANGE THE LAMP AFTER REPLACING LAMP, RESET THE LAMP TIME. OSD Message Message Contents CHANGE...

User Manual
Page 22
.... Blinks orange Turns off Turns off The Standby mode has been set. Switch power OFF, wait 20 minutes until the equipment has cooled sufficiently. Replace the lamp if the same problem occurs. Lights red Blinks red Lamp or lamp cover is not lit. And switch power ON again. Lights red Turns off and check whether the ventilation openings are blocked, whether the air filter is too hot. Then switch power ON again. Contact your dealer if the same problem occurs again. Lights red Turns...
.... Blinks orange Turns off Turns off The Standby mode has been set. Switch power OFF, wait 20 minutes until the equipment has cooled sufficiently. Replace the lamp if the same problem occurs. Lights red Blinks red Lamp or lamp cover is not lit. And switch power ON again. Lights red Turns off and check whether the ventilation openings are blocked, whether the air filter is too hot. Then switch power ON again. Contact your dealer if the same problem occurs again. Lights red Turns...
User Manual
Page 23
...not disconnected. Turn on the main power switch. 8,9 The power cord is Plug the power cord into an AC The power is blurred. Turn off the projector with the MENU no audio. Brightness and contrast are dark. Use the projector or remote control transmitter to set the power switch disconnected during operation to minimum. Remove the lens cap. adjusted. Images are not correctly adjusted. power outlet. TROUBLESHOOTING (continued) Symptom Before requesting repair, check in accordance with a new lamp. Adjust the video. Focus or...
...not disconnected. Turn on the main power switch. 8,9 The power cord is Plug the power cord into an AC The power is blurred. Turn off the projector with the MENU no audio. Brightness and contrast are dark. Use the projector or remote control transmitter to set the power switch disconnected during operation to minimum. Remove the lens cap. adjusted. Images are not correctly adjusted. power outlet. TROUBLESHOOTING (continued) Symptom Before requesting repair, check in accordance with a new lamp. Adjust the video. Focus or...
User Manual
Page 32
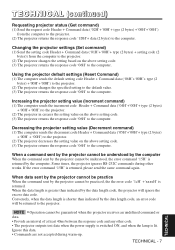
... 40ms between the response code and any other works. NOTE • Operation cannot be understood, the error command '15H' is returned. Changing the projector settings (Set command) (1) Send the setting code Header + Command data ('01H'+'00H'+ type (2 bytes) + setting code (2 bytes)) from the computer to the projector. (2) The projector returns the response code '1DH'+ data (2 bytes) to the computer. TECHNICAL - 7 TECHNICAL Using the projector default settings (Reset Command) (1) The computer sends the default setting code Header + Command data ('06H'+'00H'+ type...
... 40ms between the response code and any other works. NOTE • Operation cannot be understood, the error command '15H' is returned. Changing the projector settings (Set command) (1) Send the setting code Header + Command data ('01H'+'00H'+ type (2 bytes) + setting code (2 bytes)) from the computer to the projector. (2) The projector returns the response code '1DH'+ data (2 bytes) to the computer. TECHNICAL - 7 TECHNICAL Using the projector default settings (Reset Command) (1) The computer sends the default setting code Header + Command data ('06H'+'00H'+ type...

User Manual
Page 34
TECHNICAL (continued) Command data chart Names Operation type Header Command data CRC Action Type Setting code Get BE EF...Get BE EF 03 06 00 08 86 02 00 10 31 00 00 Auto off Increment BE EF 03 06 00 6E 86 04 00 10 31 00...Size Reset Execute BE EF 03 06 00 68 D2 06 00 04 70 00 00 Color Balance R Reset Execute BE EF 03 06 00 94 D3 06 00 05 70 00 00 Color Balance B Reset...Cover-error) (Fan-error) (Lamp-error) Power OFF Set ON Get RGB1 04 00 (Temp-error) 05 00 (Air flow-error) BE EF BE EF BE EF 03 06 00 2A D3 03 06 00 BA D2 03 06 00 19 D3 BE EF 03 06 00 FE D2 06 00 (Lamp-Time...
TECHNICAL (continued) Command data chart Names Operation type Header Command data CRC Action Type Setting code Get BE EF...Get BE EF 03 06 00 08 86 02 00 10 31 00 00 Auto off Increment BE EF 03 06 00 6E 86 04 00 10 31 00...Size Reset Execute BE EF 03 06 00 68 D2 06 00 04 70 00 00 Color Balance R Reset Execute BE EF 03 06 00 94 D3 06 00 05 70 00 00 Color Balance B Reset...Cover-error) (Fan-error) (Lamp-error) Power OFF Set ON Get RGB1 04 00 (Temp-error) 05 00 (Air flow-error) BE EF BE EF BE EF 03 06 00 2A D3 03 06 00 BA D2 03 06 00 19 D3 BE EF 03 06 00 FE D2 06 00 (Lamp-Time...

User Manual
Page 38
... the party responsible for help. This equipment generates, uses, and can be used in CANADA NOTICE: This Class B digital apparatus complies with the projector or specified. Use the cables which can radiate radio frequency energy and, if not installed and used with the requirements of the FCC Rules. For the Customers in accordance with the instructions, may have to provide...
... the party responsible for help. This equipment generates, uses, and can be used in CANADA NOTICE: This Class B digital apparatus complies with the projector or specified. Use the cables which can radiate radio frequency energy and, if not installed and used with the requirements of the FCC Rules. For the Customers in accordance with the instructions, may have to provide...


