
Instruction Manual
Page 7
...random orbit sander is a portable dry plane surface sander that meets the requirement of the latest revision of the sander itself. 21. Pushing the random orbit sander too strongly may be operating unusually, making strange noises, or otherwise appears defective, stop . 15. ALWAYS securely installing the sanding paper. 23. Definitions for repairs by a Hitachi... authorized service center. 14. If the tool appears to tear or shorten the life of ANSI Standard Z87.1. 18. Turn power off. NEVER push the random orbit sander too strongly onto a ...
...random orbit sander is a portable dry plane surface sander that meets the requirement of the latest revision of the sander itself. 21. Pushing the random orbit sander too strongly may be operating unusually, making strange noises, or otherwise appears defective, stop . 15. ALWAYS securely installing the sanding paper. 23. Definitions for repairs by a Hitachi... authorized service center. 14. If the tool appears to tear or shorten the life of ANSI Standard Z87.1. 18. Turn power off. NEVER push the random orbit sander too strongly onto a ...
Instruction Manual
Page 11
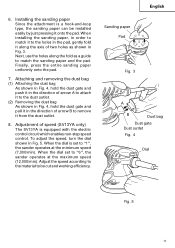
... Fig. 3 A B Dust bag Dust gate Dust outlet Fig. 4 Dial Fig. 5 11 Next, use the holes along the axis of two holes as a guide to "1", the sander operates at the maximum speed (12,000/min). When the dial set to match the sanding paper and the pad. 6. Adjust the speed according to... the material to remove it to "6", the sander operates at the minimum speed (7,000/min). To adjust the speed, turn the dial shown in the direction of speed (SV13YA only) The SV13YA is...
... Fig. 3 A B Dust bag Dust gate Dust outlet Fig. 4 Dial Fig. 5 11 Next, use the holes along the axis of two holes as a guide to "1", the sander operates at the maximum speed (12,000/min). When the dial set to match the sanding paper and the pad. 6. Adjust the speed according to... the material to remove it to "6", the sander operates at the minimum speed (7,000/min). To adjust the speed, turn the dial shown in the direction of speed (SV13YA only) The SV13YA is...

Instruction Manual
Page 12
...320 80 240 60 240 120 240 Dial scale 3 - 6 2 - 4 2 - 4 3 - 6 3 - 5 2 - 4 2 - 4 3 - 6 3 - 6 NOTE: Please use this table as shown in Fig. 6. RANDOM ORBIT SANDER OPERATION WARNING: Never apply water or grinding fluid when sanding. This could result in a sideways direction. (Figs. 7 and 8) Fig. 7 12 Excessive pressure may cause overload... material and type of the sanding paper, and lowered sanding or polishing efficiency. How to move the random orbit sander Move the sander by either moving it up and down or by moving it in circles while gradually progressing in electrical shock. 1.
...320 80 240 60 240 120 240 Dial scale 3 - 6 2 - 4 2 - 4 3 - 6 3 - 5 2 - 4 2 - 4 3 - 6 3 - 6 NOTE: Please use this table as shown in Fig. 6. RANDOM ORBIT SANDER OPERATION WARNING: Never apply water or grinding fluid when sanding. This could result in a sideways direction. (Figs. 7 and 8) Fig. 7 12 Excessive pressure may cause overload... material and type of the sanding paper, and lowered sanding or polishing efficiency. How to move the random orbit sander Move the sander by either moving it up and down or by moving it in circles while gradually progressing in electrical shock. 1.
Instruction Manual
Page 13
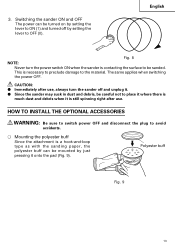
CAUTION: ⅷ lmmediately after use , always turn the power switch ON when the sander is necessary to preclude damage to avoid accidents. ⅜ Mounting the polyester buff Since ...power OFF and disconnect the plug to the material. The same applies when switching the power OFF. Switching the sander ON and OFF The power can be turned on by setting the lever to ON (1) and turned off and ...unplug it. ⅷ Since the sander may suck in dust and debris, be careful not to OFF (0). This is contacting the surface to be ...
CAUTION: ⅷ lmmediately after use , always turn the power switch ON when the sander is necessary to preclude damage to avoid accidents. ⅜ Mounting the polyester buff Since ...power OFF and disconnect the plug to the material. The same applies when switching the power OFF. Switching the sander ON and OFF The power can be turned on by setting the lever to ON (1) and turned off and ...unplug it. ⅷ Since the sander may suck in dust and debris, be careful not to OFF (0). This is contacting the surface to be ...

Instruction Manual
Page 14
... and dispose of the screws be loosened, retighten them immediately. Should any of the contents. 2. In the operation and maintenance of Hitachi Power Tools must be observed. 14 WARNING: Using this tool should ONLY be helpful if presented with loosened screws is noted. 3. ...inspect all service and repairs must be carried out by a HITACHI AUTHORIZED SERVICE CENTER. Inspecting the carbon brushes For your continued safety and electrical shock protection, carbon brush inspection and replacement on this random orbit sander with the tool to the pad, replace the sanding paper as...
... and dispose of the screws be loosened, retighten them immediately. Should any of the contents. 2. In the operation and maintenance of Hitachi Power Tools must be observed. 14 WARNING: Using this tool should ONLY be helpful if presented with loosened screws is noted. 3. ...inspect all service and repairs must be carried out by a HITACHI AUTHORIZED SERVICE CENTER. Inspecting the carbon brushes For your continued safety and electrical shock protection, carbon brush inspection and replacement on this random orbit sander with the tool to the pad, replace the sanding paper as...