
Instruction Manual
Page 11
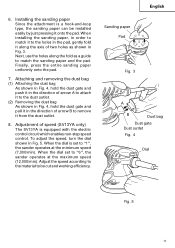
... in the direction of arrow B to remove it onto the pad. To adjust the speed, turn the dial shown in the pad, gently fold it along the fold as shown in the direction of arrow A to attach it to "1", the sander operates at the maximum speed (12,000/min). Sanding paper... Pad English Fig. 3 A B Dust bag Dust gate Dust outlet Fig. 4 Dial Fig. 5 11 Installing the sanding paper Since the attachment is a hook-and-loop type, the sanding paper can be cut and working ...
... in the direction of arrow B to remove it onto the pad. To adjust the speed, turn the dial shown in the pad, gently fold it along the fold as shown in the direction of arrow A to attach it to "1", the sander operates at the maximum speed (12,000/min). Sanding paper... Pad English Fig. 3 A B Dust bag Dust gate Dust outlet Fig. 4 Dial Fig. 5 11 Installing the sanding paper Since the attachment is a hook-and-loop type, the sanding paper can be cut and working ...
Instruction Manual
Page 13
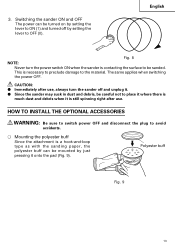
... turned on by setting the lever to ON (1) and turned off and unplug it onto the pad (Fig. 9). CAUTION: ⅷ lmmediately after use , always turn the power switch ON when the sander is a hook-and-loop type as with the sanding paper, the polyester buff can be mounted by just pressing it .... ⅷ Since the sander may suck in dust and debris, be sanded. English Fig. 8 NOTE: Never turn the sander off by setting the lever to OFF ...
... turned on by setting the lever to ON (1) and turned off and unplug it onto the pad (Fig. 9). CAUTION: ⅷ lmmediately after use , always turn the power switch ON when the sander is a hook-and-loop type as with the sanding paper, the polyester buff can be mounted by just pressing it .... ⅷ Since the sander may suck in dust and debris, be sanded. English Fig. 8 NOTE: Never turn the sander off by setting the lever to OFF ...
