Instruction Manual
Page 3
... ignored, could result in this power tool. NEVER use this power tool in the Instruction Manual before it occurs, and by the failure to prevent bodily injury or machine damage are outlined in the "SAFETY" section of the safety precautions, warnings and operating instructions in a manner that result from power tool operation and maintenance are caused by observing appropriate safety procedures. An accident can often be...
... ignored, could result in this power tool. NEVER use this power tool in the Instruction Manual before it occurs, and by the failure to prevent bodily injury or machine damage are outlined in the "SAFETY" section of the safety precautions, warnings and operating instructions in a manner that result from power tool operation and maintenance are caused by observing appropriate safety procedures. An accident can often be...

Instruction Manual
Page 4
... operating power tools may result in moving parts. Do not wear loose clothing or jewelry. English SAFETY GENERAL SAFETY RULES WARNING: Read and understand all instructions listed below, may result in a polarized outlet only one blade is grounded. (3) Do not expose power tools to rain or wet conditions. Water entering a power tool will fit in electric shock, fire and/or serious personal injury. Never use tool...
... operating power tools may result in moving parts. Do not wear loose clothing or jewelry. English SAFETY GENERAL SAFETY RULES WARNING: Read and understand all instructions listed below, may result in a polarized outlet only one blade is grounded. (3) Do not expose power tools to rain or wet conditions. Water entering a power tool will fit in electric shock, fire and/or serious personal injury. Never use tool...
Instruction Manual
Page 5
... the tool serviced by a HITACHI authorized service center. Tools are easier to follow Maintenance Instruction may become hazardous when used for which it is designed. (3) Do not use only identical replacement parts. Use the correct tool for misalignment or binding of moving parts, breakage of electric shock or injury. 5 Such preventive safety measures reduce the risk of starting . If damaged, have the switch on invites accidents. (4) Remove adjusting keys or wrenches before...
... the tool serviced by a HITACHI authorized service center. Tools are easier to follow Maintenance Instruction may become hazardous when used for which it is designed. (3) Do not use only identical replacement parts. Use the correct tool for misalignment or binding of moving parts, breakage of electric shock or injury. 5 Such preventive safety measures reduce the risk of starting . If damaged, have the switch on invites accidents. (4) Remove adjusting keys or wrenches before...
Instruction Manual
Page 6
... all screws, bolts and covers tightly in proper working order. Such tools should be used until repaired. 10. Blades, cutting implements and accessories which have been mounted to the tool should not be secure and tight. 11. Operate power tools at voltages specified on its nameplate. Prolonged exposure to high intensity noise can lead to replace the guard or safety feature before resuming operation of the tool "live " wire...
... all screws, bolts and covers tightly in proper working order. Such tools should be used until repaired. 10. Blades, cutting implements and accessories which have been mounted to the tool should not be secure and tight. 11. Operate power tools at voltages specified on its nameplate. Prolonged exposure to high intensity noise can lead to replace the guard or safety feature before resuming operation of the tool "live " wire...
Instruction Manual
Page 7
... a disc grinder. 22. Never use this tool V volts Hz .......... Do not use depressed center wheel as gasoline, thinner benzine, carbon tetrachloride, and alcohol may result in inaccurate and even dangerous operation. 27. Carefully handle power tools. Pay strict attention to a complete stop using it comes to sparks. 20. Should the revolving speed suddenly decrease due to securely grip the Sander Polisher. 21. Definitions for repairs by a Hitachi authorized service center...
... a disc grinder. 22. Never use this tool V volts Hz .......... Do not use depressed center wheel as gasoline, thinner benzine, carbon tetrachloride, and alcohol may result in inaccurate and even dangerous operation. 27. Carefully handle power tools. Pay strict attention to a complete stop using it comes to sparks. 20. Should the revolving speed suddenly decrease due to securely grip the Sander Polisher. 21. Definitions for repairs by a Hitachi authorized service center...

Instruction Manual
Page 8
... or assemble this power tool, and only genuine HITACHI replacement parts should be installed. ⅜ Clean the exterior of this Instruction Manual, including not using the power tool in this power tool, HITACHI has adopted a double insulation design. "Double insulation " means that two physically separated insulation systems have been used to insulate the electrically conductive materials connected to the power supply from the outer frame handled by the operator. To...
... or assemble this power tool, and only genuine HITACHI replacement parts should be installed. ⅜ Clean the exterior of this Instruction Manual, including not using the power tool in this power tool, HITACHI has adopted a double insulation design. "Double insulation " means that two physically separated insulation systems have been used to insulate the electrically conductive materials connected to the power supply from the outer frame handled by the operator. To...
Instruction Manual
Page 9
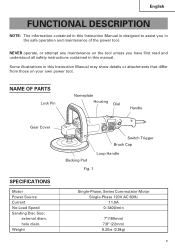
... have first read and understood all safety instructions contained in the safe operation and maintenance of the power tool. NEVER operate, or attempt any maintenance on the tool unless you in this Instruction Manual may show details or attachments that differ from those on your own power tool. NAME OF PARTS Lock Pin Nameplate Housing Dial Handle Gear Cover SPECIFICATIONS Motor Power Source Current No-Load Speed Sanding Disc Size: external diam. Some illustrations in this...
... have first read and understood all safety instructions contained in the safe operation and maintenance of the power tool. NEVER operate, or attempt any maintenance on the tool unless you in this Instruction Manual may show details or attachments that differ from those on your own power tool. NAME OF PARTS Lock Pin Nameplate Housing Dial Handle Gear Cover SPECIFICATIONS Motor Power Source Current No-Load Speed Sanding Disc Size: external diam. Some illustrations in this...
Instruction Manual
Page 10
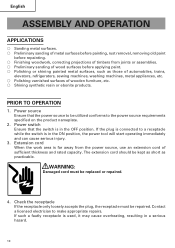
... to make appropriate repairs. WARNING: Damaged cord must be replaced or repaired. 4. Extension cord When the work area is in a serious hazard. 10 Contact a licensed electrician to a receptacle while the switch is used, it may cause overheating, resulting in the OFF position. English ASSEMBLY AND OPERATION APPLICATIONS ⅜ Sanding metal surfaces. ⅜ Preliminary sanding of metal surfaces before painting, rust removal, removing old paint...
... to make appropriate repairs. WARNING: Damaged cord must be replaced or repaired. 4. Extension cord When the work area is in a serious hazard. 10 Contact a licensed electrician to a receptacle while the switch is used, it may cause overheating, resulting in the OFF position. English ASSEMBLY AND OPERATION APPLICATIONS ⅜ Sanding metal surfaces. ⅜ Preliminary sanding of metal surfaces before painting, rust removal, removing old paint...
Instruction Manual
Page 11
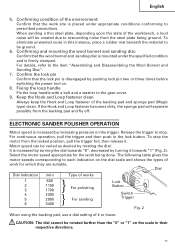
... Type of works } For polishing } For sanding Lock Button Switch Trigger Fig. 2 When using the backing pad, use a dial setting of the backing pad and sponge pad (Magic type) clean. CAUTION: The dial cannot be ground. 6. ELECTRONIC SANDER POLISHER OPERATION Motor speed is disengaged by turning it . To stop . For details, refer to stop the motor from the locked position, pull the trigger full, then release it towards "6", decreased by pushing lock pin two or three times before switching the power tool...
... Type of works } For polishing } For sanding Lock Button Switch Trigger Fig. 2 When using the backing pad, use a dial setting of the backing pad and sponge pad (Magic type) clean. CAUTION: The dial cannot be ground. 6. ELECTRONIC SANDER POLISHER OPERATION Motor speed is disengaged by turning it . To stop . For details, refer to stop the motor from the locked position, pull the trigger full, then release it towards "6", decreased by pushing lock pin two or three times before switching the power tool...
Instruction Manual
Page 12
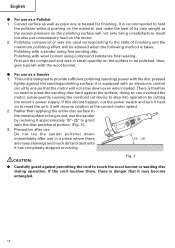
Polishing with a sander using compound substance final waxing. First put unnecessory load on the material, and make the best of finishing and the maximum polishing effect will resume rotation at the correct motor speed. 2. q For use as a Polisher 1. There is threfore no need to touch the wool bonnet or sanding disc during operation. doing so can overload the motor, subsequently causing the overload cut the power switch and turn it...
Polishing with a sander using compound substance final waxing. First put unnecessory load on the material, and make the best of finishing and the maximum polishing effect will resume rotation at the correct motor speed. 2. q For use as a Polisher 1. There is threfore no need to touch the wool bonnet or sanding disc during operation. doing so can overload the motor, subsequently causing the overload cut the power switch and turn it...

Instruction Manual
Page 13
If not centered, vibration will result. (3) To remove the wool bonnet, follow the above -mentioned procedure in reverse order. Backing Pad < > Using the rubber pad (optional accessory) (Fig. 5) (1) Insert the washer nut (optional accessory) through the rubber pad (optional accessory) and thread it . Wool Bonnet (Hook & Loop type) Spindle Fig. 4 Lock Pin Wool Bonnet Spindle Fig. 5 Lock Pin Tuck the excess string into Hood Fig. 6 13 Align the respective...
If not centered, vibration will result. (3) To remove the wool bonnet, follow the above -mentioned procedure in reverse order. Backing Pad < > Using the rubber pad (optional accessory) (Fig. 5) (1) Insert the washer nut (optional accessory) through the rubber pad (optional accessory) and thread it . Wool Bonnet (Hook & Loop type) Spindle Fig. 4 Lock Pin Wool Bonnet Spindle Fig. 5 Lock Pin Tuck the excess string into Hood Fig. 6 13 Align the respective...
Instruction Manual
Page 14
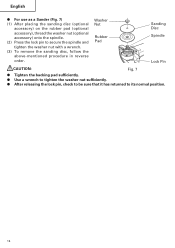
... releasing the lock pin, check to be sure that it has returned to tighten the washer nut sufficiently. q Use a wrench to its normal position. 14 Washer Nut Rubber Pad Sanding Disc Spindle Lock Pin CAUTION: Fig. 7 q Tighten the backing pad sufficiently. English q For use as a Sander (Fig. 7) (1) After placing the sanding disc (optional accessory) on the rubber pad (optional accessory), thread the washer nut (optional accessory) onto the spindle. (2) Press the lock pin to secure the spindle and tighten the washer nut with a wrench. (3) To remove the sanding disc...
... releasing the lock pin, check to be sure that it has returned to tighten the washer nut sufficiently. q Use a wrench to its normal position. 14 Washer Nut Rubber Pad Sanding Disc Spindle Lock Pin CAUTION: Fig. 7 q Tighten the backing pad sufficiently. English q For use as a Sander (Fig. 7) (1) After placing the sanding disc (optional accessory) on the rubber pad (optional accessory), thread the washer nut (optional accessory) onto the spindle. (2) Press the lock pin to secure the spindle and tighten the washer nut with a wrench. (3) To remove the sanding disc...
Instruction Manual
Page 15
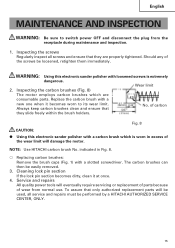
... the screws be easily removed. 3. Cleaning lock pin section If the lock pin section becomes dirty, clean it becomes worn to switch power OFF and disconnect the plug from normal use. WARNING: Using this electronic sander polisher with a 43 new one when it at once. 4. Fig. 8 CAUTION: q Using this electronic sander polisher with a slotted screwdriver. NOTE: Use HITACHI carbon brush No. Inspecting the screws Regularly inspect all service and repairs must be used, all screws...
... the screws be easily removed. 3. Cleaning lock pin section If the lock pin section becomes dirty, clean it becomes worn to switch power OFF and disconnect the plug from normal use. WARNING: Using this electronic sander polisher with a 43 new one when it at once. 4. Fig. 8 CAUTION: q Using this electronic sander polisher with a slotted screwdriver. NOTE: Use HITACHI carbon brush No. Inspecting the screws Regularly inspect all service and repairs must be used, all screws...
Instruction Manual
Page 16
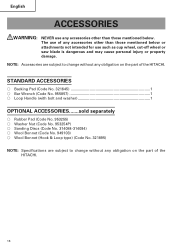
... to change without any obligation on the part of the HITACHI. 16 The use such as cup wheel, cut-off wheel or saw blade is dangerous and may cause personal injury or property damage. STANDARD ACCESSORIES ⅜ Backing Pad (Code No. 321645 1 ⅜ Bar Wrench (Code No. 955857 1 ⅜ Loop Handle (with bolt and washer 1 OPTIONAL ACCESSORIES.......sold separately ⅜ Rubber Pad (Code No. 953255) ⅜ Washer Nut (Code No. 953254P) ⅜ Sanding Discs (Code...
... to change without any obligation on the part of the HITACHI. 16 The use such as cup wheel, cut-off wheel or saw blade is dangerous and may cause personal injury or property damage. STANDARD ACCESSORIES ⅜ Backing Pad (Code No. 321645 1 ⅜ Bar Wrench (Code No. 955857 1 ⅜ Loop Handle (with bolt and washer 1 OPTIONAL ACCESSORIES.......sold separately ⅜ Rubber Pad (Code No. 953255) ⅜ Washer Nut (Code No. 953254P) ⅜ Sanding Discs (Code...
Parts List
Page 2
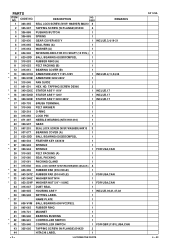
... SEAL LOCK SCREW (W/SP.WASHER)M5X14(BLACK) 4 * 32 953-255 RUBBER PAD (D16 HOLE) 1 * 32 953-247Z RUBBER PAD (D14 HOLE) 1 FOR USA,CAN * 33 953-246Z WASHER NUT M14 1 * 33 953-254P WASHER NUT 5/8"-11UNC 1 FOR USA,CAN 34 315-047 DUST SEAL 1 35 320-945 HOUSING ASS'Y 1 INCLUD.39,41,47,48 36 320-948 SETTING LABEL 1 * 37 NAME PLATE...
... SEAL LOCK SCREW (W/SP.WASHER)M5X14(BLACK) 4 * 32 953-255 RUBBER PAD (D16 HOLE) 1 * 32 953-247Z RUBBER PAD (D14 HOLE) 1 FOR USA,CAN * 33 953-246Z WASHER NUT M14 1 * 33 953-254P WASHER NUT 5/8"-11UNC 1 FOR USA,CAN 34 315-047 DUST SEAL 1 35 320-945 HOUSING ASS'Y 1 INCLUD.39,41,47,48 36 320-948 SETTING LABEL 1 * 37 NAME PLATE...
Parts List
Page 4
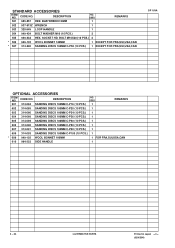
... WRENCH 1 503 320-949 LOOP HANDLE 1 504 949-434 BOLT WASHER M10 (10 PCS.) 2 505 949-844 HEX. STANDARD ACCESSORIES ITEM NO. USED 601 314-084 SANDING DISCS 180MM C-P16 (10 PCS.) 1 REMARKS 602 314-085 SANDING DISCS 180MM C-P20 (10 PCS.) 1 603 314-086 SANDING DISCS 180MM C-P24 (10 PCS.) 1 604 314-088 SANDING DISCS 180MM C-P36 (10 PCS.) 1 605 314-089 SANDING DISCS...
... WRENCH 1 503 320-949 LOOP HANDLE 1 504 949-434 BOLT WASHER M10 (10 PCS.) 2 505 949-844 HEX. STANDARD ACCESSORIES ITEM NO. USED 601 314-084 SANDING DISCS 180MM C-P16 (10 PCS.) 1 REMARKS 602 314-085 SANDING DISCS 180MM C-P20 (10 PCS.) 1 603 314-086 SANDING DISCS 180MM C-P24 (10 PCS.) 1 604 314-088 SANDING DISCS 180MM C-P36 (10 PCS.) 1 605 314-089 SANDING DISCS...

