
Owners Guide
Page 1
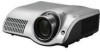
... are used in a safe place for any errors that , if ignored, could possibly result in personal injury or even death due to incorrect handling. ENGLISH Projector PJ-TX100 User's Manual - Operating Guide Thank you for purchasing this manual is a trademark of these manuals to the pages written following this document or contents is...
... are used in a safe place for any errors that , if ignored, could possibly result in personal injury or even death due to incorrect handling. ENGLISH Projector PJ-TX100 User's Manual - Operating Guide Thank you for purchasing this manual is a trademark of these manuals to the pages written following this document or contents is...
Owners Guide
Page 2
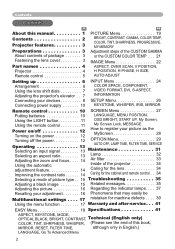
...or the CUSTOM COLOR TEMP . . . 21 IMAGE Menu 22 ASPECT, OVER SCAN, V POSITION, Projector 4 Remote control 5 H POSITION, H PHASE, H SIZE, AUTO ADJUST Setting up 6 Arrangement 6 Using the lens shift dials 7 Adjusting the projector's elevator . . 7 INPUT Menu 24 COLOR SPACE, COMPONENT, VIDEO FORMAT, DVI, S-ASPECT, ... an aspect ratio 13 Lamp 32 Adjusting the zoom and focus . . . . 14 Air filter 33 Using the automatic Inside of the projector 34 adjustment feature 14 Caring for the lens 34 Improving the contrast ratio. . . . . . 14 Caring for the cabinet and remote control ...
...or the CUSTOM COLOR TEMP . . . 21 IMAGE Menu 22 ASPECT, OVER SCAN, V POSITION, Projector 4 Remote control 5 H POSITION, H PHASE, H SIZE, AUTO ADJUST Setting up 6 Arrangement 6 Using the lens shift dials 7 Adjusting the projector's elevator . . 7 INPUT Menu 24 COLOR SPACE, COMPONENT, VIDEO FORMAT, DVI, S-ASPECT, ... an aspect ratio 13 Lamp 32 Adjusting the zoom and focus . . . . 14 Air filter 33 Using the automatic Inside of the projector 34 adjustment feature 14 Caring for the lens 34 Improving the contrast ratio. . . . . . 14 Caring for the cabinet and remote control ...

Owners Guide
Page 3
...dispersion) lenses are adopted for installation and large images can easily be sure to the strap ring of lens cover. Your projector should come with blacker black. 1.6x zoom lens and the optical lens shift allow flexible installation and viewing position.... Motorized iris control is the entertainment projector that will turn your dealer if anything is required for the highest possible image quality. 720P wide LCD panels realize faithful reproduction of the "User's manual - Contact immediately your room ...
...dispersion) lenses are adopted for installation and large images can easily be sure to the strap ring of lens cover. Your projector should come with blacker black. 1.6x zoom lens and the optical lens shift allow flexible installation and viewing position.... Motorized iris control is the entertainment projector that will turn your dealer if anything is required for the highest possible image quality. 720P wide LCD panels realize faithful reproduction of the "User's manual - Contact immediately your room ...
Owners Guide
Page 4
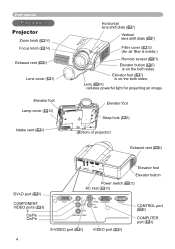
... ( 34) radiates powerful light for projecting an image. Elevator foot ( 7) is on the both sides. Elevator foot Strap hole ( 3) (Bottom of projector) Exhaust vent ( 6) DVI-D port ( 8) COMPONENT VIDEO ports ( 8) Y CB/PB CR/PR Elevator foot Elevator button Power switch ( 12) AC...Y CB/PB CR/PR COMPONENT VIDEO S-VIDEO COMPUTER VIDEO CONTROL S-VIDEO port ( 8) VIDEO port ( 8) CONTROL port ( 8) COMPUTER port ( 8) 4 Part names Part names Projector Zoom knob ( 14) Focus knob ( 14) Exhaust vent ( 6) Lens cover ( 3) Elevator foot Lamp cover ( 32) Intake vent ( 6) Horizontal lens shift dials ( ...
... ( 34) radiates powerful light for projecting an image. Elevator foot ( 7) is on the both sides. Elevator foot Strap hole ( 3) (Bottom of projector) Exhaust vent ( 6) DVI-D port ( 8) COMPONENT VIDEO ports ( 8) Y CB/PB CR/PR Elevator foot Elevator button Power switch ( 12) AC...Y CB/PB CR/PR COMPONENT VIDEO S-VIDEO COMPUTER VIDEO CONTROL S-VIDEO port ( 8) VIDEO port ( 8) CONTROL port ( 8) COMPUTER port ( 8) 4 Part names Part names Projector Zoom knob ( 14) Focus knob ( 14) Exhaust vent ( 6) Lens cover ( 3) Elevator foot Lamp cover ( 32) Intake vent ( 6) Horizontal lens shift dials ( ...
Owners Guide
Page 6
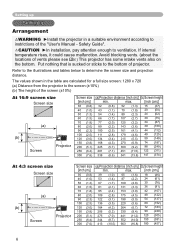
... 300 (7.6) (a)Projection distance [inch (m)] (b)Screen height min. The values shown in a suitable environment according to instrictions of vents please see 4.) This projector has some intake vents also on the bottom. max. [inch (cm)] 32 (0.8) 52 (1.3) 43 (1.1) 70 (1.8) 54 (1.4) 89 (2.3) 66 (1.7)... 360 (9.2) 98 (249) 281 (7.1) 451 (11.5) 122 (311) 338 (8.6) 541 (13.8) 147 (374) At 4:3 screen size Screen size (a) (b) Screen Projector Screen size [inch (m)] 30 (0.8) 40 (1.0) 50 (1.3) 60 (1.5) 70 (1.8) 80 (2.0) 90 (2.3) 100 (2.5) 120 (3.0) 150 (3.8) 200 (5.1) 250 (6.4) 300 (7.6) ...
... 300 (7.6) (a)Projection distance [inch (m)] (b)Screen height min. The values shown in a suitable environment according to instrictions of vents please see 4.) This projector has some intake vents also on the bottom. max. [inch (cm)] 32 (0.8) 52 (1.3) 43 (1.1) 70 (1.8) 54 (1.4) 89 (2.3) 66 (1.7)... 360 (9.2) 98 (249) 281 (7.1) 451 (11.5) 122 (311) 338 (8.6) 541 (13.8) 147 (374) At 4:3 screen size Screen size (a) (b) Screen Projector Screen size [inch (m)] 30 (0.8) 40 (1.0) 50 (1.3) 60 (1.5) 70 (1.8) 80 (2.0) 90 (2.3) 100 (2.5) 120 (3.0) 150 (3.8) 200 (5.1) 250 (6.4) 300 (7.6) ...
Owners Guide
Page 7
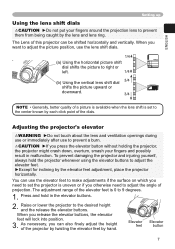
... use or immediately after use the elevator feet to make adjustments if the surface on which you press the elevator button without holding the projector, the projector might crash down, overturn, smash your fingers around the projection lens to the center known by the lens and lens ring. ...You can use to the desired height and the release the elevator buttons. Elevator Elevator feet button 7 The Lens of this projector can also finely adjust the height of the elevator feet is 0 to adjust the elevator feet. ►Except for inclining by hand. ...
... use or immediately after use the elevator feet to make adjustments if the surface on which you press the elevator button without holding the projector, the projector might crash down, overturn, smash your fingers around the projection lens to the center known by the lens and lens ring. ...You can use to the desired height and the release the elevator buttons. Elevator Elevator feet button 7 The Lens of this projector can also finely adjust the height of the elevator feet is 0 to adjust the elevator feet. ►Except for inclining by hand. ...
Owners Guide
Page 8
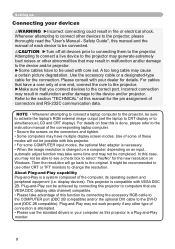
...devices prior to connecting them to the DVI-D port (DDC 2B compatible). Attempting to connect a live device to the projector may not be recommended to simultaneous LCD and CRT display). For details on an input, automatic adjust function may take advantage of this manual for the pin ... the image resolution is compatible with your devices WARNING ►Incorrect connecting could result in malfunction and/or damage to the device and/or projector. ►Some cables have to activate the laptop's RGB external image output (set . Use of some of connectors and RS-232C communication...
...devices prior to connecting them to the DVI-D port (DDC 2B compatible). Attempting to connect a live device to the projector may not be recommended to simultaneous LCD and CRT display). For details on an input, automatic adjust function may take advantage of this manual for the pin ... the image resolution is compatible with your devices WARNING ►Incorrect connecting could result in malfunction and/or damage to the device and/or projector. ►Some cables have to activate the laptop's RGB external image output (set . Use of some of connectors and RS-232C communication...

Owners Guide
Page 10
... well with used one . • Only plug the power cord into an outlet rated for use with the projector. Insert the batteries. Close the battery cover. Never attempt to the AC inlet of the projector. 2. Remove the battery cover. Replace the battery cover in the direction of the arrow. 2. Connect the connector...
... well with used one . • Only plug the power cord into an outlet rated for use with the projector. Insert the batteries. Close the battery cover. Never attempt to the AC inlet of the projector. 2. Remove the battery cover. Replace the battery cover in the direction of the arrow. 2. Connect the connector...
Owners Guide
Page 11
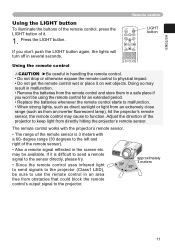
... When strong lights, such as direct sunlight or light from an extremely close range (such as from an inverter fluorescent lamp), hit the projector's remote sensor, the remote control may be sure to use the remote control in the screen etc. The remote control works with a 60- ...to send a remote signal to the sensor directly, please try. • Since the remote control uses infrared light to send signals to the projector (Class1 LED), be available. Using the remote control MENU RESET BRIGHT CONTRAST COLOR DVI PC AUTO CAUTION ►Be careful in several seconds. ...
... When strong lights, such as direct sunlight or light from an extremely close range (such as from an inverter fluorescent lamp), hit the projector's remote sensor, the remote control may be sure to use the remote control in the screen etc. The remote control works with a 60- ...to send a remote signal to the sensor directly, please try. • Since the remote control uses infrared light to send signals to the projector (Class1 LED), be available. Using the remote control MENU RESET BRIGHT CONTRAST COLOR DVI PC AUTO CAUTION ►Be careful in several seconds. ...

Owners Guide
Page 12
... (Solid orange) The power indicator will stop blinking light green. Power on/off Power on/off WARNING ►When the power is on the projector before the connected devices. Please power on , a strong light is emitted. POWER 2. Remove the lens cover, and set the power switch to... because buttons may not function for approximately 5 seconds. will appear on , the indicator will begin blinking green. Press the button STANDBY/ON (projector) or POWER (remote control) again while the message is complete. Then the POWER indicator will light to the OFF position. Set the power ...
... (Solid orange) The power indicator will stop blinking light green. Power on/off Power on/off WARNING ►When the power is on the projector before the connected devices. Please power on , a strong light is emitted. POWER 2. Remove the lens cover, and set the power switch to... because buttons may not function for approximately 5 seconds. will appear on , the indicator will begin blinking green. Press the button STANDBY/ON (projector) or POWER (remote control) again while the message is complete. Then the POWER indicator will light to the OFF position. Set the power ...
Owners Guide
Page 13
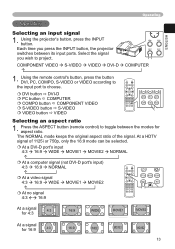
Using the projector's button, press the INPUT button. At a DVI-D port's input 4:3 16:9 WIDE MOVIE1 MOVIE2 NORMAL At a computer signal (not DVI-D port's input) 4:3 16:9 NORMAL At a video ... between its input ports. Each time you wish to project. At a HDTV signal of the signal. Select the signal you press the INPUT button, the projector switches between the modes for 16:9 4:3 16:9 WIDE MOVIE1 MOVIE2 13 The NORMAL mode keeps the original aspect ratio of 1125i or 750p, only the...
Using the projector's button, press the INPUT button. At a DVI-D port's input 4:3 16:9 WIDE MOVIE1 MOVIE2 NORMAL At a computer signal (not DVI-D port's input) 4:3 16:9 NORMAL At a video ... between its input ports. Each time you wish to project. At a HDTV signal of the signal. Select the signal you press the INPUT button, the projector switches between the modes for 16:9 4:3 16:9 WIDE MOVIE1 MOVIE2 13 The NORMAL mode keeps the original aspect ratio of 1125i or 750p, only the...
Owners Guide
Page 14
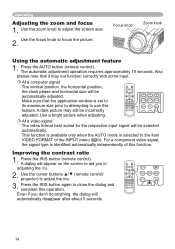
... type is selected to aid you don't do anything, the dialog will automatically disappear after about 5 seconds. Use the cursor buttons ▲/▼ (remote control/ projector) to focus the picture. Even if you in adjusting the iris. 2. Focus knob Zoom knob Using the automatic adjustment feature 1. The automatic adjustment operation requires...
... type is selected to aid you don't do anything, the dialog will automatically disappear after about 5 seconds. Use the cursor buttons ▲/▼ (remote control/ projector) to focus the picture. Even if you in adjusting the iris. 2. Focus knob Zoom knob Using the automatic adjustment feature 1. The automatic adjustment operation requires...
Owners Guide
Page 16
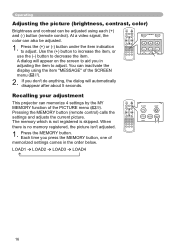
... MODE MEMORY ASPECT IRIS ENTER MENU RESET BRIGHT CONTRAST COLOR DVI PC AUTO COMPO S-VIDEO VIDEO MENU RESET BRIGHT CONTRAST COLOR Recalling your adjustment This projector can also be adjusted using the item "MESSAGE" of the SCREEN menu ( 27). 2. Press the MEMORY button. Each time you in the order below. The...
... MODE MEMORY ASPECT IRIS ENTER MENU RESET BRIGHT CONTRAST COLOR DVI PC AUTO COMPO S-VIDEO VIDEO MENU RESET BRIGHT CONTRAST COLOR Recalling your adjustment This projector can also be adjusted using the item "MESSAGE" of the SCREEN menu ( 27). 2. Press the MEMORY button. Each time you in the order below. The...
Owners Guide
Page 17
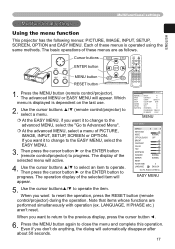
...MENU RESET BRIGHT CONTRAST COLOR DVI PC AUTO COMPO S-VIDEO VIDEO 1. Press the MENU button (remote control/projector). Use the cursor buttons ▲/▼ (remote control/projector) to operate the item. Use the cursor buttons▲/▼ to select a menu. When you ... etc.) aren't reset. When you don't do anything, the dialog will appear. Multifunctional settings Multifunctional settings ENGLISH Using the menu function This projector has the following menus: PICTURE, IMAGE, INPUT, SETUP, SCREEN, OPTION and EASY MENU. Which menu is displayed is operated using the same...
...MENU RESET BRIGHT CONTRAST COLOR DVI PC AUTO COMPO S-VIDEO VIDEO 1. Press the MENU button (remote control/projector). Use the cursor buttons ▲/▼ (remote control/projector) to operate the item. Use the cursor buttons▲/▼ to select a menu. When you ... etc.) aren't reset. When you don't do anything, the dialog will appear. Multifunctional settings Multifunctional settings ENGLISH Using the menu function This projector has the following menus: PICTURE, IMAGE, INPUT, SETUP, SCREEN, OPTION and EASY MENU. Which menu is displayed is operated using the same...

Owners Guide
Page 20
... the following and then pressing the ► (or the ENTER) button performs each function. LOAD1 LOAD2 LOAD3 LOAD4 MY MEMORY SAVE4 SAVE3 SAVE2 SAVE1 This projector has 4 numbered memories for example, jagged line) of the picture at an interlaced signal of a VIDEO input, a S-VIDEO input or a COMPONENT VIDEO input of the...
... the following and then pressing the ► (or the ENTER) button performs each function. LOAD1 LOAD2 LOAD3 LOAD4 MY MEMORY SAVE4 SAVE3 SAVE2 SAVE1 This projector has 4 numbered memories for example, jagged line) of the picture at an interlaced signal of a VIDEO input, a S-VIDEO input or a COMPONENT VIDEO input of the...
Owners Guide
Page 26
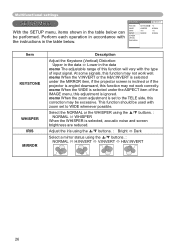
... of the IMAGE menu, this correction may not work correctly. memo When the WIDE is selected under the MIRROR item, if the projector screen is inclined or if the projector is set to the TELE side, this adjustment is selected, acoustic noise and screen brightness are reduced. This function should be performed...
... of the IMAGE menu, this correction may not work correctly. memo When the WIDE is selected under the MIRROR item, if the projector screen is inclined or if the projector is set to the TELE side, this adjustment is selected, acoustic noise and screen brightness are reduced. This function should be performed...

Owners Guide
Page 29
.... Select the RESET using ▲ button to reset the timer. : RESET CANCEL Selecting the RESET resets the count of the current lamp, to 99, the projector lamp will go off and the power indicator begins blinking when the passed time with the instructions in the table below can be performed. MENU...
.... Select the RESET using ▲ button to reset the timer. : RESET CANCEL Selecting the RESET resets the count of the current lamp, to 99, the projector lamp will go off and the power indicator begins blinking when the passed time with the instructions in the table below can be performed. MENU...
Owners Guide
Page 30
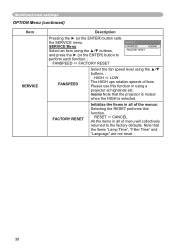
... will collectively returned to perform each function. : FANSPEED FACTORY RESET SERVICE FANSPEED FANCTORY RESET NORMAL FANSPEED Select the fan speed level using a projector at highlands etc. SERVICE Menu Select an item using the ▲/▼ buttons, and press the ► (or the ENTER) button...: HIGH LOW The HIGH ups rotation speeds of the menus: Selecting the RESET performs this function in all of fans. Note that the projector is noisier when the HIGH is selected. Multifunctional settings OPTION Menu (continued) Item SERVICE Description Pressing the ► (or the ENTER) ...
... will collectively returned to perform each function. : FANSPEED FACTORY RESET SERVICE FANSPEED FANCTORY RESET NORMAL FANSPEED Select the fan speed level using a projector at highlands etc. SERVICE Menu Select an item using the ▲/▼ buttons, and press the ► (or the ENTER) button...: HIGH LOW The HIGH ups rotation speeds of the menus: Selecting the RESET performs this function in all of fans. Note that the projector is noisier when the HIGH is selected. Multifunctional settings OPTION Menu (continued) Item SERVICE Description Pressing the ► (or the ENTER) ...
Owners Guide
Page 31
..., if jolted or scratched, handled while hot, or worn over time. do not try to clean the projector or replace the lamp yourself. • If the lamp should break (it will make a loud bang... the lamp should break (it will make sure not to breathe the gas that comes out of the projector vents, or get it is possible that shards of in trash. In addition, when the bulb bursts,.... • If the lamp breaks soon after you to request a replacement lamp from the projector's vent holes. ►About disposal of breakage. 31 The lamp can cause burns, as well as possible....
..., if jolted or scratched, handled while hot, or worn over time. do not try to clean the projector or replace the lamp yourself. • If the lamp should break (it will make a loud bang... the lamp should break (it will make sure not to breathe the gas that comes out of the projector vents, or get it is possible that shards of in trash. In addition, when the bulb bursts,.... • If the lamp breaks soon after you to request a replacement lamp from the projector's vent holes. ►About disposal of breakage. 31 The lamp can cause burns, as well as possible....

Owners Guide
Page 32
... switching power on the ceiling, or if the lamp has broken, also ask the dealer to lock it in incorrect message functions. 32 If the projector is facing up the lamp by yourself, Bottom side 3. Unscrew the 2 screws (marked by arrow) of resetting after the message of the lamp ... in the previous process to replace the lamp. NOTE • When the lamp has been replaced after replacement) will result in place. Turn off the projector, and unplug the power cord. Tell the dealer your dealer to cool for 3 seconds. (4) Choose the "RESET" using the ▲/▼ button, then ...
... switching power on the ceiling, or if the lamp has broken, also ask the dealer to lock it in incorrect message functions. 32 If the projector is facing up the lamp by yourself, Bottom side 3. Unscrew the 2 screws (marked by arrow) of resetting after the message of the lamp ... in the previous process to replace the lamp. NOTE • When the lamp has been replaced after replacement) will result in place. Turn off the projector, and unplug the power cord. Tell the dealer your dealer to cool for 3 seconds. (4) Choose the "RESET" using the ▲/▼ button, then ...


