Owners Guide
Page 1
PLASMA TELEVISION Operating Guide for P42H401, P42H401A P50H401, P50H401A, P55H401, P42H4011 P42H4011A, P50H4011, P50H4011A and P55H4011 IMPORTANT SAFETY INSTRUCTIONS ...2-3 FIRST TIME USE ...4-22 THE REMOTE CONTROL ...23-31 ON-SCREEN DISPLAY ...32-54 USEFUL INFORMATION ...55-64 OPERATING GUIDE IN SPANISH ...65-128 END USER LICENSE AGREEMENT FOR HITACHI DTV SOFTWARE 129-137 APPENDIXES ...138-139 INDEX ...140 SPANISH
PLASMA TELEVISION Operating Guide for P42H401, P42H401A P50H401, P50H401A, P55H401, P42H4011 P42H4011A, P50H4011, P50H4011A and P55H4011 IMPORTANT SAFETY INSTRUCTIONS ...2-3 FIRST TIME USE ...4-22 THE REMOTE CONTROL ...23-31 ON-SCREEN DISPLAY ...32-54 USEFUL INFORMATION ...55-64 OPERATING GUIDE IN SPANISH ...65-128 END USER LICENSE AGREEMENT FOR HITACHI DTV SOFTWARE 129-137 APPENDIXES ...138-139 INDEX ...140 SPANISH
Owners Guide
Page 2
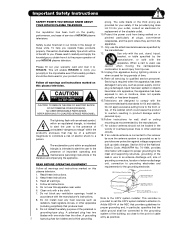
... or moisture, does not operate RISK OF ELECTRIC SHOCK DO NOT OPEN normally, or has been dropped. 15.Televisions are YOUR HITACHI PLASMA TELEVISION provided for your product model. recommended safety standards for (including amplifiers) that a safety problem should not be of overhead ...Follow all servicing to qualified service personnel. Servicing is damaged, liquid has been spilled or objects CAUTION have fallen into your HITACHI plasma television. built up static charges. Do not defeat the safety purpose of the polarized or cable ground shall be sure ...
... or moisture, does not operate RISK OF ELECTRIC SHOCK DO NOT OPEN normally, or has been dropped. 15.Televisions are YOUR HITACHI PLASMA TELEVISION provided for your product model. recommended safety standards for (including amplifiers) that a safety problem should not be of overhead ...Follow all servicing to qualified service personnel. Servicing is damaged, liquid has been spilled or objects CAUTION have fallen into your HITACHI plasma television. built up static charges. Do not defeat the safety purpose of the polarized or cable ground shall be sure ...
Owners Guide
Page 3
...than the specified voltage. Dispose of receiving analog basic, digital basic cable television programming by HITACHI could void the user's warranty. Never connect the plasma television to a cable system providing such programming. If the television does not operate properly, unplug... digital cable services such as vases, should not be permanently imprinted onto your HITACHI Factory Warranty. Lead Notice This product contains lead. Important Safety Instructions Power source This plasma television is designed to a mains socket outlet with a protective earthing connection.
...than the specified voltage. Dispose of receiving analog basic, digital basic cable television programming by HITACHI could void the user's warranty. Never connect the plasma television to a cable system providing such programming. If the television does not operate properly, unplug... digital cable services such as vases, should not be permanently imprinted onto your HITACHI Factory Warranty. Lead Notice This product contains lead. Important Safety Instructions Power source This plasma television is designed to a mains socket outlet with a protective earthing connection.

Owners Guide
Page 4
..." size batteries for a maximum tilting angle of 45 degrees from vertical. 2. CAUTION: Do not insert batteries with Hitachi P42H401, P42H401A, P50H401 and P50H401A models. Note : The accessories for optional www.hitachi.us/tv accessories. This plasma television product is designed for the remote control. Insert the bottom of the battery, the (-) side, into...
..." size batteries for a maximum tilting angle of 45 degrees from vertical. 2. CAUTION: Do not insert batteries with Hitachi P42H401, P42H401A, P50H401 and P50H401A models. Note : The accessories for optional www.hitachi.us/tv accessories. This plasma television product is designed for the remote control. Insert the bottom of the battery, the (-) side, into...
Owners Guide
Page 5
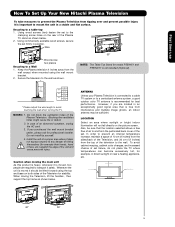
... cabinet color changes, and increased chance of the television to the wall. A 55" NOTE: The Table Top Stand for model P55H401 and P55H4011 is recommended for best performance. When moving the main unit As this product is heavy, whenever it is moved it should be sure that is... block the ventilation holes of the unit and cause personal injury. First time use How To Set Up Your New Hitachi Plasma Television To take measures to prevent the Plasma Television from tipping over and prevent possible injury it is free from interference and multiple image ghosts, an indoor antenna...
... cabinet color changes, and increased chance of the television to the wall. A 55" NOTE: The Table Top Stand for model P55H401 and P55H4011 is recommended for best performance. When moving the main unit As this product is heavy, whenever it is moved it should be sure that is... block the ventilation holes of the unit and cause personal injury. First time use How To Set Up Your New Hitachi Plasma Television To take measures to prevent the Plasma Television from tipping over and prevent possible injury it is free from interference and multiple image ghosts, an indoor antenna...
Owners Guide
Page 6
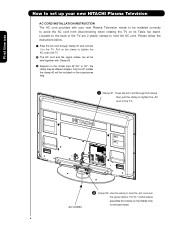
... clamp to tighten the AC cord to the TV. · The AC cord and the signal cables can all be held together with your new HITACHI Plasma Television AC CORD INSTALLATION INSTRUCTION The AC cord provided with Clamp #2. » Depend on the model size 42",50" or 55", the clamp may be... hold the AC cord. then pull the clamp to tighten the AC cord to the TV. First time use How to set up your new Plasma Television needs to be installed correctly to avoid the AC cord from disconnecting when rotating the TV on its Table top stand.
... clamp to tighten the AC cord to the TV. · The AC cord and the signal cables can all be held together with your new HITACHI Plasma Television AC CORD INSTALLATION INSTRUCTION The AC cord provided with Clamp #2. » Depend on the model size 42",50" or 55", the clamp may be... hold the AC cord. then pull the clamp to tighten the AC cord to the TV. First time use How to set up your new Plasma Television needs to be installed correctly to avoid the AC cord from disconnecting when rotating the TV on its Table top stand.
Owners Guide
Page 7
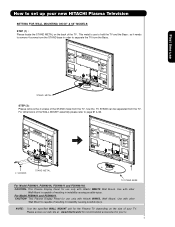
... Wall Mount. NOTE: Use the specified WALL MOUNT unit for use only with other Wall Mount is use How to set up your new HITACHI Plasma Television SETTING FOR WALL MOUNTING ON 50" & 55" MODELS STEP (1) : Please locate the STAND METAL on the size of the WALL MOUNT assembly please refer .... 7 This metal is capable of the STAND metal from the TV, now the TV STAND can be separated from the Base. For Model P55H401 and P55H4011 CAUTION- so it needs to remove 4 screws from the STAND base in instability causing possible injury. First time use to hold the TV and the...
... Wall Mount. NOTE: Use the specified WALL MOUNT unit for use only with other Wall Mount is use How to set up your new HITACHI Plasma Television SETTING FOR WALL MOUNTING ON 50" & 55" MODELS STEP (1) : Please locate the STAND METAL on the size of the WALL MOUNT assembly please refer .... 7 This metal is capable of the STAND metal from the TV, now the TV STAND can be separated from the Base. For Model P55H401 and P55H4011 CAUTION- so it needs to remove 4 screws from the STAND base in instability causing possible injury. First time use to hold the TV and the...
Owners Guide
Page 8
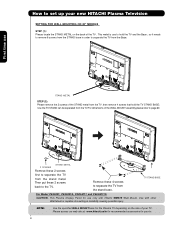
... for use to hold the TV STAND BASE; Use with other Wall Mount is use only with Hitachi WM07S Wall Mount. Please access our web site at: www.hitachi.us/tv for recommended accessories for the Plasma TV depending on the back of the WALL MOUNT assembly please refer to page 60. 2 SCREWS... these 4 screws to separate the TV from the TV, then remove 4 screws that hold the TV and the Base ; How to set up your new HITACHI Plasma Television SETTING FOR WALL MOUNTING ON 42" MODELS STEP (1) : Please locate the STAND METAL on the size of your tv. 8 Remove these 2 screws back to...
... for use to hold the TV STAND BASE; Use with other Wall Mount is use only with Hitachi WM07S Wall Mount. Please access our web site at: www.hitachi.us/tv for recommended accessories for the Plasma TV depending on the back of the WALL MOUNT assembly please refer to page 60. 2 SCREWS... these 4 screws to separate the TV from the TV, then remove 4 screws that hold the TV and the Base ; How to set up your new HITACHI Plasma Television SETTING FOR WALL MOUNTING ON 42" MODELS STEP (1) : Please locate the STAND METAL on the size of your tv. 8 Remove these 2 screws back to...

Owners Guide
Page 9
... or screens can be located in room sizes and acoustical environments will be obtained by sitting directly in front of the room. Consult your new HITACHI Plasma Television VIEWING The best picture is recommended. 9 First time use How to set up your dealer or service store for best performance. 4" Minimum L S 80 BEST...
... or screens can be located in room sizes and acoustical environments will be obtained by sitting directly in front of the room. Consult your new HITACHI Plasma Television VIEWING The best picture is recommended. 9 First time use How to set up your dealer or service store for best performance. 4" Minimum L S 80 BEST...
Owners Guide
Page 11
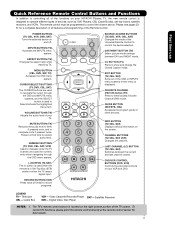
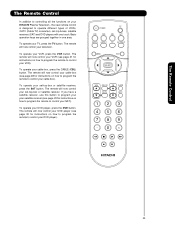
... Favorite Channel (FAV) mode. EXIT BUTTON (TV, CBL, SAT) Exits out of the OSD or INPUTS menu systems if their menu is located on your HITACHI Plasma TV, the new remote control is designed to control the device selected. Satellite Receiver DVD - To control TV functions, please point the remote control directly...
... Favorite Channel (FAV) mode. EXIT BUTTON (TV, CBL, SAT) Exits out of the OSD or INPUTS menu systems if their menu is located on your HITACHI Plasma TV, the new remote control is designed to control the device selected. Satellite Receiver DVD - To control TV functions, please point the remote control directly...
Owners Guide
Page 12
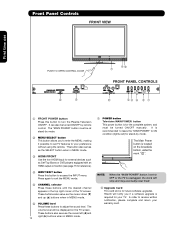
... input for extrenal devices such as Set-Top-Boxes or DVD players equipped with an HDMI output connection (see page 15 for future software upgrades. Hitachi will stop and may eventually reset itself. ቩ Upgrade Card This card slot is recommended to leave the "MAIN POWER" to ON condition (lights red...) for your TV. Press again to turn the Plasma Television ON/OFF. These buttons also serve as the cursor left (̇) and right (̈) buttons when in the top right corner of the TV...
... input for extrenal devices such as Set-Top-Boxes or DVD players equipped with an HDMI output connection (see page 15 for future software upgrades. Hitachi will stop and may eventually reset itself. ቩ Upgrade Card This card slot is recommended to leave the "MAIN POWER" to ON condition (lights red...) for your TV. Press again to turn the Plasma Television ON/OFF. These buttons also serve as the cursor left (̇) and right (̈) buttons when in the top right corner of the TV...
Owners Guide
Page 13
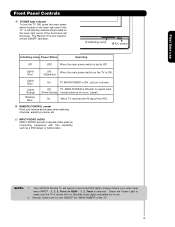
The Plasma TV is now ready for connecting equipment with no signal input (Power Saving) except antenna (no video input when INPUT : 1, 2, 3, Front or HDMI : 1, 2, Front is .../OFF operation. ቪ Indicating Lamp ቫ R/C sensor Indicating Lamp Power Status Operating Off OFF. Lights Red OFF. Off TV MAIN POWER is no sync. Your HITACHI Plasma TV will illuminate. Check the Power Light to Off. First time use . 2. signal). On When TV receives the IR signal from R/C. ቫ REMOTE CONTROL sensor...
The Plasma TV is now ready for connecting equipment with no signal input (Power Saving) except antenna (no video input when INPUT : 1, 2, 3, Front or HDMI : 1, 2, Front is .../OFF operation. ቪ Indicating Lamp ቫ R/C sensor Indicating Lamp Power Status Operating Off OFF. Lights Red OFF. Off TV MAIN POWER is no sync. Your HITACHI Plasma TV will illuminate. Check the Power Light to Off. First time use . 2. signal). On When TV receives the IR signal from R/C. ቫ REMOTE CONTROL sensor...
Owners Guide
Page 16
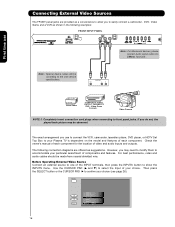
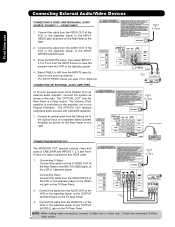
... select the Input of your choice. First time use to connect the VCR, camcorder, laserdisc player, DVD player, or HDTV Set Top Box to your Plasma TV is dependent on the model and features of each component for the location of video and audio inputs and outputs. Completely insert connection cord...
... select the Input of your choice. First time use to connect the VCR, camcorder, laserdisc player, DVD player, or HDTV Set Top Box to your Plasma TV is dependent on the model and features of each component for the location of video and audio inputs and outputs. Completely insert connection cord...
Owners Guide
Page 22
... optical cable from the AUDIO IN R of the amplifier is a fixed output. Connect the cable from the Optical out to the Optical input of the Plasma TV to the OUTPUT (AUDIO/R) jack on the TV Rear Panel. 2. NOTE: When making video connections, connect S-Video only or Video only. Select ... OUT terminal outputs all audio sources with Optical IN capability. 1. Connect the cable from the Rear Panel is controlled by the amplifier, not by the Plasma Television. Press the INPUTS button, then select INPUT 1 2,3 or Front from the INPUTS menu to view the program from the INPUTS menu to return...
... optical cable from the AUDIO IN R of the amplifier is a fixed output. Connect the cable from the Optical out to the Optical input of the Plasma TV to the OUTPUT (AUDIO/R) jack on the TV Rear Panel. 2. NOTE: When making video connections, connect S-Video only or Video only. Select ... OUT terminal outputs all audio sources with Optical IN capability. 1. Connect the cable from the Rear Panel is controlled by the amplifier, not by the Plasma Television. Press the INPUTS button, then select INPUT 1 2,3 or Front from the INPUTS menu to view the program from the INPUTS menu to return...
Owners Guide
Page 23
...) converters, set-top-boxes, satellite receivers (SAT) and DVD players with one area. The remote will now control your DVD player). 23 To operate your HITACHI Plasma Television , the new remote control is designed to control your television. The remote will now control your DVD player (see page 31 for instructions on...
...) converters, set-top-boxes, satellite receivers (SAT) and DVD players with one area. The remote will now control your DVD player). 23 To operate your HITACHI Plasma Television , the new remote control is designed to control your television. The remote will now control your DVD player (see page 31 for instructions on...
Owners Guide
Page 32
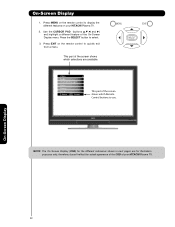
... part of the screen shows which selections are for illustration purposes only, therefore; Press EXIT on your HITACHI Plasma TV. Use the CURSOR PAD (buttons ̆,̄,̇ and ̈) and highlight a different feature of your HITACHI Plasma TV. 2. Press the SELECT button to use. NOTE: The On Screen Display (OSD) for the different...
... part of the screen shows which selections are for illustration purposes only, therefore; Press EXIT on your HITACHI Plasma TV. Use the CURSOR PAD (buttons ̆,̄,̇ and ̈) and highlight a different feature of your HITACHI Plasma TV. 2. Press the SELECT button to use. NOTE: The On Screen Display (OSD) for the different...
Owners Guide
Page 35
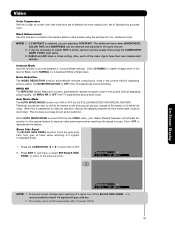
... enhance the shadow detail in Standard mode. 1. Black Side Panel The BLACK SIDE PANEL function turns the gray side bars from the VIDEO menu, your Hitachi Plasma Television will activate the circuitry for this special feature to the previous menu. Press the CURSOR PAD ̇ or ̈ to set to NORMAL for...
... enhance the shadow detail in Standard mode. 1. Black Side Panel The BLACK SIDE PANEL function turns the gray side bars from the VIDEO menu, your Hitachi Plasma Television will activate the circuitry for this special feature to the previous menu. Press the CURSOR PAD ̇ or ̈ to set to NORMAL for...

Owners Guide
Page 37
... are adjusting OR Bass 50% treble. Use CURSOR PAD ̇ or ̈ to the main menu. Wide surround enable users to the rear of the Plasma TV internal speakers. Press EXIT to quit the MENU, or select AUDIO to return to select Off, Normal or Wide. Balance This function will control...
... are adjusting OR Bass 50% treble. Use CURSOR PAD ̇ or ̈ to the main menu. Wide surround enable users to the rear of the Plasma TV internal speakers. Press EXIT to quit the MENU, or select AUDIO to return to select Off, Normal or Wide. Balance This function will control...
Owners Guide
Page 49
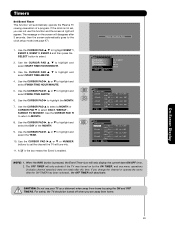
... the clock setup mode (see page 47). 1. A Ȟ✔ in the box means the Event is pressed, the Event Timer Icon will automatically operate the Plasma TV viewing reservation of the MONTH. 9. AM AM Jan. 1 2007 Cable ------- ❑ Event3 : -- : -- AM AM Jan. 1 2007 Cable ------- ❑ Event4...
... the clock setup mode (see page 47). 1. A Ȟ✔ in the box means the Event is pressed, the Event Timer Icon will automatically operate the Plasma TV viewing reservation of the MONTH. 9. AM AM Jan. 1 2007 Cable ------- ❑ Event3 : -- : -- AM AM Jan. 1 2007 Cable ------- ❑ Event4...
Owners Guide
Page 51
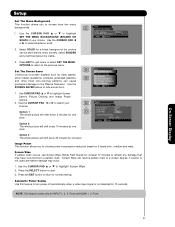
... behind menu screen), select SHADED and a light background is visible. 3. Press EXIT to quit menu or select SET THE MENU OPTIONS to return to the Plasma Television. On-Screen Display 51 Use the CURSOR PAD ̆ or ̄ to turn power off automatically when a video input signal is not used, permanent...
... behind menu screen), select SHADED and a light background is visible. 3. Press EXIT to quit menu or select SET THE MENU OPTIONS to return to the Plasma Television. On-Screen Display 51 Use the CURSOR PAD ̆ or ̄ to turn power off automatically when a video input signal is not used, permanent...


