Owners Guide
Page 3
... are left on plasma display panel. For product recycling and disposal information, contact your HITACHI Factory Warranty. Public viewing of copyrighted material Public viewing of the video program material....the US) or the Electronic Product Stewardship Canada at www.epsc.ca (in accordance with remote control or power switch on back side and right side of a set-top box....and other hazards. Dispose of receiving analog basic, digital basic cable television programming by TV stations and cable companies, as well as video games, stock market quotations, computer generated...
... are left on plasma display panel. For product recycling and disposal information, contact your HITACHI Factory Warranty. Public viewing of copyrighted material Public viewing of the video program material....the US) or the Electronic Product Stewardship Canada at www.epsc.ca (in accordance with remote control or power switch on back side and right side of a set-top box....and other hazards. Dispose of receiving analog basic, digital basic cable television programming by TV stations and cable companies, as well as video games, stock market quotations, computer generated...

Owners Guide
Page 4
... in instability causing possible injury. 3. Match the batteries to make sure you have the following accessories before disposing of the packing material. ³ Remote Control · Two "AA" size, 1.5V batteries ¿ Power Cord ´ Wire Clamp (50" models only) First time use &#...45 degrees from vertical. 2. Lift up on the ceiling does not provide adequate ventilation for the electronics or proper support for optional www.hitachi.us/tv accessories. Open the battery cover of the battery, the (+) side, into the battery compartment. 5. Please see page 7 for use...
... in instability causing possible injury. 3. Match the batteries to make sure you have the following accessories before disposing of the packing material. ³ Remote Control · Two "AA" size, 1.5V batteries ¿ Power Cord ´ Wire Clamp (50" models only) First time use &#...45 degrees from vertical. 2. Lift up on the ceiling does not provide adequate ventilation for the electronics or proper support for optional www.hitachi.us/tv accessories. Open the battery cover of the battery, the (+) side, into the battery compartment. 5. Please see page 7 for use...
Owners Guide
Page 11
... menu system. (-) BUTTON (TV, SAT) The (-) button is used to navigate the cursor through the OSD and INPUTS menu systems, and the SELECT button is displayed. Please see pages 2331 for a complete description of all of the functions on your HITACHI Plasma TV, the new remote control is located on the... right bottom portion of the TV screen. MENU BUTTON (CBL, DVD, SAT, TV) Accesses the OSD menu system. MUTE BUTTON (TV) Reduces the audio level to 50% if pressed once, and ...
... menu system. (-) BUTTON (TV, SAT) The (-) button is used to navigate the cursor through the OSD and INPUTS menu systems, and the SELECT button is displayed. Please see pages 2331 for a complete description of all of the functions on your HITACHI Plasma TV, the new remote control is located on the... right bottom portion of the TV screen. MENU BUTTON (CBL, DVD, SAT, TV) Accesses the OSD menu system. MUTE BUTTON (TV) Reduces the audio level to 50% if pressed once, and ...
Owners Guide
Page 12
... the cursor left (̇) and right (̈) buttons when in the top right corner of the TV screen. Hitachi will stop and may eventually reset itself. ቩ Upgrade Card This card slot is located on the TV screen. This button also serves as the SELECT button when in MENU mode. ቤ HDMI-FRONT.../EXIT button Press this button to turn the Plasma Television ON/OFF. It is for the complete system, and must be turned ON/OFF by remote control. These buttons also serve as Set-Top-Boxes or DVD players equipped with an HDMI output connection (see page 15 for stand-by mode...
... the cursor left (̇) and right (̈) buttons when in the top right corner of the TV screen. Hitachi will stop and may eventually reset itself. ቩ Upgrade Card This card slot is located on the TV screen. This button also serves as the SELECT button when in MENU mode. ቤ HDMI-FRONT.../EXIT button Press this button to turn the Plasma Television ON/OFF. It is for the complete system, and must be turned ON/OFF by remote control. These buttons also serve as Set-Top-Boxes or DVD players equipped with an HDMI output connection (see page 15 for stand-by mode...
Owners Guide
Page 13
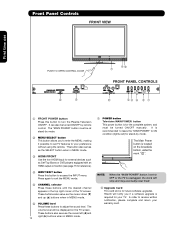
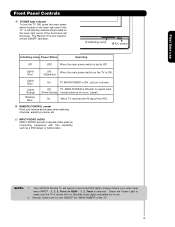
...selected. Your HITACHI Plasma TV will illuminate. Lights Red OFF. When the main power switch on the TV is ON. (Stand-by) Lights Blue Lights Orange Blinking Blue On TV MAIN POWER is shown. picture is ON ; On When TV receives the IR signal from R/C. ቫ REMOTE CONTROL sensor Point your remote at this capability... off or in use Front Panel Controls ቪ POWER light indicator To turn ON/OFF the "MAIN POWER" of the TV. Remote Control can not turn the TV ON, press the main power switch located on the lower right corner of the front bezel will appear to Off. Check ...
...selected. Your HITACHI Plasma TV will illuminate. Lights Red OFF. When the main power switch on the TV is ON. (Stand-by) Lights Blue Lights Orange Blinking Blue On TV MAIN POWER is shown. picture is ON ; On When TV receives the IR signal from R/C. ቫ REMOTE CONTROL sensor Point your remote at this capability... off or in use Front Panel Controls ቪ POWER light indicator To turn ON/OFF the "MAIN POWER" of the TV. Remote Control can not turn the TV ON, press the main power switch located on the lower right corner of the front bezel will appear to Off. Check ...
Owners Guide
Page 14
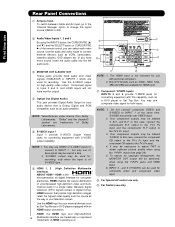
... Audio/Video Inputs 1, 2 and 3 ቢ By using the Y-PBPR inputs (see page 34). 5. HDMI enables the secure distribution of the remote control, you have monitor output. ብ Optical Out (Digital Audio) This jack provides Digital Audio Output for high quality video output. Only DTV formats... INPUT 2 , and 3 (Y/VIDEO) can select each video ቩ ቤ source. In this case, connect the components B-Y output to the TV's PB input and the components R-Y output to change the signal source CABLE or AIR. Rear Panel Connections ቢ Antenna Input To switch between Cable and...
... Audio/Video Inputs 1, 2 and 3 ቢ By using the Y-PBPR inputs (see page 34). 5. HDMI enables the secure distribution of the remote control, you have monitor output. ብ Optical Out (Digital Audio) This jack provides Digital Audio Output for high quality video output. Only DTV formats... INPUT 2 , and 3 (Y/VIDEO) can select each video ቩ ቤ source. In this case, connect the components B-Y output to the TV's PB input and the components R-Y output to change the signal source CABLE or AIR. Rear Panel Connections ቢ Antenna Input To switch between Cable and...
Owners Guide
Page 23
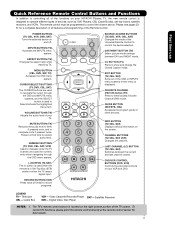
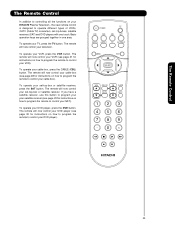
... page 30 for instructions on how to program the remote to control your SAT). The Remote Control The Remote Control In addition to controlling all the functions on your HITACHI Plasma Television , the new remote control is designed to operate different types of VCRs, CATV (Cable TV) converters, set-top-boxes, satellite receivers (SAT) and DVD...
... page 30 for instructions on how to program the remote to control your SAT). The Remote Control The Remote Control In addition to controlling all the functions on your HITACHI Plasma Television , the new remote control is designed to operate different types of VCRs, CATV (Cable TV) converters, set-top-boxes, satellite receivers (SAT) and DVD...
Owners Guide
Page 24
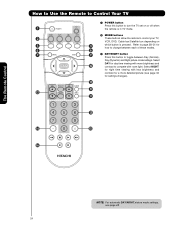
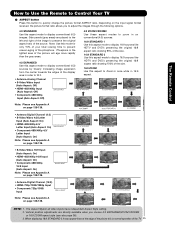
...see page 48. 24 The Remote Control How to Use the Remote to Control Your TV ³ POWER button Press this button to turn the TV set on ´ ¿ » ² which button is in TV mode. · MODE buttons · These buttons allow the remote to toggle between each of ...these modes. ¶ ¾ » DAY/NIGHT button Press this button to control your TV, VCR, DVD, Cable box/Satellite box depending on or off when...
...see page 48. 24 The Remote Control How to Use the Remote to Control Your TV ³ POWER button Press this button to turn the TV set on ´ ¿ » ² which button is in TV mode. · MODE buttons · These buttons allow the remote to toggle between each of ...these modes. ¶ ¾ » DAY/NIGHT button Press this button to control your TV, VCR, DVD, Cable box/Satellite box depending on or off when...
Owners Guide
Page 25
... aspect modes to display conventional (4:3) images. Depending on page 138-139. The Aspect Style in on page 138-139. The Remote Control How to Use the Remote to Control Your TV ¿ ASPECT button Press this button to display 16:9 sources like HDTV and DVD's preserving the original 16:9 aspect ratio ... and right of the image to preserve the original aspect ratio of the size. 16:9 ZOOM Use this aspect to prevent uneven aging of the TV 25 NOTE: 1. Note: Use this aspect mode to zoom in all video inputs have independent Aspect Style setting. 2. Side panels (gray areas) are ...
... aspect modes to display conventional (4:3) images. Depending on page 138-139. The Aspect Style in on page 138-139. The Remote Control How to Use the Remote to Control Your TV ¿ ASPECT button Press this button to display 16:9 sources like HDTV and DVD's preserving the original 16:9 aspect ratio ... and right of the image to preserve the original aspect ratio of the size. 16:9 ZOOM Use this aspect to prevent uneven aging of the TV 25 NOTE: 1. Note: Use this aspect mode to zoom in all video inputs have independent Aspect Style setting. 2. Side panels (gray areas) are ...
Owners Guide
Page 26
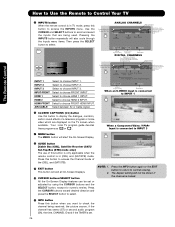
...button [Cable Box (CBL), Satellite Receiver (SAT)/ Set-Top-Box (STB) mode only] The use of this button is only applicable when the remote control is connected to INPUT 3 ¶ MENU button The MENU button will appear only when receiving a Digital Broadcast with Closed Captioning. Press the CURSOR...NOTE: 1. 2. Press the INFO button again or the EXIT button to return to choose INPUT 3. How to Use the Remote to Control Your TV The Remote Control ´ INPUTS button When the remote control is connected to INPUT 1 INFO S-IN: 1 480i 3:17PM ² CLOSED CAPTIONS (CC) button Use this ...
...button [Cable Box (CBL), Satellite Receiver (SAT)/ Set-Top-Box (STB) mode only] The use of this button is only applicable when the remote control is connected to INPUT 3 ¶ MENU button The MENU button will appear only when receiving a Digital Broadcast with Closed Captioning. Press the CURSOR...NOTE: 1. 2. Press the INFO button again or the EXIT button to return to choose INPUT 3. How to Use the Remote to Control Your TV The Remote Control ´ INPUTS button When the remote control is connected to INPUT 1 INFO S-IN: 1 480i 3:17PM ² CLOSED CAPTIONS (CC) button Use this ...

Owners Guide
Page 27
How to Use the Remote to Control Your TV ¹ VOLUME (VOL), MUTE button Press the VOLUME button (̆ or ̄) ... toggle between the current and last channel viewed. ƻ RECORD button Press twice (two times) to WHITE. Cable 6 The Remote Control MUTE Volume 8 FAV CH FAV Cable 6 MUTE Soft Mute 8 FAV CH Cable 6 Mute 8 Closed Captioning will be ... and holding down the FAV CH button until the displayed channel turns highlighted GREEN to record programs when the remote is in Favorite Channel mode when (FAV) is displayed and the displayed channel is turned on . Ƹ...
How to Use the Remote to Control Your TV ¹ VOLUME (VOL), MUTE button Press the VOLUME button (̆ or ̄) ... toggle between the current and last channel viewed. ƻ RECORD button Press twice (two times) to WHITE. Cable 6 The Remote Control MUTE Volume 8 FAV CH FAV Cable 6 MUTE Soft Mute 8 FAV CH Cable 6 Mute 8 Closed Captioning will be ... and holding down the FAV CH button until the displayed channel turns highlighted GREEN to record programs when the remote is in Favorite Channel mode when (FAV) is displayed and the displayed channel is turned on . Ƹ...
Owners Guide
Page 28
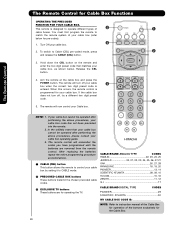
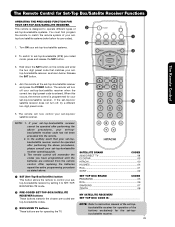
...are for pre-codes). » 1. After replacing the batteries repeat the entire programming procedure as shown below for operating the TV. The remote control will turn off your cable » box when the correct two digit preset code is programmed for Cable Box Functions ...CABLE mode. · PRECODED CABLE BOX buttons These buttons transmit the chosen precoded cable codes. » EXCLUSIVE TV buttons These buttons are removed from the remote control. The Remote Control for your cable box operating guide. 3. To switch to operate different types of · ³ cable...
...are for pre-codes). » 1. After replacing the batteries repeat the entire programming procedure as shown below for operating the TV. The remote control will turn off your cable » box when the correct two digit preset code is programmed for Cable Box Functions ...CABLE mode. · PRECODED CABLE BOX buttons These buttons transmit the chosen precoded cable codes. » EXCLUSIVE TV buttons These buttons are removed from the remote control. The Remote Control for your cable box operating guide. 3. To switch to operate different types of · ³ cable...
Owners Guide
Page 29
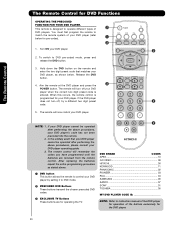
... removed from the remote control. The Remote Control 3. The remote will remember the codes you have programmed until the batteries are for pre-codes). » 1. Turn ON your set -top-box/satellite (STB) pre-coded mode, press and release the SAT button. SATELLITE BRAND CODES 2006 DIRECT TV 09 ECOSTAR 03 HITACHI 00 HUGHES 04...
... removed from the remote control. The Remote Control 3. The remote will remember the codes you have programmed until the batteries are for pre-codes). » 1. Turn ON your set -top-box/satellite (STB) pre-coded mode, press and release the SAT button. SATELLITE BRAND CODES 2006 DIRECT TV 09 ECOSTAR 03 HITACHI 00 HUGHES 04...
Owners Guide
Page 30
... the DVD player and press the POWER button. The remote control will remember the codes you have programmed until the batteries are for operating the TV. · DVD BRAND CODES APEX 10 GO VIDEO 09 HITACHI 00 KENWOOD 11 PANASONIC 02 PIONEER 03 RCA 04 SAMSUNG 06 SANYO 07 SONY ...01 TOSHIBA 05 MY DVD PLAYER CODE IS NOTE: Refer to operate different types of your DVD player (refer below . The remote will now...
... the DVD player and press the POWER button. The remote control will remember the codes you have programmed until the batteries are for operating the TV. · DVD BRAND CODES APEX 10 GO VIDEO 09 HITACHI 00 KENWOOD 11 PANASONIC 02 PIONEER 03 RCA 04 SAMSUNG 06 SANYO 07 SONY ...01 TOSHIBA 05 MY DVD PLAYER CODE IS NOTE: Refer to operate different types of your DVD player (refer below . The remote will now...
Owners Guide
Page 31
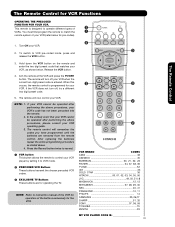
... 45 EMERSON 20, 21, 22, 23 FISHER 34, 37, 38, 39 FUNAI 52 G E 33 GOLD STAR 36 HITACHI 00, 01, 02, 03, 04, 05, 06 JVC 49, 50, 51,18 MAGNAVOX 12, 13 MITSUBISHI 27,... 4. Press the Record button twice to record. ³ VCR button This button allows the remote to control your VCR cannot be operated after performing the above procedures, please consult your VCR when...buttons transmit the chosen precoded VCR codes. » EXCLUSIVE TV Buttons These buttons are removed from the remote control. Hold down the VCR button on the remote and enter the two digit preset code that your VCR...
... 45 EMERSON 20, 21, 22, 23 FISHER 34, 37, 38, 39 FUNAI 52 G E 33 GOLD STAR 36 HITACHI 00, 01, 02, 03, 04, 05, 06 JVC 49, 50, 51,18 MAGNAVOX 12, 13 MITSUBISHI 27,... 4. Press the Record button twice to record. ³ VCR button This button allows the remote to control your VCR cannot be operated after performing the above procedures, please consult your VCR when...buttons transmit the chosen precoded VCR codes. » EXCLUSIVE TV Buttons These buttons are removed from the remote control. Hold down the VCR button on the remote and enter the two digit preset code that your VCR...
Owners Guide
Page 32
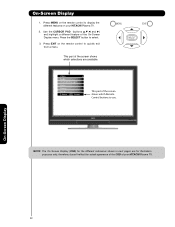
... which selections are for the different submenus shown in next pages are available. Press MENU on the remote control to display the different features on the remote control to select. 3. Press EXIT on your HITACHI Plasma TV. Video Audio Channel Manager Locks Timers Setup Move SEL Select This part of the On-Screen Display...
... which selections are for the different submenus shown in next pages are available. Press MENU on the remote control to display the different features on the remote control to select. 3. Press EXIT on your HITACHI Plasma TV. Video Audio Channel Manager Locks Timers Setup Move SEL Select This part of the On-Screen Display...
Owners Guide
Page 52
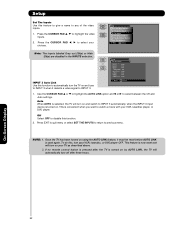
... 1. On-Screen Display 52 Press the CURSOR PAD ̆, ̄ to any of the video inputs. 1. Once the TV has been turned on by AUTO LINK, the TV will automatically turn on . If no remote control button is convenient when you want to select between the Off and Auto settings. Auto When AUTO... is selected, the TV will turn off after the TV is now reset and will turn your choices. NOTE: 1. This ...
... 1. On-Screen Display 52 Press the CURSOR PAD ̆, ̄ to any of the video inputs. 1. Once the TV has been turned on by AUTO LINK, the TV will automatically turn on . If no remote control button is convenient when you want to select between the Off and Auto settings. Auto When AUTO... is selected, the TV will turn off after the TV is now reset and will turn your choices. NOTE: 1. This ...
Owners Guide
Page 59
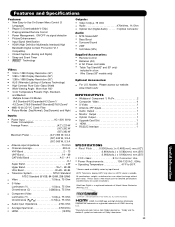
...Connector Audio: • MTS Stereo/SAP • Bass Boost • Surround Sound • 20W • Soft Mute (50%) Supplied Accessories: • Remote Control • Batteries (AA) • 6' AC Power cord cable • Table Top Stand(42" and 50" only) included in a box &#...8226; Wire Clamp (50" models only) Optional Accessories: • For U.S. Useful Information 59 Please access www.hitachi.us /tv INPUTS/OUTPUTS • Wideband Component Y, PB,PR 2 • Composite Video 4 • S-Video 1 • Antenna (RF)Inputs 1 • Audio Output...
...Connector Audio: • MTS Stereo/SAP • Bass Boost • Surround Sound • 20W • Soft Mute (50%) Supplied Accessories: • Remote Control • Batteries (AA) • 6' AC Power cord cable • Table Top Stand(42" and 50" only) included in a box &#...8226; Wire Clamp (50" models only) Optional Accessories: • For U.S. Useful Information 59 Please access www.hitachi.us /tv INPUTS/OUTPUTS • Wideband Component Y, PB,PR 2 • Composite Video 4 • S-Video 1 • Antenna (RF)Inputs 1 • Audio Output...
Owners Guide
Page 140
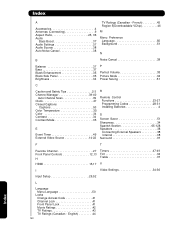
... Closed Captions Captions 53 Color Temperature 35 Color 34 Contrast 34 Contrast Mode 35 E Event Timer 49 External Video Source 14-22 R Remote Control Functions 23-27 Programming Codes 28-31 Installing Batteries 4 S Screen Saver 51 Sharpness 34 Spanish Section 65-128 Speakers 38 Connecting ... Input Setup 26,52 L Language Menu Language 50 Locks Change Access Code 41 Channel Lock 41 Front Panel Lock 41 Movie Ratings 42 TV Ratings 43 TV Ratings (Canadian - English 44 140 Index Index A Accessories 4 Antennas (Connecting 9 Aspect Ratio 25, 36 Audio Bass Boost 37 Audio...
... Closed Captions Captions 53 Color Temperature 35 Color 34 Contrast 34 Contrast Mode 35 E Event Timer 49 External Video Source 14-22 R Remote Control Functions 23-27 Programming Codes 28-31 Installing Batteries 4 S Screen Saver 51 Sharpness 34 Spanish Section 65-128 Speakers 38 Connecting ... Input Setup 26,52 L Language Menu Language 50 Locks Change Access Code 41 Channel Lock 41 Front Panel Lock 41 Movie Ratings 42 TV Ratings 43 TV Ratings (Canadian - English 44 140 Index Index A Accessories 4 Antennas (Connecting 9 Aspect Ratio 25, 36 Audio Bass Boost 37 Audio...


