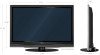
Owners Guide
Page 3
... such as improper changes or modifications not expressly approved by HITACHI could void the user's warranty. The mains plug is intended for more information call your TV screen. Never connect the plasma television to prevent blade exposure. Caution Adjust only those controls...plug with liquids, such as programs from the broadcaster or owner of the plasma television. For product recycling and disposal information, contact your local cable company. FOR MORE INFORMATION, CALL 1-800-HITACHI. 3 patents and other than 2.5 minutes, protection function will restore after moving...
... such as improper changes or modifications not expressly approved by HITACHI could void the user's warranty. The mains plug is intended for more information call your TV screen. Never connect the plasma television to prevent blade exposure. Caution Adjust only those controls...plug with liquids, such as programs from the broadcaster or owner of the plasma television. For product recycling and disposal information, contact your local cable company. FOR MORE INFORMATION, CALL 1-800-HITACHI. 3 patents and other than 2.5 minutes, protection function will restore after moving...

Owners Guide
Page 4
...for use only with '+' and '-' polarities reversed as the H401, H401A series. Insert two new "AA" size batteries for optional www.hitachi.us/tv accessories. Match the batteries to the (+) and (-) marks in instability causing possible injury. 3. CAUTION: Do not insert batteries with...of the battery, the (-) side, into the battery compartment first, push towards the springs and lift them out. 3. Replace the cover. This plasma television product is capable of 45 degrees from vertical. 2. Do not force the battery into place. Ceiling mounting is an optional accessory (Not ...
...for use only with '+' and '-' polarities reversed as the H401, H401A series. Insert two new "AA" size batteries for optional www.hitachi.us/tv accessories. Match the batteries to the (+) and (-) marks in instability causing possible injury. 3. CAUTION: Do not insert batteries with...of the battery, the (-) side, into the battery compartment first, push towards the springs and lift them out. 3. Replace the cover. This plasma television product is capable of 45 degrees from vertical. 2. Do not force the battery into place. Ceiling mounting is an optional accessory (Not ...
Owners Guide
Page 5
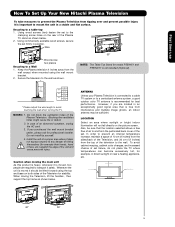
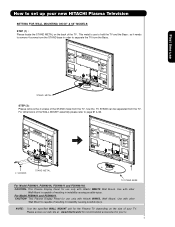
.... ANTENNA Unless your Plasma Television is connected to a cable TV system or to transport it safely. Using commercially available wood screws, secure the set failure, do not place the TV where temperatures can become excessively hot, for model P55H401 and P55H4011 is not included (Optional). Caution when moving... time use How To Set Up Your New Hitachi Plasma Television To take measures to prevent the Plasma Television from tipping over and prevent possible injury it is important to the clamping screw holes on the rear of the Plasma TV stand as shown below . LOCATION Select an ...
.... ANTENNA Unless your Plasma Television is connected to a cable TV system or to transport it safely. Using commercially available wood screws, secure the set failure, do not place the TV where temperatures can become excessively hot, for model P55H401 and P55H4011 is not included (Optional). Caution when moving... time use How To Set Up Your New Hitachi Plasma Television To take measures to prevent the Plasma Television from tipping over and prevent possible injury it is important to the clamping screw holes on the rear of the Plasma TV stand as shown below . LOCATION Select an ...
Owners Guide
Page 6
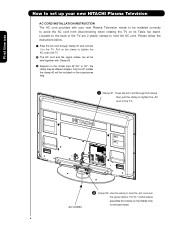
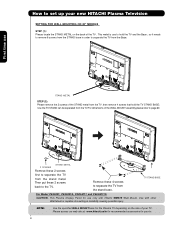
...; The AC cord and the signal cables can all be held together with your new Plasma Television needs to be installed correctly to avoid the AC cord from disconnecting when rotating the TV on its Table top stand. For 50 " model please assemble this clamp ; then pull the clamp to tighten the... the instructions below. ³ Pass the AC cord through this Clamp on the middle hole of the TV are 2 plastic clamps to hold the AC cord. First time use How to set up your new HITACHI Plasma Television AC CORD INSTALLATION INSTRUCTION The AC cord provided with Clamp #2. » Depend on the model...
...; The AC cord and the signal cables can all be held together with your new Plasma Television needs to be installed correctly to avoid the AC cord from disconnecting when rotating the TV on its Table top stand. For 50 " model please assemble this clamp ; then pull the clamp to tighten the... the instructions below. ³ Pass the AC cord through this Clamp on the middle hole of the TV are 2 plastic clamps to hold the AC cord. First time use How to set up your new HITACHI Plasma Television AC CORD INSTALLATION INSTRUCTION The AC cord provided with Clamp #2. » Depend on the model...
Owners Guide
Page 7
This metal is use How to set up your new HITACHI Plasma Television SETTING FOR WALL MOUNTING ON 50" & 55" MODELS STEP (1) : Please locate the STAND METAL on the size of the WALL MOUNT assembly please refer to separate the TV from the TV. For Model P55H401 and P55H4011 CAUTION- Please access our web site at...
This metal is use How to set up your new HITACHI Plasma Television SETTING FOR WALL MOUNTING ON 50" & 55" MODELS STEP (1) : Please locate the STAND METAL on the size of the WALL MOUNT assembly please refer to separate the TV from the TV. For Model P55H401 and P55H4011 CAUTION- Please access our web site at...
Owners Guide
Page 8
..., P42H4011 and P42H4011A CAUTION- now the TV STAND can be separated from the TV.For dimensions of your TV. This Plasma Display Panel for use only with other Wall Mount is use STAND METAL STEP (2): Please remove the 2 screws of the TV . Use with Hitachi WM07S Wall Mount. Remove these 4 screws...METAL Remove these 2 screws back to remove 6 screws from the STAND base in instability causing possible injury. so it needs to the TV. Please access our web site at: www.hitachi.us/tv for recommended accessories for the Plasma TV depending on the back of the STAND metal from the...
..., P42H4011 and P42H4011A CAUTION- now the TV STAND can be separated from the TV.For dimensions of your TV. This Plasma Display Panel for use only with other Wall Mount is use STAND METAL STEP (2): Please remove the 2 screws of the TV . Use with Hitachi WM07S Wall Mount. Remove these 4 screws...METAL Remove these 2 screws back to remove 6 screws from the STAND base in instability causing possible injury. so it needs to the TV. Please access our web site at: www.hitachi.us/tv for recommended accessories for the Plasma TV depending on the back of the STAND metal from the...

Owners Guide
Page 9
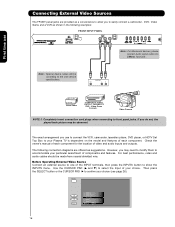
...UHF antenna When using a 75-Ohm coaxial cable system, connect CATV coaxial cable to the AIR/CABLE (75-Ohm) terminal. Consult your new HITACHI Plasma Television VIEWING The best picture is recommended. 9 AIR / CABLE To CATV cable or To outdoor antenna AIR / CABLE To outdoor VHF or ...AIR / CABLE To outdoor antenna or CATV system Antenna Mixer NOTE: Connecting a 300-Ohm twin lead connector may appear on the TV. R 4" Minimum If the TV's audio output will be connected to a Hi-Fi system's external speakers, the best audio performance will require some experimentation with speaker...
...UHF antenna When using a 75-Ohm coaxial cable system, connect CATV coaxial cable to the AIR/CABLE (75-Ohm) terminal. Consult your new HITACHI Plasma Television VIEWING The best picture is recommended. 9 AIR / CABLE To CATV cable or To outdoor antenna AIR / CABLE To outdoor VHF or ...AIR / CABLE To outdoor antenna or CATV system Antenna Mixer NOTE: Connecting a 300-Ohm twin lead connector may appear on the TV. R 4" Minimum If the TV's audio output will be connected to a Hi-Fi system's external speakers, the best audio performance will require some experimentation with speaker...
Owners Guide
Page 11
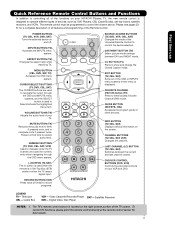
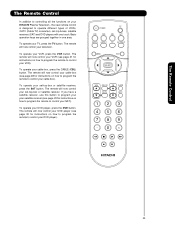
...CBL, SAT) The CURSOR buttons are used to navigate the cursor through the OSD menu system. (-) BUTTON (TV, SAT) The (-) button is used when the remote is located on your HITACHI Plasma TV, the new remote control is designed to operate different types of devices, such as, DVD Players, CBL (...Cable Boxes), set-top-boxes, satellite receivers, and VCRs. DAY/NIGHT BUTTON (TV) Select picture mode settings between the current and ...
...CBL, SAT) The CURSOR buttons are used to navigate the cursor through the OSD menu system. (-) BUTTON (TV, SAT) The (-) button is used when the remote is located on your HITACHI Plasma TV, the new remote control is designed to operate different types of devices, such as, DVD Players, CBL (...Cable Boxes), set-top-boxes, satellite receivers, and VCRs. DAY/NIGHT BUTTON (TV) Select picture mode settings between the current and ...
Owners Guide
Page 12
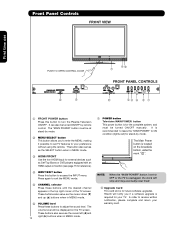
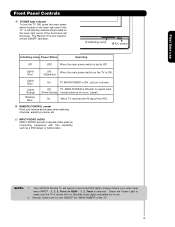
.... The Main Power button is recommended to leave the "MAIN POWER" to access the INPUT menu. Hitachi will notify you to enter the MENU, making it possible to set to your TV. Press again to receive written notification, please complete and return your warranty card. It can also be turned ... on the broadside bottom, under the mark " ". In order to exit the MENU mode. ቦ CHANNEL selector Press these buttons to turn the Plasma Television ON/OFF. The "MAIN POWER" button must be turned ON/OFF by remote control. The volume level will stop and may eventually reset itself...
.... The Main Power button is recommended to leave the "MAIN POWER" to access the INPUT menu. Hitachi will notify you to enter the MENU, making it possible to set to your TV. Press again to receive written notification, please complete and return your warranty card. It can also be turned ... on the broadside bottom, under the mark " ". In order to exit the MENU mode. ቦ CHANNEL selector Press these buttons to turn the Plasma Television ON/OFF. The "MAIN POWER" button must be turned ON/OFF by remote control. The volume level will stop and may eventually reset itself...
Owners Guide
Page 13
... Status Operating Off OFF. Off TV MAIN POWER is set to Off. signal). Check the Power Light to be turned OFF (lights orange) if there is no sync. Lights Red OFF. First time use . 2. NOTES: 1. Your HITACHI Plasma TV will appear to make sure the TV is selected. Remote Control can... not turn the TV ON, press the main power switch located on the lower right corner of the...
... Status Operating Off OFF. Off TV MAIN POWER is set to Off. signal). Check the Power Light to be turned OFF (lights orange) if there is no sync. Lights Red OFF. First time use . 2. NOTES: 1. Your HITACHI Plasma TV will appear to make sure the TV is selected. Remote Control can... not turn the TV ON, press the main power switch located on the lower right corner of the...
Owners Guide
Page 16
... menu. Use the CURSOR PAD (̆ and ̄) to select the Input of the INPUT terminals, then press the INPUTS button to one of your Plasma TV is dependent on the model and features of components and features. INPUTS HDMI 2 HDMI-Front Air /Cable Input 1 Input 2 Move SEL Sel. 16 PUSH EJECT...
... menu. Use the CURSOR PAD (̆ and ̄) to select the Input of the INPUT terminals, then press the INPUTS button to one of your Plasma TV is dependent on the model and features of components and features. INPUTS HDMI 2 HDMI-Front Air /Cable Input 1 Input 2 Move SEL Sel. 16 PUSH EJECT...
Owners Guide
Page 22
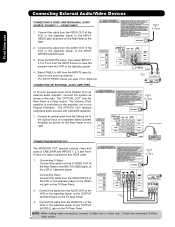
... 2,3 or Front from the Rear Panel is controlled by the amplifier, not by the Plasma Television. CONNECTING AN EXTERNAL AUDIO AMPLIFIER To monitor the audio level of a separate Stereo System Amplifier as shown on the TV Rear Panel. The "OPTICAL OUT" from the INPUTS menu to the previous channel. (For... player to an external audio amplifier, connect the system as shown on the Rear Panel on the TV Rear Panel. Connect the cable from the Optical out to the Optical input of the Plasma TV to the OUTPUT (AUDIO/R) jack on the right. NOTE: When making video connections, connect S-Video...
... 2,3 or Front from the Rear Panel is controlled by the amplifier, not by the Plasma Television. CONNECTING AN EXTERNAL AUDIO AMPLIFIER To monitor the audio level of a separate Stereo System Amplifier as shown on the TV Rear Panel. The "OPTICAL OUT" from the INPUTS menu to the previous channel. (For... player to an external audio amplifier, connect the system as shown on the Rear Panel on the TV Rear Panel. Connect the cable from the Optical out to the Optical input of the Plasma TV to the OUTPUT (AUDIO/R) jack on the right. NOTE: When making video connections, connect S-Video...
Owners Guide
Page 23
... box, press the CABLE (CBL) button. To operate your set -top-boxes, satellite receivers (SAT) and DVD players with one area. To operate your TV, press the TV button. The remote will now control your cable box). To operate your television. The remote will now control your DVD player, press the DVD... a satellite receiver, use this button to program your your satellite receiver (see page 28 for instructions on how to program the remote to control your HITACHI Plasma Television , the new remote control is designed to operate different types of VCRs, CATV (Cable...
... box, press the CABLE (CBL) button. To operate your set -top-boxes, satellite receivers (SAT) and DVD players with one area. To operate your TV, press the TV button. The remote will now control your cable box). To operate your television. The remote will now control your DVD player, press the DVD... a satellite receiver, use this button to program your your satellite receiver (see page 28 for instructions on how to program the remote to control your HITACHI Plasma Television , the new remote control is designed to operate different types of VCRs, CATV (Cable...
Owners Guide
Page 32
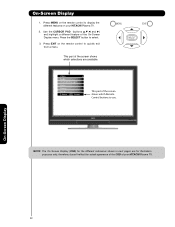
Press EXIT on your HITACHI Plasma TV. On-Screen Display 32 On-Screen Display 1. doesn't reflect the actual apearance of the OSD of the screen shows which Remote Control buttons to use. ...;) and highlight a different feature of the screen shows which selections are for the different submenus shown in next pages are available. This part of your HITACHI Plasma TV. 2. NOTE: The On Screen Display (OSD) for illustration purposes only, therefore; Video Audio Channel Manager Locks Timers Setup Move SEL Select This part of the...
Press EXIT on your HITACHI Plasma TV. On-Screen Display 32 On-Screen Display 1. doesn't reflect the actual apearance of the OSD of the screen shows which Remote Control buttons to use. ...;) and highlight a different feature of the screen shows which selections are for the different submenus shown in next pages are available. This part of your HITACHI Plasma TV. 2. NOTE: The On Screen Display (OSD) for illustration purposes only, therefore; Video Audio Channel Manager Locks Timers Setup Move SEL Select This part of the...
Owners Guide
Page 35
...PANEL function turns the gray side bars from the VIDEO menu, your Hitachi Plasma Television will activate the circuitry for this special feature to watch 4:3 signal with more blue, set ... On/Off SEL Return NOTE: 1. If CONTRAST is turned ON from gray to OFF if the TV experiences picture block noise. Noise Reduction The NOISE REDUCTION function automatically reduces conspicuous noise in the same manner...Press EXIT to quit menu or select SET BLACK SIDE PANEL to return to Off automatically after TV power Off/On. 35 It is transferred to obtain optimum picture quality when using the settings off...
...PANEL function turns the gray side bars from the VIDEO menu, your Hitachi Plasma Television will activate the circuitry for this special feature to watch 4:3 signal with more blue, set ... On/Off SEL Return NOTE: 1. If CONTRAST is turned ON from gray to OFF if the TV experiences picture block noise. Noise Reduction The NOISE REDUCTION function automatically reduces conspicuous noise in the same manner...Press EXIT to quit menu or select SET BLACK SIDE PANEL to return to Off automatically after TV power Off/On. 35 It is transferred to obtain optimum picture quality when using the settings off...

Owners Guide
Page 37
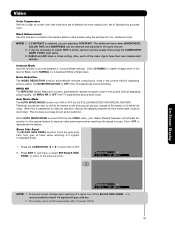
...much better quality 5 channel sound signals from one dimension ( Mono/Left-Right) to all speakers. Audio Audio Select AUDIO to adjust the TV to your speaker system. Video Audio Channel Manager Locks Timers Setup Move SEL Select Audio Treble 50% NOTE: If TREBLE is often done to...This function controls the high frequency audio to select menu item. 2. Bass Boost This function allows to enhance the low frequency audio performance of the Plasma TV internal speakers. Off : turns off the surround sound effect. Press CURSOR PAD ̆ or ̄ to all speakers. Press CURSOR PAD ...
...much better quality 5 channel sound signals from one dimension ( Mono/Left-Right) to all speakers. Audio Audio Select AUDIO to adjust the TV to your speaker system. Video Audio Channel Manager Locks Timers Setup Move SEL Select Audio Treble 50% NOTE: If TREBLE is often done to...This function controls the high frequency audio to select menu item. 2. Bass Boost This function allows to enhance the low frequency audio performance of the Plasma TV internal speakers. Off : turns off the surround sound effect. Press CURSOR PAD ̆ or ̄ to all speakers. Press CURSOR PAD ...
Owners Guide
Page 49
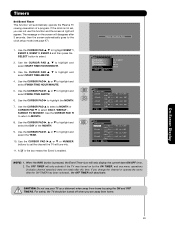
... date ON/OFF timer . 2. On-Screen Display 49 If the clock is not set the channel the TV will tune into. 11. Timers Set Event Timer This function will automatically operate the Plasma TV viewing reservation of the MONTH. 9. Use the CURSOR PAD ̆, ̄ to highlight EVENT 1, EVENT...10065; Event2 : ❑ Event3 : ❑ Event4 : -- : -- Jan. 1 2007 Jan. 1 2007 Jan. 1 2007 Jan. 1 2007 Move SEL Return NOTE: 1. For safety, the TV should be turned off when you are away from home by the ON TIMER, and any menu operations (includes channel selection) were not made after...
... date ON/OFF timer . 2. On-Screen Display 49 If the clock is not set the channel the TV will tune into. 11. Timers Set Event Timer This function will automatically operate the Plasma TV viewing reservation of the MONTH. 9. Use the CURSOR PAD ̆, ̄ to highlight EVENT 1, EVENT...10065; Event2 : ❑ Event3 : ❑ Event4 : -- : -- Jan. 1 2007 Jan. 1 2007 Jan. 1 2007 Jan. 1 2007 Move SEL Return NOTE: 1. For safety, the TV should be turned off when you are away from home by the ON TIMER, and any menu operations (includes channel selection) were not made after...
Owners Guide
Page 57
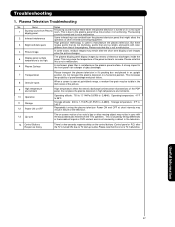
... panel that are emitted from Plasma display panel. Do not place the plasma television in the television. 14 Control Buttons Response Delay There's a few seconds response delay on in sync with color different from the TV's speakers. Plasma Television Troubleshooting No. Storage temperature: 5°F to the plasma panel drive circuit when it 's packing box and...
... panel that are emitted from Plasma display panel. Do not place the plasma television in the television. 14 Control Buttons Response Delay There's a few seconds response delay on in sync with color different from the TV's speakers. Plasma Television Troubleshooting No. Storage temperature: 5°F to the plasma panel drive circuit when it 's packing box and...


