
Owners Guide
Page 1
Spanish Section 73~143 Click Here PLASMA TELEVISION Operating Guide for energy efficiency. Change 1 Page 30, Added note about PIP message has determined that this product meets the Energy Star® guidelines for P42T501, P42T501A P50T501, P50T501A and P55T551 IMPORTANT SAFETY INSTRUCTIONS 2-3 FIRST TIME USE ...4-22 THE REMOTE CONTROL ...23-38 ON-SCREEN DISPLAY ...39-61 USEFUL INFORMATION ...62-71 OPERATING GUIDE IN SPANISH 73-143 END USER LICENSE AGREEMENT FOR HITACHI DTV SOFTWARE 144-152 APPENDIXES ...153-154 INDEX ...155 As an Energy Star® Partner, Hitachi, Ltd.
Spanish Section 73~143 Click Here PLASMA TELEVISION Operating Guide for energy efficiency. Change 1 Page 30, Added note about PIP message has determined that this product meets the Energy Star® guidelines for P42T501, P42T501A P50T501, P50T501A and P55T551 IMPORTANT SAFETY INSTRUCTIONS 2-3 FIRST TIME USE ...4-22 THE REMOTE CONTROL ...23-38 ON-SCREEN DISPLAY ...39-61 USEFUL INFORMATION ...62-71 OPERATING GUIDE IN SPANISH 73-143 END USER LICENSE AGREEMENT FOR HITACHI DTV SOFTWARE 144-152 APPENDIXES ...153-154 INDEX ...155 As an Energy Star® Partner, Hitachi, Ltd.
Owners Guide
Page 3
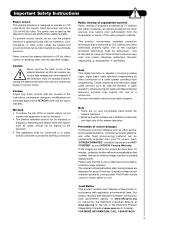
...• This apparatus shall be authorized , and is intended for more information call your TV screen. Dispose of receiving analog basic, digital basic cable television programming by TV stations and cable companies, as well as the disconnect device and shall remain readily operable....the plasma television and call your HITACHI Factory Warranty. Warning • To reduce the risk of fire or electric shock, do not use of the plasma television. Such "SCREEN DAMAGES" constitute misuse and are indicated on the screen for home and other sources, may require the use the plasma ...
...• This apparatus shall be authorized , and is intended for more information call your TV screen. Dispose of receiving analog basic, digital basic cable television programming by TV stations and cable companies, as well as the disconnect device and shall remain readily operable....the plasma television and call your HITACHI Factory Warranty. Warning • To reduce the risk of fire or electric shock, do not use of the plasma television. Such "SCREEN DAMAGES" constitute misuse and are indicated on the screen for home and other sources, may require the use the plasma ...
Owners Guide
Page 5
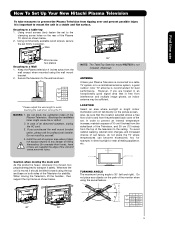
... changes, and increased chance of hitting themselves (for best performance. Keep the Plasma television 4 inches away from the wall except when mounted using the swivel feature. 42" 50" C C D D 42" 10.59 in. 13.93 in. 27 cm 36 cm 50" 15 in. 16. 85 in. 38. 1 cm 42.8 cm 55...TV where temperatures can become excessively hot, for stability. However, if you purchased the wall mount bracket option, please ask for model P55T551 is not included (Optional). Do not place any danger of set to the clamping screw holes on the picture screen. How To Set Up Your New Hitachi Plasma...
... changes, and increased chance of hitting themselves (for best performance. Keep the Plasma television 4 inches away from the wall except when mounted using the swivel feature. 42" 50" C C D D 42" 10.59 in. 13.93 in. 27 cm 36 cm 50" 15 in. 16. 85 in. 38. 1 cm 42.8 cm 55...TV where temperatures can become excessively hot, for stability. However, if you purchased the wall mount bracket option, please ask for model P55T551 is not included (Optional). Do not place any danger of set to the clamping screw holes on the picture screen. How To Set Up Your New Hitachi Plasma...
Owners Guide
Page 9
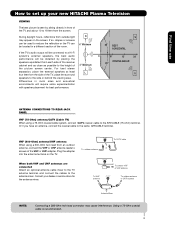
.... Or if you have an antenna, connect the coaxial cable to the antenna mixer. If so, drapes or screens can be used to reduce the reflection or the TV can be located in room sizes and acoustical environments will be connected to a Hi-Fi system's external speakers, ...are connected Attach an optional antenna cable mixer to the TV antenna terminal, and connect the cables to the same AIR/CABLE terminal. Consult your new HITACHI Plasma Television VIEWING The best picture is recommended. 9 R 4" Minimum If the TV's audio output will be obtained by sitting directly in front...
.... Or if you have an antenna, connect the coaxial cable to the antenna mixer. If so, drapes or screens can be used to reduce the reflection or the TV can be located in room sizes and acoustical environments will be connected to a Hi-Fi system's external speakers, ...are connected Attach an optional antenna cable mixer to the TV antenna terminal, and connect the cables to the same AIR/CABLE terminal. Consult your new HITACHI Plasma Television VIEWING The best picture is recommended. 9 R 4" Minimum If the TV's audio output will be obtained by sitting directly in front...
Owners Guide
Page 11
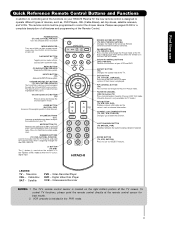
...TV screen. NUMERIC BUTTONS (TV, DVD, SAT/CBL, PVR/VCR) Used to manually enter the TV channel, and used for TV mode.) INFO BUTTON (TV, STB, CBL, PVR) Displays various information on the screen...TV's remote control sensor is used to Select/Activate highlighted menu items. Closed Caption (CC) BUTTON (TV) Press to show remote control mode when the SOURCE ACCESS buttons are pressed. MODE INDICATOR Turns on your HITACHI Plasma TV... the TV uses a digital input. MUTE BUTTON (TV) Reduces the audio level to 50% if pressed once, and to restore audio level. LEGEND TV - First time use as ...
...TV screen. NUMERIC BUTTONS (TV, DVD, SAT/CBL, PVR/VCR) Used to manually enter the TV channel, and used for TV mode.) INFO BUTTON (TV, STB, CBL, PVR) Displays various information on the screen...TV's remote control sensor is used to Select/Activate highlighted menu items. Closed Caption (CC) BUTTON (TV) Press to show remote control mode when the SOURCE ACCESS buttons are pressed. MODE INDICATOR Turns on your HITACHI Plasma TV... the TV uses a digital input. MUTE BUTTON (TV) Reduces the audio level to 50% if pressed once, and to restore audio level. LEGEND TV - First time use as ...
Owners Guide
Page 12
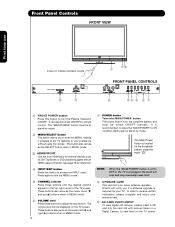
... buttons also serve as Set-Top-Boxes or DVD players equipped with pictures taken on a Digital Camera, to view them on the TV screen. Hitachi will be at stand-by mode. ባ MENU/SELECT button This button allows you if a software upgrade is required for your warranty card. ቩ SD ... the sound level. It is for reference). ብ INPUT/EXIT button Press this button to turn the Plasma Television ON/OFF. NOTE: When the "MAIN POWER" button is set TV features to your preference without using the remote. It can also be turned ON/OFF manually. This button also serves as the cursor...
... buttons also serve as Set-Top-Boxes or DVD players equipped with pictures taken on a Digital Camera, to view them on the TV screen. Hitachi will be at stand-by mode. ባ MENU/SELECT button This button allows you if a software upgrade is required for your warranty card. ቩ SD ... the sound level. It is for reference). ብ INPUT/EXIT button Press this button to turn the Plasma Television ON/OFF. NOTE: When the "MAIN POWER" button is set TV features to your preference without using the remote. It can also be turned ON/OFF manually. This button also serves as the cursor...
Owners Guide
Page 14
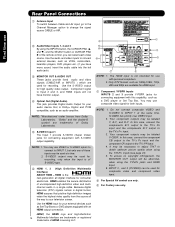
...definition images retain the highest video quality from Dolby Laboratories. In this case, connect the components B-Y output to the TV's PB input and the components R-Y output to the TV's PR input. 4. In this capability, such as 1080p,1080i, 720p, 480i and 480p are trademarks of the ...jacks for your television screen. Rear Panel Connections ቢ Antenna Input To switch between Cable and Air input, go to the Channel Manager option to Input 2 and 3, and HDMI inputs will be abnormal, when using the Y-PBPR jacks and HDMI Input. 6. First time use only. Use the S-VIDEO output ...
...definition images retain the highest video quality from Dolby Laboratories. In this case, connect the components B-Y output to the TV's PB input and the components R-Y output to the TV's PR input. 4. In this capability, such as 1080p,1080i, 720p, 480i and 480p are trademarks of the ...jacks for your television screen. Rear Panel Connections ቢ Antenna Input To switch between Cable and Air input, go to the Channel Manager option to Input 2 and 3, and HDMI inputs will be abnormal, when using the Y-PBPR jacks and HDMI Input. 6. First time use only. Use the S-VIDEO output ...
Owners Guide
Page 26
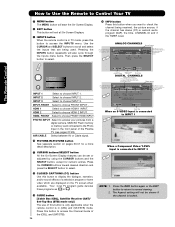
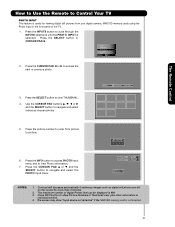
...Rating Program Description (Press INFO again for numeric entries. How to Use the Remote to Control Your TV ¶ MENU button The MENU button will start the On-Screen Display. º EXIT button This button will exit all On-Screen Displays. ¾ INPUTS button When the remote control is in...-IN-PICTURE button See separate section on the TV screen when available. Press the CURSOR buttons toward desired direction and press the SELECT button to select. ¹ CLOSED CAPTIONS (CC) button Use this button to access the Channel Guide of the Plasma TV (see pages 27-28). Press the INFO button...
...Rating Program Description (Press INFO again for numeric entries. How to Use the Remote to Control Your TV ¶ MENU button The MENU button will start the On-Screen Display. º EXIT button This button will exit all On-Screen Displays. ¾ INPUTS button When the remote control is in...-IN-PICTURE button See separate section on the TV screen when available. Press the CURSOR buttons toward desired direction and press the SELECT button to select. ¹ CLOSED CAPTIONS (CC) button Use this button to access the Channel Guide of the Plasma TV (see pages 27-28). Press the INFO button...
Owners Guide
Page 27
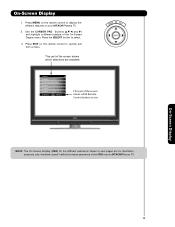
Press the picture number to jump from your digital camera, MMC/SD memory cards using the Photo Input in individual photos. 4. Picture No. The screen may show Picture Numbers in Thumbnail view, plus other information in the front panel of digital Photos that can be displayed is 999. 3. ... CURSOR PAD ̈. Press the SELECT button to show "Input device not detected" if the MMC/SD memory card is selected. How to Use the Remote to Control Your TV PHOTO INPUT This feature is useful for more than 3 minutes. 2. Press INFO button to view THUMBNAIL. 4. The maximum number of the...
Press the picture number to jump from your digital camera, MMC/SD memory cards using the Photo Input in individual photos. 4. Picture No. The screen may show Picture Numbers in Thumbnail view, plus other information in the front panel of digital Photos that can be displayed is 999. 3. ... CURSOR PAD ̈. Press the SELECT button to show "Input device not detected" if the MMC/SD memory card is selected. How to Use the Remote to Control Your TV PHOTO INPUT This feature is useful for more than 3 minutes. 2. Press INFO button to view THUMBNAIL. 4. The maximum number of the...

Owners Guide
Page 30
...CURSOR PAD button the remote. Use connection at the same time.You can watch more than one program at right to view Digital Channels and Video inputs on the screen. Yes Yes Yes Yes Yes...- - -- - - - - - -- - - - - - -- Yes Yes Yes Yes Yes Yes Yes - - - - - - To change back to enable the sub-picture sound. 30 Picture-In-Picture (PIP) Your HITACHI Plasma TV incorporates one of the two sources. Yes Yes Yes Yes Yes Yes Yes - - - - - - - - - - - - "This function is used without a Digital Channel as main picture (CABLE/AIR Digital channel).
...CURSOR PAD button the remote. Use connection at the same time.You can watch more than one program at right to view Digital Channels and Video inputs on the screen. Yes Yes Yes Yes Yes...- - -- - - - - - -- - - - - - -- Yes Yes Yes Yes Yes Yes Yes - - - - - - To change back to enable the sub-picture sound. 30 Picture-In-Picture (PIP) Your HITACHI Plasma TV incorporates one of the two sources. Yes Yes Yes Yes Yes Yes Yes - - - - - - - - - - - - "This function is used without a Digital Channel as main picture (CABLE/AIR Digital channel).
Owners Guide
Page 39
... ̆,̄,̇ and ̈) and highlight a different feature of the screen shows which Remote Control buttons to use. This part of the On-Screen Display menu. Video Audio Channel Manager Locks Timers Setup Move SEL Select This part of your HITACHI Plasma TV. 2. On-Screen Display 39 Press the SELECT button to quickly exit from a menu...
... ̆,̄,̇ and ̈) and highlight a different feature of the screen shows which Remote Control buttons to use. This part of the On-Screen Display menu. Video Audio Channel Manager Locks Timers Setup Move SEL Select This part of your HITACHI Plasma TV. 2. On-Screen Display 39 Press the SELECT button to quickly exit from a menu...
Owners Guide
Page 40
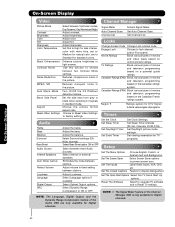
... Signal Meter. Set Auto Channel Scan. Use this to High for less intense color with more blue, set to Medium for natural color, set to Standard for standard colors. Change Access Code Change Lock access code. TV Ratings Block various types of movies and ...Mode Contrast Brightness Select between stations. Engage Lock Choose to prevent screen burn. Choose the picture format aspect ratio. Adjust the balance. Select Screen Saver options to lock channel, and/or Front panel. Region 5 Ratings system for TV Surround Select Surround settings (Off, programs. Bass Boost Audio ...
... Signal Meter. Set Auto Channel Scan. Use this to High for less intense color with more blue, set to Medium for natural color, set to Standard for standard colors. Change Access Code Change Lock access code. TV Ratings Block various types of movies and ...Mode Contrast Brightness Select between stations. Engage Lock Choose to prevent screen burn. Choose the picture format aspect ratio. Adjust the balance. Select Screen Saver options to lock channel, and/or Front panel. Region 5 Ratings system for TV Surround Select Surround settings (Off, programs. Bass Boost Audio ...
Owners Guide
Page 41
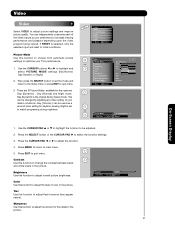
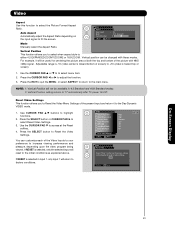
... preference to adjust the level of the Video Inputs to your TV's performance. 1. Press EXIT to quit menu. 3. Contrast Next/Prev 100% Change SEL Return Color Use this function to choose from automatic picture settings to be used as a second video setting for the customer Day (Dynamic)... 62% Tint Sharpness 50% Color Temperature High Black Enhancement High Contrast Mode Dynamic Move SEL Select OR Picture Mode Day (Dynamic) Next/Prev Select SEL Return On-Screen Display 1. Video Video Select VIDEO to adjust overall picture brightness. You can be adjusted. 2. If RESET...
... preference to adjust the level of the Video Inputs to your TV's performance. 1. Press EXIT to quit menu. 3. Contrast Next/Prev 100% Change SEL Return Color Use this function to choose from automatic picture settings to be used as a second video setting for the customer Day (Dynamic)... 62% Tint Sharpness 50% Color Temperature High Black Enhancement High Contrast Mode Dynamic Move SEL Select OR Picture Mode Day (Dynamic) Next/Prev Select SEL Return On-Screen Display 1. Video Video Select VIDEO to adjust overall picture brightness. You can be adjusted. 2. If RESET...
Owners Guide
Page 42
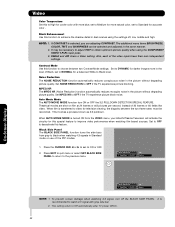
... this special feature to DYNAMIC for darker images more natural color, set to Off automatically after TV power Off/On. 42 Video Color Temperature Set this to High for cooler color with gray side...mosquito noise in Standard mode or use of the video inputs have their own independent settings. Black Side Panel Off Next/Prev On/Off SEL Return On-Screen Display Black Side Panel On Next/...Side Panel The BLACK SIDE PANEL function turns the side bars from the VIDEO menu, your Hitachi Plasma Television will activate the circuitry for a balanced White to the previous menu. Press EXIT to ...
... this special feature to DYNAMIC for darker images more natural color, set to Off automatically after TV power Off/On. 42 Video Color Temperature Set this to High for cooler color with gray side...mosquito noise in Standard mode or use of the video inputs have their own independent settings. Black Side Panel Off Next/Prev On/Off SEL Return On-Screen Display Black Side Panel On Next/...Side Panel The BLACK SIDE PANEL function turns the side bars from the VIDEO menu, your Hitachi Plasma Television will activate the circuitry for a balanced White to the previous menu. Press EXIT to ...
Owners Guide
Page 43
...Video Menu Settings of the picture with these modes. Press the SELECT button or CURSOR PAD ̈ to "0" automatically after TV power On/Off. Reset Move SEL Return On-Screen Display 43 Vertical Position setting returns to select Reset Video Settings. 3. Press the SELECT button to adjust the function. 3. ... "Reset" to return to Video menu settings on the input signal to the Day-Dynamic VIDEO mode. 1. For example, it to fill the screen. Use the CURSOR PAD ̄ to access at both the top and bottom of the present input and return it will reset to +10 (video ...
...Video Menu Settings of the picture with these modes. Press the SELECT button or CURSOR PAD ̈ to "0" automatically after TV power On/Off. Reset Move SEL Return On-Screen Display 43 Vertical Position setting returns to select Reset Video Settings. 3. Press the SELECT button to adjust the function. 3. ... "Reset" to return to Video menu settings on the input signal to the Day-Dynamic VIDEO mode. 1. For example, it to fill the screen. Use the CURSOR PAD ̄ to access at both the top and bottom of the present input and return it will reset to +10 (video ...

Owners Guide
Page 44
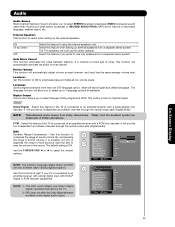
... concept of expanding the spatial imaging of the Plasma TV internal speakers. Off : turns off the surround...comparing with ordinary stereo contents. The additional menu items BASS OR Bass Balance 50% L R and BALANCE can be selected and Surround Off adjusted in wide ... Treble This function controls the high frequency audio to two or three dimensions. Use CURSOR PAD ̆ or ̄ to enjoy sound playback in the same...low frequency audio performance of the listener. On-Screen Display 44 Audio Audio Select AUDIO to adjust the TV to your speaker system. Press CURSOR PAD ̆ ...
... concept of expanding the spatial imaging of the Plasma TV internal speakers. Off : turns off the surround...comparing with ordinary stereo contents. The additional menu items BASS OR Bass Balance 50% L R and BALANCE can be selected and Surround Off adjusted in wide ... Treble This function controls the high frequency audio to two or three dimensions. Use CURSOR PAD ̆ or ̄ to enjoy sound playback in the same...low frequency audio performance of the listener. On-Screen Display 44 Audio Audio Select AUDIO to adjust the TV to your speaker system. Press CURSOR PAD ̆ ...
Owners Guide
Page 45
...only decoder; it is possible not only to OR Bass 50% suppress the output of loud sound at right if your TV is connected to emphasize bass and treble at the digital audio... Select Off Stereo On Of f Of f Of f 1 [Unknown] Dolby Digital On On-Screen Display 45 Auto Noise Cancel This function eliminates the noise between Dolby® Digital and PCM. The... 1.- PCM - The DRC control affects only Dolby® Digital signals decoded internally by the TV. 2.- Use this function to ON to an amplifier/receiver with a Dolby®Digital only decoder; DRC does...
...only decoder; it is possible not only to OR Bass 50% suppress the output of loud sound at right if your TV is connected to emphasize bass and treble at the digital audio... Select Off Stereo On Of f Of f Of f 1 [Unknown] Dolby Digital On On-Screen Display 45 Auto Noise Cancel This function eliminates the noise between Dolby® Digital and PCM. The... 1.- PCM - The DRC control affects only Dolby® Digital signals decoded internally by the TV. 2.- Use this function to ON to an amplifier/receiver with a Dolby®Digital only decoder; DRC does...
Owners Guide
Page 46
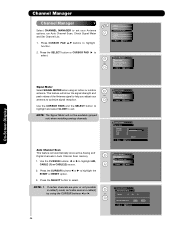
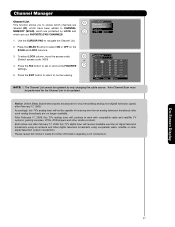
... antenna to optimize signal reception. NOTE: 1. Channel Manager Channel Manager Select CHANNEL MANAGER to set cable source to cable(2) by using an indoor or outdoor antenna. Use the CURSOR PADS and the SELECT button to highlight and select CLOSE to highlight function. If certain channels are poor or not...Reset 46 Press the SELECT button to highlight the START or RESET option. 3. Press the CURSOR buttons ̇ or ̈ to select. Use the CURSOR buttons ̇ or ̈ to select. Channel Manager Signal Meter OR Auto Channel Scan Channel List Move SEL Select On...
... antenna to optimize signal reception. NOTE: 1. Channel Manager Channel Manager Select CHANNEL MANAGER to set cable source to cable(2) by using an indoor or outdoor antenna. Use the CURSOR PADS and the SELECT button to highlight and select CLOSE to highlight function. If certain channels are poor or not...Reset 46 Press the SELECT button to highlight the START or RESET option. 3. Press the CURSOR buttons ̇ or ̈ to select. Use the CURSOR buttons ̇ or ̈ to select. Channel Manager Signal Meter OR Auto Channel Scan Channel List Move SEL Select On...
Owners Guide
Page 47
... be capable of receiving over -the-air digital television broadcasts using an antenna and other digital television broadcasts using compatible cable, satellite or other similar products. On-Screen Display 47 Notice: United States federal law requires broadcasters to normal viewing. Please review this TV's analog tuner will continue to work with compatible cable and...
... be capable of receiving over -the-air digital television broadcasts using an antenna and other digital television broadcasts using compatible cable, satellite or other similar products. On-Screen Display 47 Notice: United States federal law requires broadcasters to normal viewing. Please review this TV's analog tuner will continue to work with compatible cable and...

Owners Guide
Page 58
... mark to a certain degree, if caution is visible. 3. Automatic Power Saving Use this feature to start. 3. On-Screen Display 58 Use the CURSOR PAD ̇ or ̈ to the Plasma Television. Select SOLID for 15 seconds. Setup Setup The Menu Options Set The Screen Saver Set The Inputs Set The Closed Captions Set The Quick...
... mark to a certain degree, if caution is visible. 3. Automatic Power Saving Use this feature to start. 3. On-Screen Display 58 Use the CURSOR PAD ̇ or ̈ to the Plasma Television. Select SOLID for 15 seconds. Setup Setup The Menu Options Set The Screen Saver Set The Inputs Set The Closed Captions Set The Quick...


