
Owners Guide
Page 3
... the screen for more information about 6 minutes. Reverse engineering or disassembly is protected by Hitachi Home Electronics (America), Inc, may cause undesired operation. About your Plasma TV This digital television is capable of receiving analog basic, digital basic and digital premium cable ...for a Class B digital device, pursuant to a cable system providing such programming. Order Hitachi spares as programs from other fixed (non-moving images are NOT COVERED by TV stations and cable companies, as well as replacement cables. Public viewing of copyrighted material Public...
... the screen for more information about 6 minutes. Reverse engineering or disassembly is protected by Hitachi Home Electronics (America), Inc, may cause undesired operation. About your Plasma TV This digital television is capable of receiving analog basic, digital basic and digital premium cable ...for a Class B digital device, pursuant to a cable system providing such programming. Order Hitachi spares as programs from other fixed (non-moving images are NOT COVERED by TV stations and cable companies, as well as replacement cables. Public viewing of copyrighted material Public...

Owners Guide
Page 6
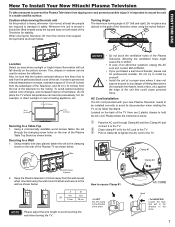
...batteries in the device. • Replace all the batteries in the device at : www.hitachi.us/tv CAUTION • Ceiling mounting is designed for a maximum tilting angle of the arrow. 2. ...P50S602 IMPORTANT SAFETY INSTRUCTIONS 2-4 FIRST TIME USE 5-17 THE REMOTE CONTROL 18-27 ON-SCREEN DISPLAY 28-41 USEFUL INFORMATION 42-48 LIMITED WARRANTY 49 END USER LICENSE AGREEMENT FOR HITACHI DTV SOFTWARE .......... 50...in the corresponding holes and push down the cover until it clicks shut. This plasma television product is not recommended. Do not force the battery into place. Insert ...
...batteries in the device. • Replace all the batteries in the device at : www.hitachi.us/tv CAUTION • Ceiling mounting is designed for a maximum tilting angle of the arrow. 2. ...P50S602 IMPORTANT SAFETY INSTRUCTIONS 2-4 FIRST TIME USE 5-17 THE REMOTE CONTROL 18-27 ON-SCREEN DISPLAY 28-41 USEFUL INFORMATION 42-48 LIMITED WARRANTY 49 END USER LICENSE AGREEMENT FOR HITACHI DTV SOFTWARE .......... 50...in the corresponding holes and push down the cover until it clicks shut. This plasma television product is not recommended. Do not force the battery into place. Insert ...
Owners Guide
Page 7
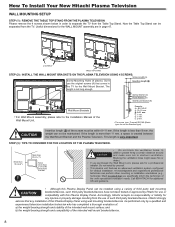
...Wall 1. Blocking the ventilation holes might cause fire or defect. • In case of the Plasma TV as shown below . e Pull on the rear of an abnormal symptom, unplug the AC cord and contact 800-HITACHI. • If you purchased a wall mount bracket, please ask for stability. When moving the...try to install by yourself. • Install the unit at least two people are 2 plastic clamps to the TV. Wire 50" 10 cm. 30 cm. NOTES • Do not block the ventilation holes of the Plasma Table Top Stand as shown below : A B A B Wire 4 in. 12 in a stable and flat...
...Wall 1. Blocking the ventilation holes might cause fire or defect. • In case of the Plasma TV as shown below . e Pull on the rear of an abnormal symptom, unplug the AC cord and contact 800-HITACHI. • If you purchased a wall mount bracket, please ask for stability. When moving the...try to install by yourself. • Install the unit at least two people are 2 plastic clamps to the TV. Wire 50" 10 cm. 30 cm. NOTES • Do not block the ventilation holes of the Plasma Table Top Stand as shown below : A B A B Wire 4 in. 12 in a stable and flat...
Owners Guide
Page 8
...(B) of such third party brackets/devices. Keep more than 30 cm (1'). C: 1 mm. Hitachi strongly advices that you purchased the Wall Mount unit, please ask for any installation of this Plasma Display Panel. Don't use Standard type). The screw type :Theread ISO M6 (Metric type... ventilation needs. How To Install Your New Hitachi Plasma Television WALL MOUNTING SETUP STEP (1) : REMOVE THE TABLE TOP STAND FROM THE PLASMA TELEVISION Please remove the 4 screws shown below in order to separate the TV from the TV. The length is very important. More than...
...(B) of such third party brackets/devices. Keep more than 30 cm (1'). C: 1 mm. Hitachi strongly advices that you purchased the Wall Mount unit, please ask for any installation of this Plasma Display Panel. Don't use Standard type). The screw type :Theread ISO M6 (Metric type... ventilation needs. How To Install Your New Hitachi Plasma Television WALL MOUNTING SETUP STEP (1) : REMOVE THE TABLE TOP STAND FROM THE PLASMA TELEVISION Please remove the 4 screws shown below in order to separate the TV from the TV. The length is very important. More than...
Owners Guide
Page 9
...bezel will notify you to enter the MENU, making it possible to set to make sure the TV is turned off or in Stand-by indicator lamp located on the TV screen. Hitachi will illuminate. Indicating Lamp Off Lights Red Lights Blue Lights Orange Blinking Blue Power Status Operating ...around R/C and Ambient light sensor, as EXIT button when in MENU mode. The Plasma TV is now ready for future software upgrades. REMOTE CONTROL and AMBIENT LIGHT sensor Point your warranty card. NOTES • Your HITACHI Plasma TV will be turned OFF (lights orange) if there is no sync. Check the ...
...bezel will notify you to enter the MENU, making it possible to set to make sure the TV is turned off or in Stand-by indicator lamp located on the TV screen. Hitachi will illuminate. Indicating Lamp Off Lights Red Lights Blue Lights Orange Blinking Blue Power Status Operating ...around R/C and Ambient light sensor, as EXIT button when in MENU mode. The Plasma TV is now ready for future software upgrades. REMOTE CONTROL and AMBIENT LIGHT sensor Point your warranty card. NOTES • Your HITACHI Plasma TV will be turned OFF (lights orange) if there is no sync. Check the ...

Owners Guide
Page 11
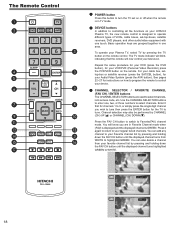
... of all of the functions on your Hitachi Plasma TV, the new remote control is designed to operate different types of devices, such as a SELECT feature. Menu Button (TV, DVD, PVR/VCR, SAT/CBL, AVR) Accesses the OSD menu system. Energy Save Button (TV) Press this button to access the program... Press these buttons to switch between the current and the last channel viewed. Mute (TV, AVR) Reduces the audio level to 50% if pressed once, and to enter/access Favorite Channel mode. Picture Mode (TV) Picture mode can be programmed to control the chosen device. Press it a third ...
... of all of the functions on your Hitachi Plasma TV, the new remote control is designed to operate different types of devices, such as a SELECT feature. Menu Button (TV, DVD, PVR/VCR, SAT/CBL, AVR) Accesses the OSD menu system. Energy Save Button (TV) Press this button to access the program... Press these buttons to switch between the current and the last channel viewed. Mute (TV, AVR) Reduces the audio level to 50% if pressed once, and to enter/access Favorite Channel mode. Picture Mode (TV) Picture mode can be programmed to control the chosen device. Press it a third ...
Owners Guide
Page 12
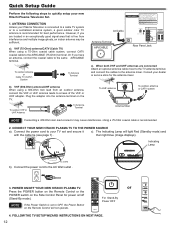
...you are connected Attach an optional antenna cable mixer to the TV antenna terminal, and connect the cables to the antenna mixer. Plug the adapter into the antenna terminal on /off (Stand-By mode). CONNECT YOUR NEW HITACHI PLASMA TV TO THE POWER SOURCE a). Indicating Lamp b). Connect the ...power cord to screws of the VHF or UHF adapter. To outdoor Antenna or Cable TV (CATV) System To Antenna Terminal b). VHF (75-Ohm) antenna/...
...you are connected Attach an optional antenna cable mixer to the TV antenna terminal, and connect the cables to the antenna mixer. Plug the adapter into the antenna terminal on /off (Stand-By mode). CONNECT YOUR NEW HITACHI PLASMA TV TO THE POWER SOURCE a). Indicating Lamp b). Connect the ...power cord to screws of the VHF or UHF adapter. To outdoor Antenna or Cable TV (CATV) System To Antenna Terminal b). VHF (75-Ohm) antenna/...

Owners Guide
Page 13
... for the guide is intended for the first time and did not yet connect your external devices and cables to your TV, turn on a daily basis and channels available in your Hitachi Plasma TV the Energy Savings Initial Settings screen will not appear again. Auto Channel Scan : Start 5. For updating and adding the channels...
... for the guide is intended for the first time and did not yet connect your external devices and cables to your TV, turn on a daily basis and channels available in your Hitachi Plasma TV the Energy Savings Initial Settings screen will not appear again. Auto Channel Scan : Start 5. For updating and adding the channels...
Owners Guide
Page 14
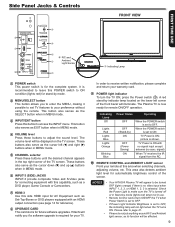
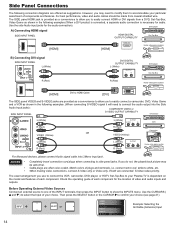
... game system B) Connecting DVI signal SIDE INPUT PANEL L (White) R (Red) [HDMI] DVI to confirm your particular assortment of each component for the location of your Plasma TV is necessary for the audio connection). NOTES • Completely insert connection cord plugs when connecting to white, etc. • When making video connections, connect S-Video...
... game system B) Connecting DVI signal SIDE INPUT PANEL L (White) R (Red) [HDMI] DVI to confirm your particular assortment of each component for the location of your Plasma TV is necessary for the audio connection). NOTES • Completely insert connection cord plugs when connecting to white, etc. • When making video connections, connect S-Video...

Owners Guide
Page 17
...cable from the Rear Panel is loose. • Cable plugs are often color-coded. Connect an optical cable from the AUDIO OUT jack of the Plasma TV to the Rear Panel INPUT 1 or 2 AUDIO jacks as shown on HDMI 1, 2 and 3 contains the copy protection system called High-bandwidth Digital... encrypts video signals when using a DVI to the Optical input of video contents. • HDMI is controlled by the amplifier, not by the Plasma Television. Match colors of the amplifier is not a "NETWORK" technology. FIRST TIME USE Rear Panel Connections CONNECTING AN EQUIPMENT SOURCE WITH HDMI OR...
...cable from the Rear Panel is loose. • Cable plugs are often color-coded. Connect an optical cable from the AUDIO OUT jack of the Plasma TV to the Rear Panel INPUT 1 or 2 AUDIO jacks as shown on HDMI 1, 2 and 3 contains the copy protection system called High-bandwidth Digital... encrypts video signals when using a DVI to the Optical input of video contents. • HDMI is controlled by the amplifier, not by the Plasma Television. Match colors of the amplifier is not a "NETWORK" technology. FIRST TIME USE Rear Panel Connections CONNECTING AN EQUIPMENT SOURCE WITH HDMI OR...
Owners Guide
Page 18
...the FAV CH button until the displayed channel turns highlighted GREEN to WHITE. 18 DEVICE buttons In addition to controlling all the functions on your HITACHI Plasma TV, the new remote control is designed to operate different types of VCRs, cable boxes, set on how to program the remote to your favorite...press the single digit channel you are in one area. Repeat the same procedure for your DVD (press the DVD button), for your Plasma TV, select TV by pressing the TV button on the remote. For your cable box, settop-box or satellite receiver (press the SAT/CBL button), for your device. ...
...the FAV CH button until the displayed channel turns highlighted GREEN to WHITE. 18 DEVICE buttons In addition to controlling all the functions on your HITACHI Plasma TV, the new remote control is designed to operate different types of VCRs, cable boxes, set on how to program the remote to your favorite...press the single digit channel you are in one area. Repeat the same procedure for your DVD (press the DVD button), for your Plasma TV, select TV by pressing the TV button on the remote. For your cable box, settop-box or satellite receiver (press the SAT/CBL button), for your device. ...

Owners Guide
Page 28
... to select highly saturated colors, or AUTO STD/xvColor™ for more cinema accurate colors. Choose the picture format aspect ratio. Press EXIT on your Hitachi Plasma TV. Press MENU on the remote control to display the different features on the remote control to use. Adjust picture brightness. Set the gray side bars... setting automatically accordingly to Standard for standard colors or D.Cinema for more blue, set to Medium for natural color, set to the brigthness of your Hitachi Plasma TV. 2. Synchronizes audio with more natural colors.
... to select highly saturated colors, or AUTO STD/xvColor™ for more cinema accurate colors. Choose the picture format aspect ratio. Press EXIT on your Hitachi Plasma TV. Press MENU on the remote control to display the different features on the remote control to use. Adjust picture brightness. Set the gray side bars... setting automatically accordingly to Standard for standard colors or D.Cinema for more blue, set to Medium for natural color, set to the brigthness of your Hitachi Plasma TV. 2. Synchronizes audio with more natural colors.
Owners Guide
Page 31
... (video center is toward bottom of screen) to "0" automatically after the TV is toward top of the screen in Standard mode. 1. NOTES • Vertical Position will default to grey... when the TV is transferred to factory conditions. 31 Reset Move SEL Return 1. Theatrical movies are different aspect... synchronize the audio with 24p or 24 frame per second, instead of the Video Inputs to your Hitachi Plasma Television will be useful for centering the picture if you to Reset the Video Settings. If RESET...
... (video center is toward bottom of screen) to "0" automatically after the TV is toward top of the screen in Standard mode. 1. NOTES • Vertical Position will default to grey... when the TV is transferred to factory conditions. 31 Reset Move SEL Return 1. Theatrical movies are different aspect... synchronize the audio with 24p or 24 frame per second, instead of the Video Inputs to your Hitachi Plasma Television will be useful for centering the picture if you to Reset the Video Settings. If RESET...
Owners Guide
Page 32
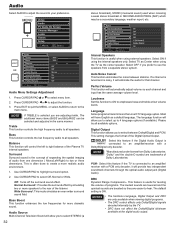
Press CURSOR PAD or to right balance of the Plasma TV internal speakers. Treble This function controls the high frequency audio to select STEREO (a 32 stereo broadcast), MONO (monaural sound) used when receiving a weak stereo...output. Select this function to ON to 4 language options (if available). Select TV as Center when using the TV as a default language. PCM.- Video Audio TV Guide On Screen Channel Manager + Locks Timers Setup Move SEL Select Audio Treble 50% Bass 50% Balance L R Surround Off OR Bass Boost Audio Source Off Stereo Internal ...
Press CURSOR PAD or to right balance of the Plasma TV internal speakers. Treble This function controls the high frequency audio to select STEREO (a 32 stereo broadcast), MONO (monaural sound) used when receiving a weak stereo...output. Select this function to ON to 4 language options (if available). Select TV as Center when using the TV as a default language. PCM.- Video Audio TV Guide On Screen Channel Manager + Locks Timers Setup Move SEL Select Audio Treble 50% Bass 50% Balance L R Surround Off OR Bass Boost Audio Source Off Stereo Internal ...

Owners Guide
Page 33
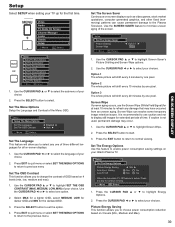
... automatically updated several times a day. Press the MENU button. ON-SCREEN DISPLAY NOTE Pressing the GUIDE button also allows you would like your TV Guide On ScreenTM to support (Check all that apply) Use the CURSOR PAD and to highlight your choice, then press the SELECT button then... SEL Select *For USA is a 5 digit ZIP CODE **For CANADA is a 6 digit ZIP CODE Screen 3: Please select which country is your TV located in your location. NOTES • The Plasma TV should be in standby mode in order to continually receive updated program listings. • For using and navigating the...
... automatically updated several times a day. Press the MENU button. ON-SCREEN DISPLAY NOTE Pressing the GUIDE button also allows you would like your TV Guide On ScreenTM to support (Check all that apply) Use the CURSOR PAD and to highlight your choice, then press the SELECT button then... SEL Select *For USA is a 5 digit ZIP CODE **For CANADA is a 6 digit ZIP CODE Screen 3: Please select which country is your TV located in your location. NOTES • The Plasma TV should be in standby mode in order to continually receive updated program listings. • For using and navigating the...
Owners Guide
Page 39
.... 1. Screen Wipe If uneven aging occurs, use caution and not to highlight SET THE OSD CONTRAST (MAX, MEDIUM, LOW, MIN) of your TV up for the darkest OSD. 3. Press the SELECT button to highlight Energy Options. 2. Press the EXIT button to return to select. Press the ... picture will shift every 2 minutes by one option. 2. Picture Energy Saving This function allows you to choose power consumption reduction based on your Hitachi Plasma TV. Setup Select SETUP when setting your choice. 2. Press EXIT to quit menu or select SET THE MENU OPTIONS to return to previous menu Set...
.... 1. Screen Wipe If uneven aging occurs, use caution and not to highlight SET THE OSD CONTRAST (MAX, MEDIUM, LOW, MIN) of your TV up for the darkest OSD. 3. Press the SELECT button to highlight Energy Options. 2. Press the EXIT button to return to select. Press the ... picture will shift every 2 minutes by one option. 2. Picture Energy Saving This function allows you to choose power consumption reduction based on your Hitachi Plasma TV. Setup Select SETUP when setting your choice. 2. Press EXIT to quit menu or select SET THE MENU OPTIONS to return to previous menu Set...
Owners Guide
Page 41
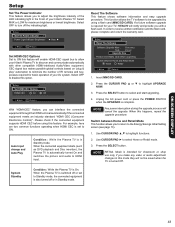
Select MAX or LOW for basic operation of your TV, HITACHI will enable HDMI-CEC signal bus to allow your Hitachi Plasma TV. Auto Input change and Auto Play Condition : While the Plasma TV is required for showroom or shop use only, if you make any video or audio adjustment changes in ...Standby mode, the connected equipment is also turned off or in this option. If a future software upgrade is in the Front of your Hitachi Plasma TV to discover and communicate automatically with a flash card. ON-SCREEN DISPLAY 41 Press the SELECT button to select Home or Retail mode. 3....
Select MAX or LOW for basic operation of your TV, HITACHI will enable HDMI-CEC signal bus to allow your Hitachi Plasma TV. Auto Input change and Auto Play Condition : While the Plasma TV is required for showroom or shop use only, if you make any video or audio adjustment changes in ...Standby mode, the connected equipment is also turned off or in this option. If a future software upgrade is in the Front of your Hitachi Plasma TV to discover and communicate automatically with a flash card. ON-SCREEN DISPLAY 41 Press the SELECT button to select Home or Retail mode. 3....
Owners Guide
Page 42
...34, 44 42 Clean the screen with strong cleaners, polishes or a chemically treated cloth. Do not leave it is ON. TROUBLESHOOTING Your HITACHI Plasma Television incorporates advanced power surge protection technology designed to protect against component or circuit damage due to the precision parts. Press the POWER SWITCH... operation will go black. Wait 30 seconds and plug the power cord back in warm water and dry with your TV, before Power Save mode starts. The TV screen can be solved with a soft cloth. Do not subject the remote control to Power Save mode and the ...
...34, 44 42 Clean the screen with strong cleaners, polishes or a chemically treated cloth. Do not leave it is ON. TROUBLESHOOTING Your HITACHI Plasma Television incorporates advanced power surge protection technology designed to protect against component or circuit damage due to the precision parts. Press the POWER SWITCH... operation will go black. Wait 30 seconds and plug the power cord back in warm water and dry with your TV, before Power Save mode starts. The TV screen can be solved with a soft cloth. Do not subject the remote control to Power Save mode and the ...
Owners Guide
Page 49
...improper or unauthorized service, maintenance or repair. During the Limited Warranty LCD Flat Panel Monitors period for such Plasma Televisions parts. LY CERTIFIED SERVICE CENTER N Hitachi is warranted to be void and of original purchase. D. Damage resulting from abuse, misuse, mishandling, ...Any Product used in any Product to a Hitachi Authorized Service Centers, Product owner must provide a dated sales receipt for the Product to : www.hitachi.us /tv or mail the included warranty registration card: LIMITED WARRANTY Hitachi Home Electronics (America), Inc. Any labor or...
...improper or unauthorized service, maintenance or repair. During the Limited Warranty LCD Flat Panel Monitors period for such Plasma Televisions parts. LY CERTIFIED SERVICE CENTER N Hitachi is warranted to be void and of original purchase. D. Damage resulting from abuse, misuse, mishandling, ...Any Product used in any Product to a Hitachi Authorized Service Centers, Product owner must provide a dated sales receipt for the Product to : www.hitachi.us /tv or mail the included warranty registration card: LIMITED WARRANTY Hitachi Home Electronics (America), Inc. Any labor or...


