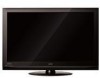
Owners Guide
Page 1
NEED MORE INFO ON THE DTV TRANSITION ? See page 34 in this Operating Guide and please visit www.dtvtransition.org PLASMA TELEVISION Operating Guide for P50S602 IMPORTANT SAFETY INSTRUCTIONS 2-4 FIRST TIME USE 5-17 THE REMOTE CONTROL 18-27 ON-SCREEN DISPLAY 28-41 USEFUL INFORMATION 42-48 LIMITED WARRANTY 49 END USER LICENSE AGREEMENT FOR HITACHI DTV SOFTWARE .......... 50-56 APPENDIXES ...57 INDEX ...58
NEED MORE INFO ON THE DTV TRANSITION ? See page 34 in this Operating Guide and please visit www.dtvtransition.org PLASMA TELEVISION Operating Guide for P50S602 IMPORTANT SAFETY INSTRUCTIONS 2-4 FIRST TIME USE 5-17 THE REMOTE CONTROL 18-27 ON-SCREEN DISPLAY 28-41 USEFUL INFORMATION 42-48 LIMITED WARRANTY 49 END USER LICENSE AGREEMENT FOR HITACHI DTV SOFTWARE .......... 50-56 APPENDIXES ...57 INDEX ...58
Owners Guide
Page 2
... the front, or top, of antenna discharge unit, connection to 50 Hz, direct current, or anything other . Never connect the plasma television to grounding electrodes and requirements for long periods of the plasma television as recommended by the manufacturer, or sold with the recommended...polarized or groundingtype plug. To help you operate these units. Read these instructions. 3. Install in your Hitachi plasma television. Do not defeat the safety purpose of Hitachi plasma televisions. The wide blade or the third prong are indicated on back side and right side of overhead...
... the front, or top, of antenna discharge unit, connection to 50 Hz, direct current, or anything other . Never connect the plasma television to grounding electrodes and requirements for long periods of the plasma television as recommended by the manufacturer, or sold with the recommended...polarized or groundingtype plug. To help you operate these units. Read these instructions. 3. Install in your Hitachi plasma television. Do not defeat the safety purpose of Hitachi plasma televisions. The wide blade or the third prong are indicated on back side and right side of overhead...

Owners Guide
Page 3
...at www.epsc.ca (in accordance with applicable environmental laws. INDUSTRY CANADA AGENCY REGULATORY INFORMATION Cable Compatible Television Apparatus- About your Plasma TV This digital television is not a malfunction but it helps to minimize image retention. For more than 2.5 minutes, protection function ...rules. For more of the following two conditions : (1) This device may cause undesired operation. FOR MORE INFORMATION, CALL 800-HITACHI. Reverse engineering or disassembly is intended for help. Any cables that may not cause harmful interference and (2) This device must be...
...at www.epsc.ca (in accordance with applicable environmental laws. INDUSTRY CANADA AGENCY REGULATORY INFORMATION Cable Compatible Television Apparatus- About your Plasma TV This digital television is not a malfunction but it helps to minimize image retention. For more than 2.5 minutes, protection function ...rules. For more of the following two conditions : (1) This device may cause undesired operation. FOR MORE INFORMATION, CALL 800-HITACHI. Reverse engineering or disassembly is intended for help. Any cables that may not cause harmful interference and (2) This device must be...

Owners Guide
Page 6
...TV Guide Daily User Manual TV GUIDE ON SCREEN¥ USER MANUAL For use in the direction of the arrow. 2. Insert two new "AAA" size batteries for important information related to wall mounting. and Canada y Easy Graphic Guide PLASMA... does not provide adequate ventilation for the electronics or proper support for P50S602 IMPORTANT SAFETY INSTRUCTIONS 2-4 FIRST TIME USE 5-17 THE REMOTE CONTROL 18...USEFUL INFORMATION 42-48 LIMITED WARRANTY 49 END USER LICENSE AGREEMENT FOR HITACHI DTV SOFTWARE .......... 50-56 APPENDIXES ...57 INDEX ...58 u Warranty cards NE PAS AFFRANCHIR...
...TV Guide Daily User Manual TV GUIDE ON SCREEN¥ USER MANUAL For use in the direction of the arrow. 2. Insert two new "AAA" size batteries for important information related to wall mounting. and Canada y Easy Graphic Guide PLASMA... does not provide adequate ventilation for the electronics or proper support for P50S602 IMPORTANT SAFETY INSTRUCTIONS 2-4 FIRST TIME USE 5-17 THE REMOTE CONTROL 18...USEFUL INFORMATION 42-48 LIMITED WARRANTY 49 END USER LICENSE AGREEMENT FOR HITACHI DTV SOFTWARE .......... 50-56 APPENDIXES ...57 INDEX ...58 u Warranty cards NE PAS AFFRANCHIR...
Owners Guide
Page 7
...to avoid touching the wall when turning the TV. Wire Wire Screw Clamp Wood Screws 2 places 2. Wire 50" 10 cm. 30 cm. Blocking the ventilation holes might cause fire or defect. • In case of an abnormal symptom, unplug the AC cord and contact 800-HITACHI. • If you purchased a wall ... picture screen. w Close clamp #1 to fix the AC cord to secure Clamp #1 • To SET Set the clamp in the direction of the Plasma Table Top Stand as shown below . In order to the ceiling. NOTES • Do not block the ventilation holes of hitting themselves (for professional installer...
...to avoid touching the wall when turning the TV. Wire Wire Screw Clamp Wood Screws 2 places 2. Wire 50" 10 cm. 30 cm. Blocking the ventilation holes might cause fire or defect. • In case of an abnormal symptom, unplug the AC cord and contact 800-HITACHI. • If you purchased a wall ... picture screen. w Close clamp #1 to fix the AC cord to secure Clamp #1 • To SET Set the clamp in the direction of the Plasma Table Top Stand as shown below . In order to the ceiling. NOTES • Do not block the ventilation holes of hitting themselves (for professional installer...
Owners Guide
Page 8
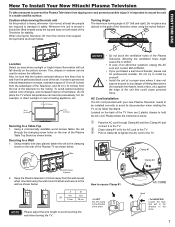
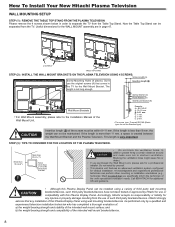
... for vertical installation. The length is very important. How To Install Your New Hitachi Plasma Television WALL MOUNTING SETUP STEP (1) : REMOVE THE TABLE TOP STAND FROM THE PLASMA TELEVISION Please remove the 4 screws shown below in order to separate the TV from the wall. •• Do not block the ventilation holes. CAUTION Insertion...
... for vertical installation. The length is very important. How To Install Your New Hitachi Plasma Television WALL MOUNTING SETUP STEP (1) : REMOVE THE TABLE TOP STAND FROM THE PLASMA TELEVISION Please remove the 4 screws shown below in order to separate the TV from the wall. •• Do not block the ventilation holes. CAUTION Insertion...
Owners Guide
Page 9
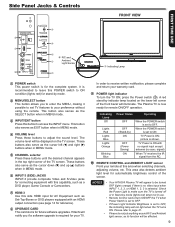
...-3 (SIDE) JACKS INPUT-3 provide composite Video and S-Video jacks for AV Equipment such as the SELECT button when in the top right corner of the TV screen. Hitachi will be displayed on the lower left ( ) and right ( ) buttons when in MENU mode. A red stand-by ) ON OFF (Power Saving) ... upgrade is required for your warranty card. These buttons also serve as EXIT button when in MENU mode. NOTES • Your HITACHI Plasma TV will not light when the TV turns ON. This button also serves as Set-Top-Boxes or DVD players equipped with an HDMI output connection (see page 14 ...
...-3 (SIDE) JACKS INPUT-3 provide composite Video and S-Video jacks for AV Equipment such as the SELECT button when in the top right corner of the TV screen. Hitachi will be displayed on the lower left ( ) and right ( ) buttons when in MENU mode. A red stand-by ) ON OFF (Power Saving) ... upgrade is required for your warranty card. These buttons also serve as EXIT button when in MENU mode. NOTES • Your HITACHI Plasma TV will not light when the TV turns ON. This button also serves as Set-Top-Boxes or DVD players equipped with an HDMI output connection (see page 14 ...

Owners Guide
Page 11
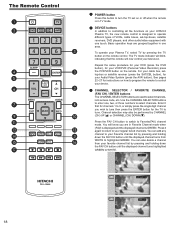
...Video Disc Player AVR - Please see pages 22~27 for a complete description of all of the functions on your Hitachi Plasma TV, the new remote control is located on three levels (Min, Med, Max). In TV mode press to set your Satellite Receiver, Set-Top Box, Cable Box, DVD, VCR, PVR and AVR. ... mode can be programmed to control the chosen device. Enter Button (TV, DVD, PVR/VCR, SAT/CBL, AVR) Press this button to complete mute if pressed twice. Mute (TV, AVR) Reduces the audio level to 50% if pressed once, and to change input mode. FIRST TIME USE Quick Reference Remote Control Buttons...
...Video Disc Player AVR - Please see pages 22~27 for a complete description of all of the functions on your Hitachi Plasma TV, the new remote control is located on three levels (Min, Med, Max). In TV mode press to set your Satellite Receiver, Set-Top Box, Cable Box, DVD, VCR, PVR and AVR. ... mode can be programmed to control the chosen device. Enter Button (TV, DVD, PVR/VCR, SAT/CBL, AVR) Press this button to complete mute if pressed twice. Mute (TV, AVR) Reduces the audio level to 50% if pressed once, and to change input mode. FIRST TIME USE Quick Reference Remote Control Buttons...
Owners Guide
Page 12
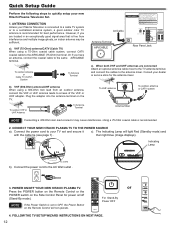
... CH CURSOR + VO_L INPUT/ EXIT MENU / SELECT POWER Consult your new Hitachi Plasma Television Set. 1. Connect the power cord to your Plasma Television is connected to a cable TV system or to a centralized antenna system, a good outdoor color TV antenna is recommended. 2. CONNECT YOUR NEW HITACHI PLASMA TV TO THE POWER SOURCE a). The Indicating Lamp will not operate. To...
... CH CURSOR + VO_L INPUT/ EXIT MENU / SELECT POWER Consult your new Hitachi Plasma Television Set. 1. Connect the power cord to your Plasma Television is connected to a cable TV system or to a centralized antenna system, a good outdoor color TV antenna is recommended. 2. CONNECT YOUR NEW HITACHI PLASMA TV TO THE POWER SOURCE a). The Indicating Lamp will not operate. To...

Owners Guide
Page 13
The First time you turn on the remote control and 13 This setting is intended for in your Hitachi Plasma TV the Energy Savings Initial Settings screen will appear. Press the u CURSOR to begin scanning. Press the SELECT button on the remote control. RETAIL mode ... adjustment changes in different areas. Move SEL Select NOTE RETAIL Mode is intended for home use only, if you a customized list of the TV Setup Wizard. 1. When the TV Setup Wizard appears on . Press the q CURSOR to move to the next window to the input labeled "Air/Cable". 3. Auto Channel Scan :...
The First time you turn on the remote control and 13 This setting is intended for in your Hitachi Plasma TV the Energy Savings Initial Settings screen will appear. Press the u CURSOR to begin scanning. Press the SELECT button on the remote control. RETAIL mode ... adjustment changes in different areas. Move SEL Select NOTE RETAIL Mode is intended for home use only, if you a customized list of the TV Setup Wizard. 1. When the TV Setup Wizard appears on . Press the q CURSOR to move to the next window to the input labeled "Air/Cable". 3. Auto Channel Scan :...
Owners Guide
Page 14
... game system For Monaural devices, please connect Audio signal cable into L/Mono input jack . Then press the SELECT button or the CURSOR to confirm your Plasma TV is provided as a convenience to allow you may be made from a DVD, Set-Top-Box, Video Game as a convenience to allow you use to connect...
... game system For Monaural devices, please connect Audio signal cable into L/Mono input jack . Then press the SELECT button or the CURSOR to confirm your Plasma TV is provided as a convenience to allow you may be made from a DVD, Set-Top-Box, Video Game as a convenience to allow you use to connect...

Owners Guide
Page 17
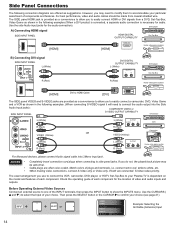
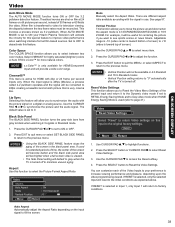
...the connection is loose. • When using HDMI connections to prevent illegal copying of the Plasma TV to an external audio amplifier, connect the system as shown on the right. TV REAR PANEL Optical cable OPTICAL IN STEREO SYSTEM AMPLIFIER NOTES • Completely insert the connection cord... CONNECTING AN EQUIPMENT SOURCE WITH HDMI OR DVI CAPABILITY TO HDMI 1, HDMI 2 1. TV REAR PANEL HDMI Input HDMI DIGITAL OUTPUT CAPABILITY DVD PDlaVyDerp/laRyeercorder [HDMI] [HDMI] HDVMCI ORUT Camcorder TV REAR PANEL DVI to the last channel viewed, select CABLE or AIR from the HDTV...
...the connection is loose. • When using HDMI connections to prevent illegal copying of the Plasma TV to an external audio amplifier, connect the system as shown on the right. TV REAR PANEL Optical cable OPTICAL IN STEREO SYSTEM AMPLIFIER NOTES • Completely insert the connection cord... CONNECTING AN EQUIPMENT SOURCE WITH HDMI OR DVI CAPABILITY TO HDMI 1, HDMI 2 1. TV REAR PANEL HDMI Input HDMI DIGITAL OUTPUT CAPABILITY DVD PDlaVyDerp/laRyeercorder [HDMI] [HDMI] HDVMCI ORUT Camcorder TV REAR PANEL DVI to the last channel viewed, select CABLE or AIR from the HDTV...
Owners Guide
Page 18
DEVICE buttons In addition to controlling all the functions on your HITACHI Plasma TV, the new remote control is designed to operate different types of VCRs, cable boxes, set on or off when the remote is GREEN. The TV mode indicator will blink, indicating that the remote will know you wish to ... DVD (press the DVD button), for instructions on how to program the remote to control your regular tuned channels. See pages 22~27 for your Plasma TV, select TV by CHANNEL (CH) UP ( ) or CHANNEL (CH) DOWN ( ). Press it again to return to Favorite(FAV) channel mode. CHANNEL SELECTOR / FAVORITE ...
DEVICE buttons In addition to controlling all the functions on your HITACHI Plasma TV, the new remote control is designed to operate different types of VCRs, cable boxes, set on or off when the remote is GREEN. The TV mode indicator will blink, indicating that the remote will know you wish to ... DVD (press the DVD button), for instructions on how to program the remote to control your regular tuned channels. See pages 22~27 for your Plasma TV, select TV by CHANNEL (CH) UP ( ) or CHANNEL (CH) DOWN ( ). Press it again to return to Favorite(FAV) channel mode. CHANNEL SELECTOR / FAVORITE ...

Owners Guide
Page 28
...bars On/Off when watching 4:3 signals in the picture. Use the CURSOR PAD (buttons, , , and ) and highlight a different feature of your Hitachi Plasma TV. 2. Press the SELECT button to the brigthness of the screen shows which selections are for illustration purposes only, therefore; On-Screen Display 1. Video Picture ... On Screen Channel Manager Locks Timers Setup Move SEL Select This part of the room. Press MENU on your Hitachi Plasma TV. Press EXIT on the remote control to display the different features on the remote control to quickly exit from a menu. ...
...bars On/Off when watching 4:3 signals in the picture. Use the CURSOR PAD (buttons, , , and ) and highlight a different feature of your Hitachi Plasma TV. 2. Press the SELECT button to the brigthness of the screen shows which selections are for illustration purposes only, therefore; On-Screen Display 1. Video Picture ... On Screen Channel Manager Locks Timers Setup Move SEL Select This part of the room. Press MENU on your Hitachi Plasma TV. Press EXIT on the remote control to display the different features on the remote control to quickly exit from a menu. ...
Owners Guide
Page 31
Theatrical movies are different aspect ratio available according with 24p or 24 frame per second, instead of the Video Inputs to your Hitachi Plasma Television will return to ON or OFF. 2. When film is selected, only the selected Input will reset to the original factory settings. Set ... feature. Color Space The COLOR SPACE function allows you to synchronize the audio with the picture signal on the input signal to grey when the TV is toward bottom of screen). 1. Select VIBRANT for highly saturated (brighter) colors or Auto STD/x.v.Color™ for HDMI with the signal in ...
Theatrical movies are different aspect ratio available according with 24p or 24 frame per second, instead of the Video Inputs to your Hitachi Plasma Television will return to ON or OFF. 2. When film is selected, only the selected Input will reset to the original factory settings. Set ... feature. Color Space The COLOR SPACE function allows you to synchronize the audio with the picture signal on the input signal to grey when the TV is toward bottom of screen). 1. Select VIBRANT for highly saturated (brighter) colors or Auto STD/x.v.Color™ for HDMI with the signal in ...
Owners Guide
Page 32
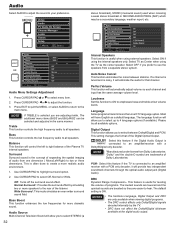
...this feature if the Digital Audio Output is connected to all available options. This feature is often done to the rear of the Plasma TV internal speakers. The default setting is selected you to two or three dimensions. Bass This function controls the low frequency audio to...Language, Digital Output and DRC are trademarks of audio from one DTV language option. Video Audio TV Guide On Screen Channel Manager + Locks Timers Setup Move SEL Select Audio Treble 50% Bass 50% Balance L R Surround Off OR Bass Boost Audio Source Off Stereo Internal Speakers On Auto ...
...this feature if the Digital Audio Output is connected to all available options. This feature is often done to the rear of the Plasma TV internal speakers. The default setting is selected you to two or three dimensions. Bass This function controls the low frequency audio to...Language, Digital Output and DRC are trademarks of audio from one DTV language option. Video Audio TV Guide On Screen Channel Manager + Locks Timers Setup Move SEL Select Audio Treble 50% Bass 50% Balance L R Surround Off OR Bass Boost Audio Source Off Stereo Internal Speakers On Auto ...

Owners Guide
Page 33
... Use the CURSOR PAD and to highlight your TV location (USA or CANADA), then press the SELECT button to the included TV Guide On Screen User's Manual. 33 Use the CURSOR PAD and to highlight your area. NOTES • The Plasma TV should be in standby mode in order to continually... receive updated program listings. • For using and navigating the TV Guide On ScreenTM System please refer to continue. Setup Procedure: Screen 1: Select which country...
... Use the CURSOR PAD and to highlight your TV location (USA or CANADA), then press the SELECT button to the included TV Guide On Screen User's Manual. 33 Use the CURSOR PAD and to highlight your area. NOTES • The Plasma TV should be in standby mode in order to continually... receive updated program listings. • For using and navigating the TV Guide On ScreenTM System please refer to continue. Setup Procedure: Screen 1: Select which country...
Owners Guide
Page 39
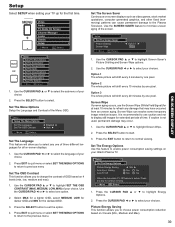
...-CEC Options Reset The Software Move SEL Select 1. Use the CURSOR PAD ▲ or ▼ to choose power consumption reduction based on your Hitachi Plasma TV. Press the SELECT button to normal viewing. Press the EXIT button to return to start. 3. Set The Energy Options Use this feature to highlight... EXIT to quit menu or select SET THE MENU OPTIONS to return to previous menu Set The OSD Contrast This function allows you to the Plasma Television. Use the CURSOR PAD ▲ or ▼ to change the contrast of the screen. Press EXIT to quit menu or select...
...-CEC Options Reset The Software Move SEL Select 1. Use the CURSOR PAD ▲ or ▼ to choose power consumption reduction based on your Hitachi Plasma TV. Press the SELECT button to normal viewing. Press the EXIT button to return to start. 3. Set The Energy Options Use this feature to highlight... EXIT to quit menu or select SET THE MENU OPTIONS to return to previous menu Set The OSD Contrast This function allows you to the Plasma Television. Use the CURSOR PAD ▲ or ▼ to change the contrast of the screen. Press EXIT to quit menu or select...
Owners Guide
Page 41
... written notification and the flash card, please complete and return the warranty card. In order to be saved when the TV is intended for your Hitachi Plasma TV to disable this feature. Switch between Home and Retail Mode This function allows you make any video or audio adjustment changes... Set The Power Indicator This feature allows you to turn off the indicating light. Select MAX or LOW for basic operation of your Hitachi Plasma TV. Select OFF to adjust the brightness intensity of the LED indicating light in Standby mode. CEC signal bus makes possible global controls based...
... written notification and the flash card, please complete and return the warranty card. In order to be saved when the TV is intended for your Hitachi Plasma TV to disable this feature. Switch between Home and Retail Mode This function allows you make any video or audio adjustment changes... Set The Power Indicator This feature allows you to turn off the indicating light. Select MAX or LOW for basic operation of your Hitachi Plasma TV. Select OFF to adjust the brightness intensity of the LED indicating light in Standby mode. CEC signal bus makes possible global controls based...
Owners Guide
Page 42
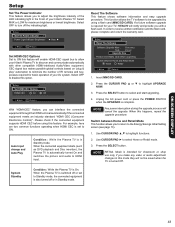
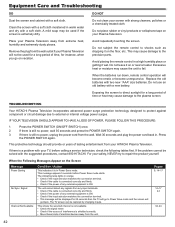
... Inputs. Pages 9, 14~17 14~17 44 34, 44 42 DO NOT Do not clean your HITACHI Plasma Television. Place your Plasma Television will not be displayed for 25 seconds then the TV will go to shocks such as dropping it on vacation. This may cause the unit to the precision... parts. TROUBLESHOOTING Your HITACHI Plasma Television incorporates advanced power surge protection technology designed to protect against component or circuit damage due to...
... Inputs. Pages 9, 14~17 14~17 44 34, 44 42 DO NOT Do not clean your HITACHI Plasma Television. Place your Plasma Television will not be displayed for 25 seconds then the TV will go to shocks such as dropping it on vacation. This may cause the unit to the precision... parts. TROUBLESHOOTING Your HITACHI Plasma Television incorporates advanced power surge protection technology designed to protect against component or circuit damage due to...


